Showing posts with label cookies. Show all posts

Friday, January 25, 2013

Ultimate Chocolate Chip Cookies

Well, here's my "new" cookie recipe for the month of January.  I have the Cook's Illustrated Cookbook and I decided to try their recipe of an old classic.  I have been trying lots of chocolate chip cookie recipes over the years, but realized that I have tried my most trusted cookbook's recipe.  Shame on me!

These cookies were so delicious, that the first batch I made was gone the very first day, something that never happens in my house- for real. So, I made another batch the very next day.  I hope this is an indication to you of how much we all enjoyed them.  The method of making the cookies was different than any other I've made before.  You brown the butter first, so you are going in with completely melted butter, which is something that is normally taboo in a cookie recipe.  Then you do a mix and rest period- not sure exactly what it does, but the cookies turn out soft, gooey, and great!

I did all this by hand, and normally I won't try a recipe I don't think I can use my mixer with.

Ultimate Chocolate Chip Cookies:

Oven: 375'

1 3/4 c flour
1/2 tsp baking soda
14 TBSP unsalted butter
3/4 cup brown sugar
1/2 cup granulated sugar
1 tsp salt
2 tsp vanilla
1 large egg plus 1 egg yolk
1 1/4 cup semisweet chocolate chips

1) Whisk flour and baking soda together in a medium bowl and set aside.

2) Melt 10 TBSP of the butter in a skillet over medium heat.  Cook until butter is browned and has an aroma, about 3 minutes.

3) Transfer browned butter into a large bowl and immediately add the remaining 4 TBSP butter, stir until butter has completely melted.  Add brown sugar, sugar, vanilla, and salt to the melted butter and whisk until incorporated.

4) Add egg and egg yolk to butter mixture and whisk for 30 seconds.  Set bowl aside to rest for 3 minutes.  Then whisk again for 30 seconds.  Let it rest for 3 minutes and whisk for 30 seconds 2 more times.

5) Using a spatula, fold the flour mixture into the wet ingredients.  Mix until combined.  Slowly fold in the chocolate chips.  Drop evenly onto prepared baking sheets (I like to use parchment paper).  Bake 10-14 minutes, rotating the pan halfway through.

Source:  Cook's Illustrated Cookbook

Friday, June 8, 2012

Thousand Layer Chocolate Chip Cookies

I found the recipe for these cookies the day after I got my wisdom teeth out.  I was immediately intrigued by the title, thousand layer- who wouldn't want to try a thousand layer chocolate chip cookie?  Talk about sheer torture, I couldn't make them because I couldn't eat them, so I made a note to myself to make them as soon as I could chew.  The very next weekend, I made my first (and second batch of these cookies).

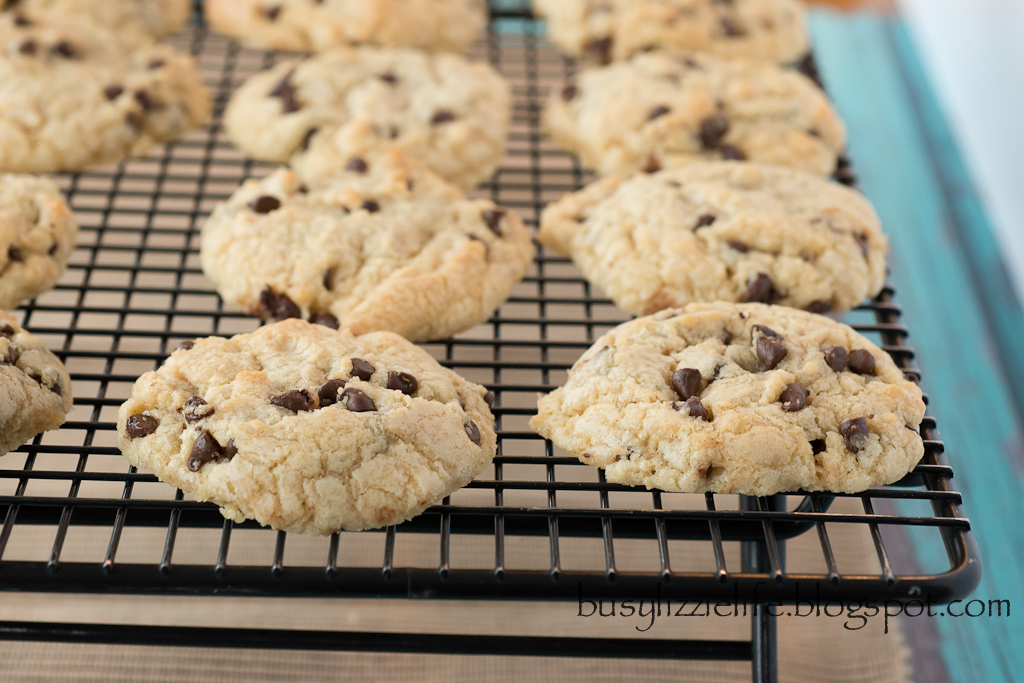
The recipe is pretty much the same as the toll house recipe, except you use egg yolks only and you layer the dough and smash the chips in.  The extra step of layering the dough had me intimidated for about two days before I finally bit the bullet and made them.  Seriously, the extra step adds very little time and the end result is so good that you won't even mind.  The cookies are crispy on the outside and edges and soft and delicious in the middle.  They taste exactly like the big giant chocolate chip cookies I used to buy from the bakery that used to be in the town where I grew up.

If you've got a party or barbecue to go to this summer, you might consider bringing a batch of these, they are sure to be a hit.  The best part?  You can freeze the cookies once you cut them out and bake them directly from the freezer and your craving hits.
Thousand Layer Chocolate Chip Cookies:


Oven:  375'

1 cup (2 sticks) unsalted butter
3/4 cup brown sugar
3/4 cup sugar
4 egg yolks
1 tsp vanilla
2 1/4 cup flour
3/4 tsp baking soda
3/4 tsp salt
6 oz mini chocolate chips- I wouldn't try normal sized chips, I don't think they'd work well here (or you can shred a chocolate bar)

1) With paddle attachment in mixer, cream together the butter, sugar, and brown sugar on medium high until light and fluffy.

2) While butter/sugars are beating, separate eggs, saving the yolks.  After butter is creamed, add in egg yolks and vanilla.  Scape down sides.

3) In separate medium bowl, mix together flour, baking soda, and salt.  Slowly add flour mixture to batter in mixing bowl, mix on low until combined.  Scrape down sides, mix again, then stop mixing. Scrape dough off of paddle.

4) Stretch a piece of plastic wrap on your counter.  Take 1/3 of dough, place it on the plastic wrap and using your hands, form it into a 4X8 rectangle.  Wrap the dough rectangle up in the plastic wrap and set aside.  Repeat the process for the remaining 2/3 of the dough.  Try to keep each rectangle the same size.  Place the three wrapped rectangles in the refrigerator to firm up slightly for 30 minutes.

5) After the dough has been in the fridge for 30 minutes, remove it and bring it to the counter top.  Lightly flour the counter top, unwrap and place the first rectangle on the floured surface.  Place 1/2 of the chocolate chips on top of the dough rectangle.  Place the second rectangle on top of the chips, then place the remaining 1/2 of the chocolate chips on top of this, and finally, cover the top with the last dough rectangle. You will have a pretty high mound of dough and chips (it's ok if chips fall out, you will collect them later).
6) Using a lightly floured rolling pin, roll/pound the dough down to about 1- 1 1/2" thick.  Using a round cookie or biscuit cutter, cut out cookies and place them on a plate covered with parchment paper.
Take the dough scraps and smoosh them together (at this point, I abandon the rolling pin and just use my hands).  Form another 1" thick dough piece and cut out more cookies, continue until there is enough dough left to smoosh into the center of the cookie cutter to form the last cookie.
7) Put the cut out cookies in the fridge for 1 hour (lightly covered with plastic wrap).  At this point, you can stick them in the freezer for about thirty minutes to begin freezing, and then transfer them to a freezer safe plastic bag for storage until you are ready to cook them.  (Note:  I have made them from the freezer, from the fridge after 1 hour, and impatiently right away after cutting them out.  I haven't noticed a huge difference in flavor immediately, but the leftovers the second day taste way better from the ones that have been refrigerated for 1 hour before baking.  If you do any type of research online for the best chocolate chip cookie recipe, they all seem to stand by refrigerating the dough before cooking to maximize flavor - most are in there at least six hours).

8) After 1 hour, remove cookies from the fridge, place on a baking sheet lined with parchment paper.  If you like (and I do), sprinkle the tops with sea salt.  Bake in 375' oven for 15-20 minutes (until edges are golden and tops start to turn golden.  Try to let them cool before biting in.  If you are baking from the freezer, cook time will be 20-25 minutes, but let the color of the tops be your guide.

Source:  The Newlyweds Cookbook by Sarah Copeland via Tracey's Culinary Adventures
How did I do it?  The first time I made these, Dave was out of town on a business trip.  Since I was using the mixer, I didn't need to be fully paying attention.  I was adding ingredients to the mixer while I was making dinner for the kids.  When the dough was done, I took five minutes while they were drinking their milk to form the rectangles and get them in the fridge.  Then while they were in there for 30 minutes, I served dinner, did the dishes, and cleaned up the table.  While I was pounding out the cookies, a few kids were helping, and the others were reading books.  WHile the cookies were refrigerating for 1 hour, we did baths and jammies, then we got impatient and baked them after 30 minutes.  While they were baking, we read bedtime stories, then we ate them, brushed teeth, and they were off to bed so I could sneak a few more cookies.

Thursday, May 17, 2012

Zucchini Coconut Breakfast Cookies

I was inspired to make these while thumbing through the current King Arthur Flour catalog.  I'm a big fan of zucchini bread, and have never been a coconut fan.  When I was sitting on the couch after getting my wisdom teeth out, I watched an episode of America's Test Kitchen, where they made a three layer coconut cake and for some reason, coconut sounded really good.  Then, of course, this catalog comes in the mail that day and I HAD to make these.  

The original recipe in the catalog was for popovers or a loaf, but I did a lot of alterations on the recipe and the batter was thick, so I opted to scoop the dough onto a parchment lined sheet for a soft muffin top-like cookie- YUM!  I made them Sunday, it's the closest to solid food I can eat since they're soft and easily chewed.  They were so good and gone by Monday afternoon- hit with the kids too- that I made another batch last night.  The coconut is not a prevalent flavor, but it adds a nice sweetness not to be ignored.  If you're looking for a variation on your zucchini bread, give this a try.
Zucchini Coconut Breakfast Cookies:

Oven:  350'

2 eggs
1/3 cup sugar
1/3 cup brown sugar
1/2 cup (1 stick) butter
1/2 tsp vanilla
1/2 tsp cinnamon
1 cup white whole wheat flour
1 cup all purpose flour
1 tsp salt
1/2 tsp baking soda
1/2 tsp baking powder
2 cups grated zucchini (I didn't measure, just used two medium sized zucchini)
1/2 cup unsweetened shredded coconut

1) Preheat the oven to 350'.  Line 2 baking sheets with parchment paper.

2) Beat sugar, brown sugar, and butter until smooth and fluffy, about 4 minutes on medium high.

3) Add eggs and vanilla, mix, then scrape sides down, mix again.

4) Combine flours, baking soda, and baking powder, set aside.  Shred zucchini and set aside.

5) Slowly add dry ingredients to bowl of mixer and mix until combined.  Scrape down sides.  Add in zucchini and coconut, mix again until combined. Scrape down sides.

6) Use a large cookie scoop, drop batter onto prepared baking sheets.  I'd say it was about 3 TBSP sized scoop or more.  I was able to yield 15 cookies each time.

7) Bake for 20-25 minutes.  Be sure to rotate halfway through.  Cookies are done when cake tester inserted in the center comes out clean.

8) Let cool, then glaze.

Glaze:
2 TBSP butter, softened
1 cup confectioner's sugar
2-3 TBSP milk
1/2 tsp vanilla (or coconut extract)

optional:  toast 1/4 cup coconut and sprinkle on top after glazing.

Cream the butter and confectioner's sugar.  Add in vanilla.  Slowly add milk until desired thickness.  I wanted mine slightly thicker than pudding, so it wasn't too runny.

Source:  Inspired by King Arthur Flour catalog 

Friday, February 11, 2011

Chocolate Chocolate Chip "Brownie" Cookies

Several months ago, I went with my neighbors to a bagel shop that had these delicious chocolate chocolate chip cookies.  I can't even describe how good they were, it was like fudge, brownie, and cookie in one.  Since then, I have been online looking for recipes to try.  I made one last week, while it was good, the outer edge was crisp, more like a merengue, not what I was looking for.  These ones however, might be as good as it gets.

My neighbors had a sayonara party for me this week and I needed to bring something to share.  It was a perfect opportunity to try out a recipe for the perfect chocolate chocolate chip cookies I had been searching for.

I found the recipe on a blog called Brown Eyed Baker, and the thing that immediately drew me to the recipe was that she got it from Baker's Illustrated.  They are a part of Cook's Illustrated, my favorite cooking magazine, if you didn't already know.  First of all, I can't believe I don't own that cook book, it is definitely going to be a gift I am giving myself for my birthday this year.  Seriously if you ever want to get yourself a cookbook, get the Cook's Illustrated Family Baking Book, Best 10 years of Cooks Illustrated, or Baking Illustrated.  I have never made something that didn't turn out good from their recipes.

Triple Chocolate Cookies:


Oven:  350'

2 cups flour
1/2 cup cocoa powder
2 tsp baking powder
1/2 tsp salt
16 ounces semi-sweet chocolate, chopped (I used Nestle choc. chips)
4 eggs
2 tsp vanilla
2 tsp instant coffee or espresso powder
10 TBSP (1 1/4 cup) unsalted butter, softened
1 1/2 cups packed light brown sugar
1/2 cup sugar
12 ounces semi-sweet chocolate chips (I used mini, wish I used the regular sized)

1) Mix together flour, cocoa, baking powder, and salt in medium bowl, set aside.

2) In medium bowl, whisk together eggs and vanilla.  Add in coffee powder, set aside for coffee to dissolve.

3) In either a double boiler or microwave (alternating 30 seconds of heating and mixing), melt the 16 oz. of semi- sweet chocolate.  Let cool slightly.  Meanwhile, in bowl of mixer, cream sugar, brown sugar, and butter.

4) While mixer is on low, add in the egg mixture.  Scrape down sides.  Add in the melted chocolate and beat until combined.  Slowly mix in the dry ingredients until combined.  Fold in the chocolate chips.

5) Cover bowl with plastic wrap and let sit for 30 minutes.  Mixture will thicken and become fudge-like. Drop cookies onto prepared baking sheet and bake for 10-12 minutes.  (I opted to put Candy Cane Hersey Kisses on the tops of some of my cookies after they were removed from the oven).

Wouldn't your Valentine just love a plate of these?

Thursday, June 3, 2010

Peanut butter cookies (think Girl Scout Doh Si Doh)


Before I say anything else, can I just say "GOODBYE $4 box of processed girl scout cookies and HELLO homemade party in my mouth!" Okay that said, we had yet another party to attend, which provided me with another opportunity to try a new recipe. Surprisingly, this time it was not cupcakes, but cookies. I'm forseeing a new addiction to making sandwich cookies. I found this recipe on a site called Savory Sweet Life, which is just one of the many on my ever growing cooking blog bookmarks.

Lately, I have been trying to find recipes for all the food items we miss from home that we can not possibly buy here and am trying to replicate them. So far, the Krispy Kreme doughnuts were a success. Now, these.

Oven: 350'

Cookies:
3/4 cup flour
1/2 tsp baking soda
1/4 tsp baking powder
1/2 tsp salt
1/2 cup butter, softened (1 stick)
1/2 cup peanut butter
1/2 cup sugar
1/2 cup light brown sugar
1 egg
1 teaspoon vanilla
1 cup oats

Filling:
3 TBSP butter
3/4 cup creamy peanut butter
1 cup confectioner's sugar
3 TBSP heavy cream
1-2 TBSP milk

For the cookies:
Cream together butter, peanut butter, and sugars. Let mix until it is a pale tan fluffy mixture. Mix in egg and vanilla. In separate bowl, mix together flour, baking soda, baking powder, and salt. Slowly add flour mixture to the batter until blended in. Add the oats, mix until incorporated. Drop dough onto cookie sheet (I like to use a cookie scoop, like this one from Pampered chef). Lightly press down on the tops to make them like flattened balls. Bake about 12 min. Remove from oven and cool on cookie rack. This recipe made exactly 18 filled cookies- I felt as though being a sandwich cookie, the normal sized cookie was a bit too big, a bit too much to eat in one sitting, especially for a 2 year old, so next time, I might make 36 mini cookies.

For the filling:
Mix together butter and peanut butter. Slowly incorporate all of the confectioner's sugar, this will be a slightly crumbly mix at this point. Add in the cream, I was actually mixing this together with my hand held mixers on low- I wanted my filling to be fluffy! After adding the cream, I felt as though the filling was a bit too thick, so I added a few TBSP milk to reach my fluffy consistency. ( This was not done in the recipe I found, so it is up to you the consistency you want for the filling, I found it easier to spread once in the cookies). I had just enough filling for all 18 sandiches, with a small bit to taste of course.

OMG were they good!!!! I will be making these again (only when there's a party of course, so I don't eat them all. I even had a request from someone to try the Samoas (well now Caramel Delites- what's up with the name changes anyways?). I found that recipe, so you can look forward to that after my summer trip when I bring back all of the ingredients.