Showing posts with label creative play. Show all posts

Saturday, January 28, 2012

Kid Friendly Letter Writing Center

This has been on my "to do list" for over three years now.  We have always lived apart from our families, and I thought having a special place set up for the kids to write letters to their family and friends that live far away was essential.

I have always been a letter writer.  I have so much stationery that I could probably write a letter a day to everyone I know for a year and still not be out of it.  We rarely buy cards. I encourage the kids to make their own, so for the little ones that can't spell yet, I am constantly telling them what to write and how to spell it.

Last year, when shopping for homeschool stuff, one of the main things I wanted to buy for my second grader was a book of letter writing etiquette.  I searched online and went into a few teaching stores, and such an item was not available.  I had the idea to make my own basic templates, but never sat down to do it.

I am currently taking an e-course at Playful Learning Spaces to help me create playful spaces for my kids throughout the house and as a major motivator to unpack.  My first week was very successful because it motivated me to finally create this letter writing center for the kids.  About two weeks ago, I saw a similar idea on pinkandgreenmama blog, which made me want to make mine even more.

The idea is to create places the are fun and inviting to the kids where they want to sit and create.  This is great because they have all the things they need to do it on their own, while I'm cooking dinner or changing the baby ;)

In the letter writing center, I included normal and very small sized notecards.  The very small ones are for our Valentine's mailboxes that I posted about earlier in the week.  The kids are SOOO excited to use them and get mail.  The normal ones are for sending to family and friends.  We love getting mail, but so do other people- sometimes if you want to get mail, you've got to send it.  We love supporting the US Postal Service because we have a lot of family members (a lot) that work for them !

Here's a quick tour:
In the top left, I hung a calendar, family and friend's birthdays are marked down so the kids can decide if they want to send someone a card.
I used a five drawer organizer that I had from homeschooling, you can get them at Target, Michael's, JoAnn's for around $12.  I used adhesive velcro to attach the labels to the drawers.

Here's a close up of some of the drawers:
Stickers- we use them to decorate homemade cards and the outsides of envelopes.  For the time of year, I only put out Valentine's and Birthday stickers:
Mini notecards:
The top drawer houses our Addresses.  I created a 4x2 table in power point and put a picture and the name of the people in the picture in each grid.  After I printed the pictures, I turned the paper over and printed the addresses on the backs.  (If you do this, when creating the tables, whoever is on the right in the picture table, their address would be typed in on the left in the address table, remember it will print on the opposite side when printing on the back).
I cut the pictures out and laminated them.  I placed them all in the top drawer, now readers and non-readers can identify who they want to write to.  There are family and friends new and old included.

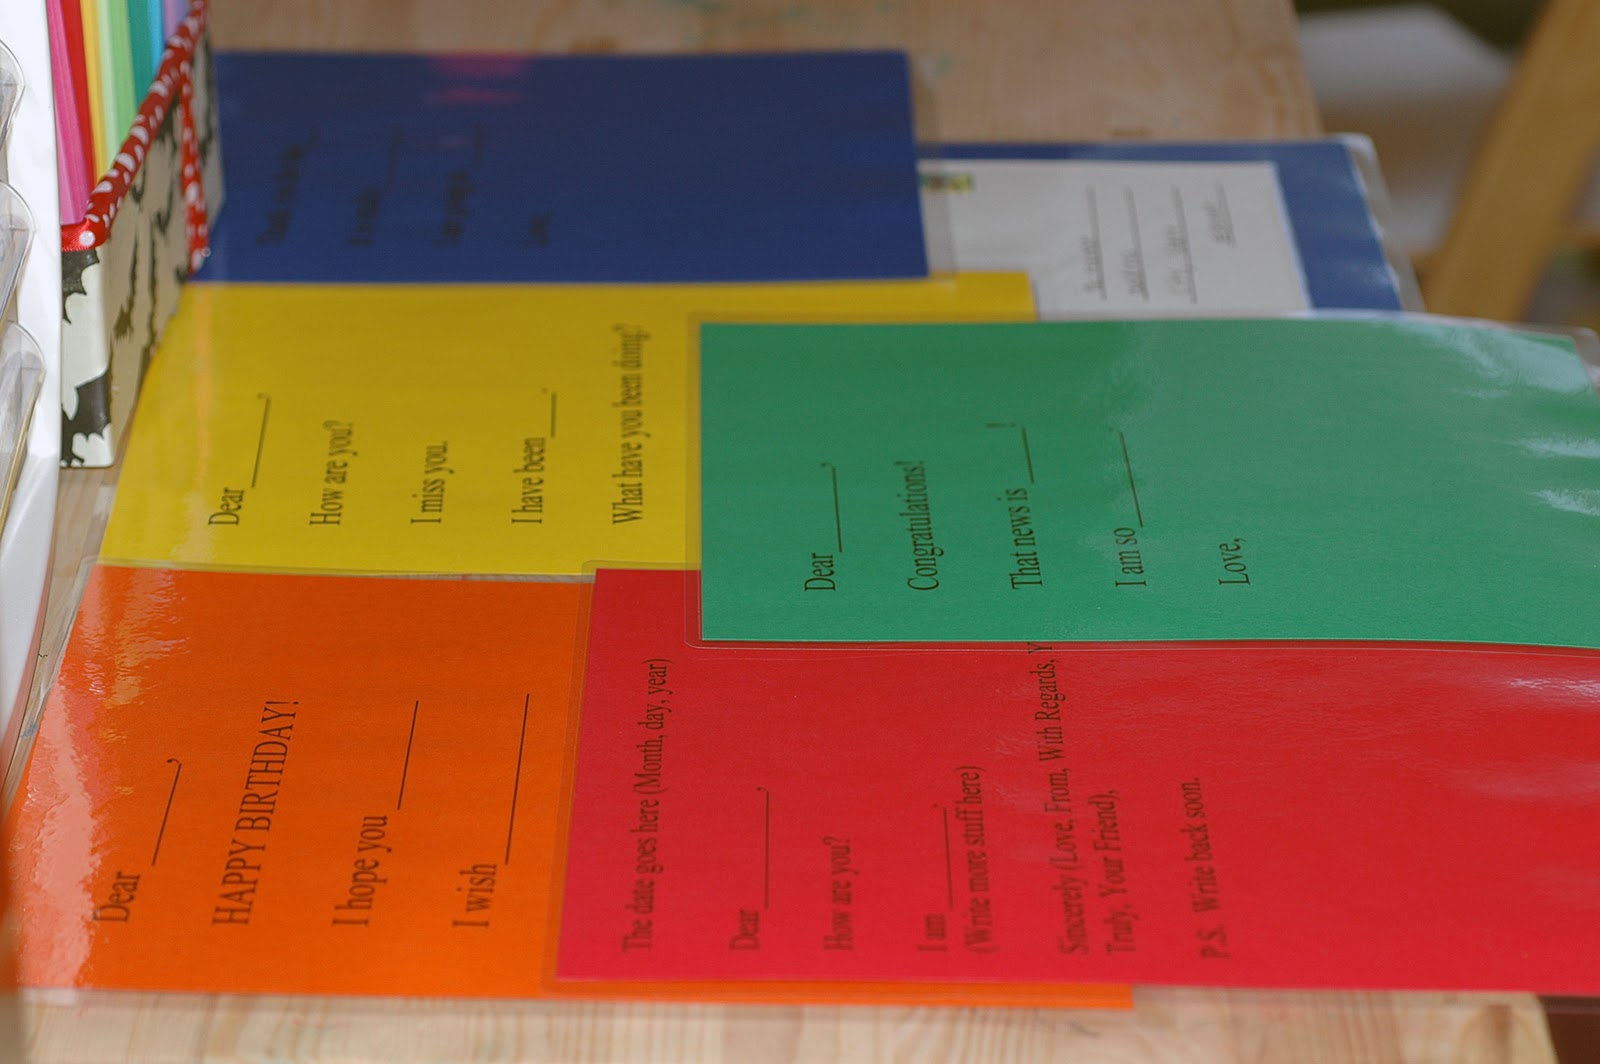
On the top of the organizer, I put laminated letter writing templates.  Sorry about the shot, I tried to rotate it and it was making me sick to look at it.  I didn't have time to take another photo.   There are templates for birthday, thank you, miss you, congratulations, and a general letter.
An envelope guide:
A caddy full of writing and coloring supplies:
A box full of pretty blank cards.  We reused a cardboard box that our garbage bags came in to make this from scrapbook paper and ribbon.
The front white cards are homemade from my kids' artwork.  I scan in the pictures, save them as jpeg, then I paste them into power point to make the cards.  In the bottom right hand corner of each, it says "from the desk of...." The kids have been eyeballing these all week! (These would also make great homemade gifts!)
Under the table where the writing center is, I put a basket of books about mail:

Dear Mrs. LaRue
Millie Waits for the Mail
The Jolly Postman
Click Clack Moo, Cows that Type
The Post Office Book

I hope this inspires you to create something great in your house too.

Thursday, January 26, 2012

DIY Valentine's Mailboxes

About a month ago, I began to have Valentine's Day on the brain.  I went crazy pinning stuff on my pinterest board that I wanted to make.  One thing in particular was these Valentine's mailboxes.

Um, who doesn't love opening up the mailbox and finding a crisp envelope - preferably a colored envelope, with a real stamp on it,  and handwritten addressed to you?  OK, I sound desperate, but sorry, it's sad getting so much junk mail and catalogs and nothing fun.

If the mail isn't coming to us, we'll send it to ourselves for now.  So, the day after I pinned them, I went to Target dollar bin and bought 7 mailboxes.  I didn't have much choice in the colors, all they had was turquoise and white ones.

The next day, we went to Goodwill and for the first time, instead of dropping stuff off, we went in.  We got seven candle sticks for $0.99 each!
I let Hazel choose the paint colors, and just like I would have, she chose rainbow colors.
She painted all the candle sticks by herself, it took about two weeks to finish - we've been busy.  We did all surfaces, wood, metal, and glass with the acrylic paints we had- we did not sand or prime any of them.
I hot glued all the mailboxes onto the stands.
I cut out letters for their initials out of the scrapbooking paper that I've had laying around for 8 years, thinking it'll actually make it into an album - chuckle!  In my perfect world, I would have done all solids- doesn't this one look so nice?
But they are for the kids, so I let them choose which paper they wanted me to use.

Except dad, I chose his ;)
There have been many communal gatherings around these lately, wondering when we can use them. I think I have created a monster here.
When will I open mine and find something inside?
Send my kids some mail already!

This project has motivated me to finish something I've wanted to do for the kids for the past three years.  Stay tuned tomorrow to see the new Letter Center I made for the kids.

Thursday, December 15, 2011

Making Christmas Magical

Recently, I was asked if I could wish for anything (something concrete or something that was not short of a miracle), what would it be.  I thought and thought and really feel truly blessed to have everything I would wish for without feeling selfish.  So, I wished that every child would experience a magical Christmas.  And, I'm not talking magical in terms of getting every toy they asked for, I'm talking experiencing wondrous magical things that make their eyes sparkle and their mouths open wide with smiles.

This year, I took out the decorations, but I never put them up- I knew it would take me time, which is limited this year, and that time would be better spent with the kids, not decorating.  I decided to save my patience and free time for fun with the kids.  I don't want my holiday to be spent worrying that the kids are going to break something or move something out of place.  We may not have many decorations up, but we are still having lots of holiday fun. Over the next few days, I will go over some of the fun things we do to make the holidays special for our family.

One tradition our family has is the Elf on the Shelf.  Some nights I go to bed and wake up in a panic because I can't remember if I moved the elf or not.  One day, I found my son awake, staring at the elf because it hadn't moved.  I panicked and told him that the elf only moves after 6:30 AM, so he went back to his room and came out later, and the elf had moved- he was happy- phew.

Somehow, this year, I told my kids that all of the elves were coming over in the middle of the night for a dinner party.  They were soooo excited.  I had my husband help them set the table, with a paper table cloth and child tea set.
They drew some pictures for our elf, Stayler:
They left a sign in sheet:
We used the mortar and pestle to crush up candy canes because they use that instead of salt and pepper:
The elves TRASHED the house with toilet paper and moved around our decorations:
They flipped the chairs:
Tipped their cups:
Cut the kids' papers into snowflakes:
Drew faces on our Christmas cards:
Signed in on the sign in sheet:
Left a candy trail on their way out the door:
Our elf was so tired, look where we found him in the morning- it was such a rough night, he stayed there for two days (oops):

I only wish I had a picture of the kids' faces when they came downstairs.  The funniest thing is they were so fixated on the knocked over, misplaced chairs, they didn't really notice the toilet paper.

What have your elves been up to?

Tuesday, December 6, 2011

Busy Sewing: Crinkly Baby Play Mat

Do you have one of these (or do you know someone who does?):
Then, this post is for you. This idea has been brewing in my head for a while now.  My mom got a bunch of wacky baby toys when she visited us in Japan several years ago.  When Maeve was born, she gave me one, it looked just like a piece of cloth with the design of a Japanese newspaper.  I thought it was going to be just a soothing soft toy.  BUT, then we opened it...

This has got to be one of her favorite toys!  It is crinkly, lightweight, easy to hold, chewable, all the things a baby could ask for and more.  I have been wanting to have one of her other crinkly toys take one for the team, so I could see what was on the inside doing the crinkling.

Well, the other day, I was unpacking a box of clothes I ordered online, she was having a ball grabbing, shaking, and tossing the plastic bags of clothes.  The lightbulb went off- reuse plastic shopping bags and sew them in between fabric.  Yes, at that instant, I abandoned unpacking the box, went into my stash found two cute girly half yards of fabric, got a giant plastic shopping bag I was no longer using and...(yes it is conveniently a bag from my FAVORITE craft store from Japan):
I laid the two fabrics on top of each other, with the right sides together, then I placed the shopping bag on top.   I trimmed around the edges so the fabric was the same size as the bag.  Then I pinned them together.
I sewed around the edges (bag could be on top or bottom while sewing, will work fine either way, your preference):
I left a four inch gap to right side out the fabric:
Once fabric was inverted, I fold the fabric in at the gaps and pinned it, then I topstitched over it and around the whole mat to give it a finished look:
The whole thing took maybe 30 minutes.
How fun would this be for a homemade Christmas gift?  You can make it as large or small as you want, I think it would be fun to do one with bubble wrap on the inside, or long like a runway for the baby to crawl on. You can even put the bag between two old pieces of cut up clothes to be totally green!  Happy sewing!

Wednesday, August 3, 2011

Busy Sewing and Playing: Baby blankets

I've been busy packing lately, so I haven't had time for a whole lot of stuff otherwise.  I figured I'd take the time to show off some blankets I've made that my baby really loves!  Like I've said before, "babies LOVE colors"!  Since most of our baby gear and toys are in our shipments, Maeve has been spending a LOT of time with these two blankets, and guess what?:  she loves them loves them loves them.  She can lay on her tummy for hours and stare at the pretty colors (with no toys at all).

This is a blanket I made for my parent's to keep on their couch (I'm kind of thinking about stealing it back - it's her absolute favorite):
This is a blanket I made when I had Owen, there are two, this one and it's counterpart (which is in our shipment):
Can you even stand the cuteness?

Next time you need a baby blanket, divert from the traditional pastels and go for something bright and exciting- baby won't be disappointed.

Pst:  When I get into my house and possibly get a new machine, I might be making a few for sale on etsy.  Stay tuned.

Tuesday, July 19, 2011

Busy Playing: Homemade Sundae Slide

Last week, I said to my husband "it's too hot out, there's nothing we can do".  Whoa- I can't believe I even said that, I was totally hot and bothered- just because we don't have a pool, doesn't mean the world has to end.  I am determined to think of something fun and cool to do with the kids outside everyday this week, so check back for ideas.

Did you ever watch Double Dare on Nickelodeon?  The obstacle course at the end of the show was so awesome and I always wished I had a chance to do it.  My kids have never seen the show, but I've always wanted to make a sundae slide for them (and me too).  I wish I had a waffle maker big enough to make the giant waffle with a big pat of butter on it, covered with syrup for them to sift through for the flag too (ah dreams).

What better way to fill up a hot day by making your own sundae slide.  We don't have a slide at my parent's house, but I know the playground down the street is empty on hot days, so I planned the slide activity for a hot day.  My mom was worried the chocolate syrup would stain the playground slide, so we brought our slip and slide (got it on clearance at target for $2.00), and set it up on the side of the hill at the playground.  
Then we added chocolate syrup:
Some whipped cream (the cans don't produce as much cream as you would think):
And sprinkles to complete the sundae:
We forgot to bring a flag, so we put the whipped cream can at the top.  The kids had to start from the bottom and try to climb up and grab it (we told them no standing because it was very slippery and we didn't want any banged heads), if they slipped back, they lost their turn:
We let them have two turns each, no one made it very far, but they sure had fun trying to climb and tasting their hands:
We switched to sliding from the top down, it got more messy and fun:
Look at the smiles, love it!:
We poured water down (brought it in watering cans) to clean the slide and the kids- check out the chocolate puddle:
Did someone order sprinkles on their sundae?
I don't think any one of these kids will be complaining of a boring summer, do you?