I keep accidentally opening a folder on my computer that has pictures of these brownies that I took about one year ago. I didn't like think the pictures looked good, so I wasn't going to post them, but every time, I accidentally scroll over them (like everyday)-- I want to make them and I love the pictures a tiny bit more.
Yesterday, I was so excited to find my new favorite baking chocolate, Scharffen Berger, at Target. In honor of the score, I'm making brownies and posting this recipe. I refuse to make brownies anymore unless it's with good chocolate. To me, using bad chocolate is like using margarine instead of butter.
This recipe is definitely my go to brownie recipe and you won't be disappointed either. If you are looking for a non-traditional Thanksgiving dessert, you should make these (and eat them all!)
Sweet and Salty Brownies:
Caramel:
1 cup sugar
1 TBSP corn syrup
1/4 cup water
1/2 cup heavy cream
1 1/2 tsp sea salt
2 TBSP butter
Brownies:
1 1/4 cup all purpose flour
1 tsp salt
2 TBSP unsweetened cocoa powder
11 oz dark chocolate, chopped (60-72% chocolate)
1 cup unsalted butter (2 sticks)
1 1/2 cup sugar
1/2 cup brown sugar, firmly packed
5 eggs, room temp (important!)
2 tsp vanilla
1) Make the caramel. Measure out heavy cream, and set aside, place butter and salt in small bowl, set aside. In medium saucepan- preferably metal- combine sugar, corn syrup, and water- stir carefully- don't splash onto sides, it can wreck the caramel later. Cook over medium high heat until it reaches 350' or a dark amber color (like beer)- it will take a while to turn amber, but once it does, it can get brown fast and burn. You don't need to stir while it is heating up, maybe swirl the pan once or twice.
Once it reaches the amber color, turn off heat and slowly add cream and salt and butter- be careful because it will release a LOT of steam, the caramel may even seem to harden, just keep whisking it until smooth. Set aside to cool while you mix the brownies.
2) Preheat the oven to 350'.
3) Grease a 9x13 baking pan. You can also choose to line it front to back and side to side with parchment paper- I never have done this and my brownies have never stuck in the pan.
4) In a bowl, whisk flour, cocoa powder, and salt- set aside.
5) Put chocolate and butter in a double boiler- set this over a pan of boiling water- stir until the chocolate and butter have melted and are smooth. **(If you do not have a double boiler- put chocolate and butter in microwave safe bowl and microwave in 20 second increments, take out and stir each time- longer increments can result in the chocolate burning and drying out. )
6) Keep double boiler over pot of water, turn off the burner. Add the sugar and brown sugar to the chocolate mixture and whisk until combined.
7) Transfer chocolate mixture to a large bowl- use a scraper to get it all out. Add three eggs to the chocolate mixture and whisk until just combined (do not over mix here- this is the difference between gooey fudge brownies or dense cake ones). Add the last two eggs and mix until just combined.
8) Add vanilla and whisk until combined.
9) Sprinkle flour mixture on top of chocolate mixture- fold in with a spatula or wooden spoon. There may be small amounts of flour mixture that aren't mixed in, that is ok-Remember over mixing will result in denser brownies.
10) Pour half of the brownie batter into the prepared pan. Spread about 1/2-3/4 cup of the caramel sauce around the top of the batter- stay about 1/2 " away from the edge of the batter. Drop the rest of the batter on top of the caramel layer and use a spatula to carefully spread it out.
11) Bake the brownies for about 40-45 minutes total. After 20 minutes of baking, rotate the pan halfway to ensure even baking. After 35 minutes of baking, you can insert a toothpick into the center of the brownies to check for doneness- a few sticky crumbs will come out on the pick, but should not be dredged in batter. Remember, there is caramel in there, so it will be a littly sticky-but when in doubt cook a little longer- I have made these before and taken out when they weren't done and it is hard to finish cooking a half baked batch once you realize you under baked them.
12) Remove from oven and sprinkle the top with sea salt or another coarse salt.
Recipe adapted from Baked Explorations
Caramel recipe from Bakingdom blog.
Showing posts with label do it yourself. Show all posts
Thursday, November 27, 2014
Monday, June 2, 2014
Carrot Cake Whoopie Pies
Over the past few months (year), I have been up and down with my baking. I have given up sugar for a spurt here and there. My son has given up sugar for a month here and there, and I have noticed changes in him for the better when he does.
Well, that's part of the reason why I haven't been on here. It is very hard to have a blog to inspire people to bake and cook from scratch when I am also trying to inspire people to eat less sugar and live a healthy lifestyle. I'm stuck in the middle.
I'm hoping that those of you who follow me are at the same point and that I am inspiring you to stop buying processed foods and start making your own from home. I just can't shake eating sugar and sweets and at the times when I have completely given it up, the day I'm done, I just want to eat cookies. I find that when I bake, I am happy. When I find a delicious recipe from scratch that I love, I want to share it. I want to inspire you to get in the kitchen and cook- I hope that you will learn something new and bring it to the table for your family to enjoy.
I am spending more and more time in my kitchen these days, trying to use all fresh ingredients and making more and more on my own. I seem to make a dessert on the weekends and try to make it last through the week, unless I find a rare gem, like this, which it was made on Sunday for Easter, then again on Tuesday for dessert for the rest of the week.
OK, fine, then again a few weeks later, because after all, there are carrots in them, so they are kind of healthy... If you have a BBQ or party to go to this summer, I highly recommend bringing these. You they will not disappoint.
Carrot Cake Whoopie Pies-
1 1/2 c all purpose flour
1/2 tsp baking soda
1/2 tsp baking powder
1/4 tsp salt
1/2 tsp ground cinnamon
1/4 tsp nutmeg
1 cup brown sugar
1/2 cup (1 stick) unsalted butter- room temp (important)
1 egg - room temperature (important)
1 tsp vanilla
1 cup old fashioned oats
1 cup finely shredded or grated carrots
Filling:
3 oz cream cheese, room temp
1/4 cup ( half stick) unsalted butter- room temp
1 tsp vanilla
2 cup confectioners sugar
1) Preheat oven to 350'.
2) In small bowl, whisk together flour, baking soda, baking powder, salt, cinnamon, and nutmeg. Set aside
3) In bowl of mixer, beat butter for 2 min until creamy- add in brown sugar and beat again on medium until fluffy. Scrape down sides.
4) Add egg and vanilla, beat until incorporated, about 1 minute. Scrape down sides.
5) Add in dry ingredients and mix until just incorporated, scrape down sides of bowl. Add in oats and carrots, mix until incorporated. Scrape bowl, then mix one final time.
6) Drop 1 TBSP sized rounds of batter onto cookie sheet. Bake approx 11-14 minutes. Halfway through baking, rotate cookie sheet. Depending on your oven, the cooking time will vary. Smaller cookies will take about 11 min, whereas larger will take up to 14.
7) Remove cookies from oven and let cool. Set cookies onto baking rack to cool completely before filling.
8) Prepare filling: Beat cream cheese and butter in bowl of stand mixer for 8 minutes, will be light and fluffy- I promise, mix for the whole 8 minutes on medium-high. Add vanilla and confectioners sugar and beat again for 8 more minutes, stopping halfway through to scrape sides once. Put filling into a bag and pipe onto a cookie, press another cookie on top to make a sandwich.
Makes approx 20 small whoopie pies.
Adapted from Annie's Eats.
Well, that's part of the reason why I haven't been on here. It is very hard to have a blog to inspire people to bake and cook from scratch when I am also trying to inspire people to eat less sugar and live a healthy lifestyle. I'm stuck in the middle.
I'm hoping that those of you who follow me are at the same point and that I am inspiring you to stop buying processed foods and start making your own from home. I just can't shake eating sugar and sweets and at the times when I have completely given it up, the day I'm done, I just want to eat cookies. I find that when I bake, I am happy. When I find a delicious recipe from scratch that I love, I want to share it. I want to inspire you to get in the kitchen and cook- I hope that you will learn something new and bring it to the table for your family to enjoy.
I am spending more and more time in my kitchen these days, trying to use all fresh ingredients and making more and more on my own. I seem to make a dessert on the weekends and try to make it last through the week, unless I find a rare gem, like this, which it was made on Sunday for Easter, then again on Tuesday for dessert for the rest of the week.
OK, fine, then again a few weeks later, because after all, there are carrots in them, so they are kind of healthy... If you have a BBQ or party to go to this summer, I highly recommend bringing these. You they will not disappoint.
Carrot Cake Whoopie Pies-
1 1/2 c all purpose flour
1/2 tsp baking soda
1/2 tsp baking powder
1/4 tsp salt
1/2 tsp ground cinnamon
1/4 tsp nutmeg
1 cup brown sugar
1/2 cup (1 stick) unsalted butter- room temp (important)
1 egg - room temperature (important)
1 tsp vanilla
1 cup old fashioned oats
1 cup finely shredded or grated carrots
Filling:
3 oz cream cheese, room temp
1/4 cup ( half stick) unsalted butter- room temp
1 tsp vanilla
2 cup confectioners sugar
1) Preheat oven to 350'.
2) In small bowl, whisk together flour, baking soda, baking powder, salt, cinnamon, and nutmeg. Set aside
3) In bowl of mixer, beat butter for 2 min until creamy- add in brown sugar and beat again on medium until fluffy. Scrape down sides.
4) Add egg and vanilla, beat until incorporated, about 1 minute. Scrape down sides.
5) Add in dry ingredients and mix until just incorporated, scrape down sides of bowl. Add in oats and carrots, mix until incorporated. Scrape bowl, then mix one final time.
6) Drop 1 TBSP sized rounds of batter onto cookie sheet. Bake approx 11-14 minutes. Halfway through baking, rotate cookie sheet. Depending on your oven, the cooking time will vary. Smaller cookies will take about 11 min, whereas larger will take up to 14.
7) Remove cookies from oven and let cool. Set cookies onto baking rack to cool completely before filling.
8) Prepare filling: Beat cream cheese and butter in bowl of stand mixer for 8 minutes, will be light and fluffy- I promise, mix for the whole 8 minutes on medium-high. Add vanilla and confectioners sugar and beat again for 8 more minutes, stopping halfway through to scrape sides once. Put filling into a bag and pipe onto a cookie, press another cookie on top to make a sandwich.
Makes approx 20 small whoopie pies.
Adapted from Annie's Eats.
Tuesday, November 26, 2013
Homemade Jellied Cranberry Sauce
Hi, I'm back! I have not forgotten about this blog. I often write posts in my head, when I can't find the time to sit and type. I feel as though, now, four months into the school year, I'm getting back on my feet after having kids home all summer and homeschooling one last year.
This recipe for jellied cranberry sauce is so good, it prompted me to FINALLY get back on here! When I was a kid, a special treat with a meal would consist of a small amount of cranberry sauce or apple sauce. I remember on Thanksgiving being able to have more than just a small amount of cranberry sauce and it was delicious!
The past two years, I have made my own cranberry sauce (more of a relish style). This year, I found this recipe for jellied cranberry sauce and I had to share. I know it's a favorite at my parent's house and people who might not be compelled to try the relish would love this recipe. It is my goal to eliminate prepackaged and processed foods from my eating. For the past three weeks, I have not eaten much sugar and little to no grains. I am not above eating sugar or grains, I just like to make these products myself, so I know what I am putting into my mouth. I find eating healthy is not a cold turkey and you're done deal, it takes a long time. My way is do it myself first, then move on to elimination, portion control, etc. If I can't do it myself, I wonder should I be eating it.
At any rate, this sauce came out just like store bought, but with no chemicals. It's easy and delicious, I hope that I will inspire someone to try to make their own cranberry sauce this Thanksgiving.
Jellied Cranberry Sauce:
2 bags cranberries
2 cups sugar (sugar in the raw is ok too)
juice from 1 orange- then add water so it totals 2 cups liquid
zest from half of the orange
1) Put all ingredients in stockpot and bring to a boil.
2) Let boil for ten minutes, cranberries will start to pop- I gently mashed the berries against the side of the pan.
3) Strain the liquid through a fine mesh sieve- press hard on the berries to remove juices and pulp. I ended up putting the remnants from the sieve into a cheesecloth and squeezing out more liquid afterwards.
4) Place in air tight container in refrigerator for up to one week, or seal in a canning jar by boiling in water for 15-20 minutes. Jar should be ~1" below water level.
Jar can be stored at room temp for one year if sealed.
Once refrigerated, if you use a jar that is straight (wide mouth)- you should be able to overturn and get the sauce to pop out of the "mold". I will just scoop mine out, as I did not have a straight style jar.
Source: Foodie with Family (I halfed her recipe and got 3 pints )
This recipe for jellied cranberry sauce is so good, it prompted me to FINALLY get back on here! When I was a kid, a special treat with a meal would consist of a small amount of cranberry sauce or apple sauce. I remember on Thanksgiving being able to have more than just a small amount of cranberry sauce and it was delicious!
The past two years, I have made my own cranberry sauce (more of a relish style). This year, I found this recipe for jellied cranberry sauce and I had to share. I know it's a favorite at my parent's house and people who might not be compelled to try the relish would love this recipe. It is my goal to eliminate prepackaged and processed foods from my eating. For the past three weeks, I have not eaten much sugar and little to no grains. I am not above eating sugar or grains, I just like to make these products myself, so I know what I am putting into my mouth. I find eating healthy is not a cold turkey and you're done deal, it takes a long time. My way is do it myself first, then move on to elimination, portion control, etc. If I can't do it myself, I wonder should I be eating it.
At any rate, this sauce came out just like store bought, but with no chemicals. It's easy and delicious, I hope that I will inspire someone to try to make their own cranberry sauce this Thanksgiving.
Jellied Cranberry Sauce:
2 bags cranberries
2 cups sugar (sugar in the raw is ok too)
juice from 1 orange- then add water so it totals 2 cups liquid
zest from half of the orange
1) Put all ingredients in stockpot and bring to a boil.
2) Let boil for ten minutes, cranberries will start to pop- I gently mashed the berries against the side of the pan.
3) Strain the liquid through a fine mesh sieve- press hard on the berries to remove juices and pulp. I ended up putting the remnants from the sieve into a cheesecloth and squeezing out more liquid afterwards.
4) Place in air tight container in refrigerator for up to one week, or seal in a canning jar by boiling in water for 15-20 minutes. Jar should be ~1" below water level.
Jar can be stored at room temp for one year if sealed.
Once refrigerated, if you use a jar that is straight (wide mouth)- you should be able to overturn and get the sauce to pop out of the "mold". I will just scoop mine out, as I did not have a straight style jar.
Source: Foodie with Family (I halfed her recipe and got 3 pints )
Sunday, May 12, 2013
Chocolate Frosted Vanilla Cupcakes with Cream Filling
Back in March, it occurred to me that I hadn't made cupcakes in months. It was this blog that got me obsessed with cupcakes, and how magical they are. I used to make cupcakes more than anything else, then I stopped.
My cousin sent me a message saying she missed reading about the cupcakes I was making and it really occurred to me how much I missed making the cupcakes. I decided to recreate the first cupcake I ever made for this blog, which, in fact was the first filled cupcake I had ever made, and the last one I ever used a box mix with.
All this coincided with my photography club's presentation that I was giving about food photography, so I knew it was the perfect time to show how far I've come in three years with a photo of the same batch of cupcakes, not only with my photography skills, but my baking skills as well.
THEN:
NOW:
I wish I had time to post this before Mother's Day so my cousin could have made them for herself, but it's early enough in the day that if she wants, she can still make a batch.
Happy Mother's Day Em, thanks for inspiring me to make cupcakes again!
Oven: 350'
Yellow Cupcakes:
1 1/2 cups flour
1 cup sugar
1 1/2 tsp baking powder
1/2 tsp salt
8 TBSP unsalted butter, room temp
1/2 cup sour cream
1 egg plus 2 yolks
1 1/2 tsp vanilla
Marshmallow filling:
1/6 cup confectioner's sugar
3.5 oz marshmallow fluff (we made our own homemade-OMG wait for this recipe soon)
pinch salt
1/2 TBSP water
3-4 TBSP butter, room temp
Chocolate Frosting:
1/4 cup plus 2 TBSP dutch process cocoa powder
1/4 cup plus 2 TBSP boiling water
15 TBSP unsalted butter (she used a lot more, I don't like butter flavor frosting, so I modified)
1/2 cup confectioner's sugar
pinch salt
16 oz semi-sweet chocolate, melted and cooled (use bars if you can, not chips)
Preheat the oven to 350'
1) For the cupcakes: In the bowl of your mixer, using the paddle, combine flour, sugar, baking powder, and salt.
2) Slice butter into 8 pieces and slowly add them to the flour mixture. Add in sour cream, egg, yolks, and vanilla and beat on medium until smooth. Scrape down bowl and mix again until all ingredients are incorporated.
3) Line muffin pan with paper liners. Scoop batter into cup wells until 2/3 full. This will make 12 cupcakes, so there should be just enough batter to fill one large muffin pan.
4) Bake in oven 20-24 minutes, rotating halfway through. They are done when a cake tester inserted in the center comes out clean. Let cool completely on wire rack before filling or frosting.
5) For the filling: With whisk attached to hand or stand mixer, beat butter and marshmallow fluff together. Add in confectioner's sugar, salt, and water, beat until fluffy and combined.
6) Cut a small round cone out of the top of each cupcake, scoop a TBSP of filling into each cupcake. Shave the cake off the bottom part of each cone and replace the top of the cupcake, once it has been filled.
7) For the frosting: Break semi-sweet chocolate into pieces, put in microwave proof bowl and microwave for 20 second increments, stirring in between each time, until completely melted and smooth, set aside to cool.
8) In a medium bowl, whisk the cocoa powder and boiling water until cocoa dissolves. Set aside.
9) In bowl of mixer (stand or hand), using whisk, beat the butter, confectioner's sugar, and salt on medium until light and fluffy. Reduce mixer speed and add in the melted, cooled chocolate. Beat until combined. Scrape down sides and mix again.
10) Beat in the cocoa mixture until combined, scrape down sides and remix again. Put frosting in bag with a piping tip and frost the cupcakes.
Source: Cupcakes- Cook's Illustrated Cookbook, Frosting- Martha Stewart Cupcakes, Filling- Skip to my Lou blog
My cousin sent me a message saying she missed reading about the cupcakes I was making and it really occurred to me how much I missed making the cupcakes. I decided to recreate the first cupcake I ever made for this blog, which, in fact was the first filled cupcake I had ever made, and the last one I ever used a box mix with.
All this coincided with my photography club's presentation that I was giving about food photography, so I knew it was the perfect time to show how far I've come in three years with a photo of the same batch of cupcakes, not only with my photography skills, but my baking skills as well.
THEN:
NOW:
I wish I had time to post this before Mother's Day so my cousin could have made them for herself, but it's early enough in the day that if she wants, she can still make a batch.
Happy Mother's Day Em, thanks for inspiring me to make cupcakes again!
Oven: 350'
Yellow Cupcakes:
1 1/2 cups flour
1 cup sugar
1 1/2 tsp baking powder
1/2 tsp salt
8 TBSP unsalted butter, room temp
1/2 cup sour cream
1 egg plus 2 yolks
1 1/2 tsp vanilla
Marshmallow filling:
1/6 cup confectioner's sugar
3.5 oz marshmallow fluff (we made our own homemade-OMG wait for this recipe soon)
pinch salt
1/2 TBSP water
3-4 TBSP butter, room temp
Chocolate Frosting:
1/4 cup plus 2 TBSP dutch process cocoa powder
1/4 cup plus 2 TBSP boiling water
15 TBSP unsalted butter (she used a lot more, I don't like butter flavor frosting, so I modified)
1/2 cup confectioner's sugar
pinch salt
16 oz semi-sweet chocolate, melted and cooled (use bars if you can, not chips)
Preheat the oven to 350'
1) For the cupcakes: In the bowl of your mixer, using the paddle, combine flour, sugar, baking powder, and salt.
2) Slice butter into 8 pieces and slowly add them to the flour mixture. Add in sour cream, egg, yolks, and vanilla and beat on medium until smooth. Scrape down bowl and mix again until all ingredients are incorporated.
3) Line muffin pan with paper liners. Scoop batter into cup wells until 2/3 full. This will make 12 cupcakes, so there should be just enough batter to fill one large muffin pan.
4) Bake in oven 20-24 minutes, rotating halfway through. They are done when a cake tester inserted in the center comes out clean. Let cool completely on wire rack before filling or frosting.
5) For the filling: With whisk attached to hand or stand mixer, beat butter and marshmallow fluff together. Add in confectioner's sugar, salt, and water, beat until fluffy and combined.
6) Cut a small round cone out of the top of each cupcake, scoop a TBSP of filling into each cupcake. Shave the cake off the bottom part of each cone and replace the top of the cupcake, once it has been filled.
7) For the frosting: Break semi-sweet chocolate into pieces, put in microwave proof bowl and microwave for 20 second increments, stirring in between each time, until completely melted and smooth, set aside to cool.
8) In a medium bowl, whisk the cocoa powder and boiling water until cocoa dissolves. Set aside.
9) In bowl of mixer (stand or hand), using whisk, beat the butter, confectioner's sugar, and salt on medium until light and fluffy. Reduce mixer speed and add in the melted, cooled chocolate. Beat until combined. Scrape down sides and mix again.
10) Beat in the cocoa mixture until combined, scrape down sides and remix again. Put frosting in bag with a piping tip and frost the cupcakes.
Source: Cupcakes- Cook's Illustrated Cookbook, Frosting- Martha Stewart Cupcakes, Filling- Skip to my Lou blog
Sunday, January 20, 2013
Organization Before and After: Kids Game Closet
I used to keep my kids games out of their reach at all times. I did this for three reasons: so they could not make a huge mess when they did not clean the game up after themselves, that the pieces would not be lost, and that they would not destroy the games. In Japan, the games were on the top shelf of a closet and were stacked so high, I never felt like getting them down, because it ended up like a game of Tetris trying to get them back up. In our new house, it started off the same way, but the closet wasn't as big and we had more games- they were everywhere and I just did not like it.
I started thinking about the fact that we did not play the games very often because they were tucked away and that the kids could not decide to play a game on their own because they couldn't reach them. I realized that in the end, they are kids, they are going to wreck stuff, they are going to lose stuff, and yes, they are going to make messes. I did not buy the games to look pretty on a shelf or to maintain their value so that I could sell them underpriced at a yard sale.
For all you parents out there, something to really think about- how many toys/games do your kids have that you limit playing time with because they were really expensive and/or you don't want it destroyed. I ask you this: "why bother buying it then". In this case- who are you really buying the toys for? The kids or you? Buy things for the right reason- if it's expensive because it's durable, that's great, or because it's made with less chemically, cheap materials- fine- but just because you paid a lot of money for it is not a reason to not let them play. Make smarter decisions when you buy stuff for them, that's what I've been doing. I don't buy things I'm going to worry about, and I certainly stopped buying things that I wished I had had when I was a kid, hoping I'd relive some childhood dream.
I decided I wanted to give my kids access to all the games, but I was stumped on how to do it. I am not good at rotating stuff, so I did not want to even cross that bridge. I searched a lot online and did not really find too much. I ended up flipping through a Better Homes and Gardens Organization magazine last summer and seeing a picture of a shelf with the games placed vertically instead of horizontally. I was sold! I set up an IKEA expedit shelf that we already had in our coat closet. I alphabetized the games and laid them in there. I had a few that were too wide so I put them up top with the adult games. There were a few too many, so I placed one horizontally on top in a few of the compartments.
On top of the shelf, I placed all the smaller boxed games. I used a canvas bin to stack them to keep them from falling all over the place. There is a bowl in front of the canvas bin for all the random pieces we find in the couch or on the floor after a game has been put away. Every Friday, one of my kids gets the job of putting the pieces back in the appropriate game and making sure the games are all put away neatly.
I try to enforce a rule of only one game out at a time per kid. The littlest one is having a hard time with this, but in the end, she still has the responsibility of cleaning up the games she had out and it's easy enough for her to do. My kids definitely play their games a lot more now and that makes me happy!
Wednesday, December 5, 2012
Homemade Kid's Cotton Pants
Well, I slipped up and didn't get around to posting the third pair of pants for a few days, but that's life. I can make the pants, just not everyday. These are the pants (or shorts) that I make most often for my kids. This is a no pattern pants as well. There is a bit of guess work for width and length, but I've never had a pair that didn't fit.
The fun thing about these pants is you can choose your kids' favorite character or color and make them pants that they will really love! I usually make each of my kids at least one pair of pants each year with this method. They are light weight, easy to scrunch up into a tiny ziploc for travelling purposes, and most often chosen from my kids' wardrobes.
To start, find a pair of your kids' pants that fit them now. I usually try for something with a slightly wider leg and an elastic waist. For a 5 year old and under, 1 yard of your desired fabric is good, for older, you need 1 1/4 - 1 1/2 yards of fabric.
Take the fabric and fold it in half width wise- right sides facing. Turn the pants inside out, fold them in half along the crotch area, and lay them flat close to one side of the fabric. Trace, leaving about 1/2 " on the sides for the seam, 1 1/2 " on top for the waistband and another 1" on bottom for the hem. Then flip them over and trace again-leaving the same allotments for waist and hem.
With right sides together, sew the curved inner seams of the front and back pieces, zigzag to finish the edges and help stop fraying.
Open up the front and back pieces and lay them on top of each other, right sides together. Sew along the outer pant leg edge on both sides. Use a zigzag afterwards for a nice finish.
Sew the inner leg/crotch together. Make sure to go over the crotch area twice to make it stronger.
Iron down the top of the waistband about 1/4" all the way around and then again 1" to create the waist band.
Sew around the waistband and leave a 2 " opening for threading the elastic.
Thread in the elastic, then sew closed the opening on the waistband. Hem pants to desired length. When hemming, fold raw edge in about 1/4", then again to desired length. Sew in place. Pants are done!
Back:
The fun thing about these pants is you can choose your kids' favorite character or color and make them pants that they will really love! I usually make each of my kids at least one pair of pants each year with this method. They are light weight, easy to scrunch up into a tiny ziploc for travelling purposes, and most often chosen from my kids' wardrobes.
To start, find a pair of your kids' pants that fit them now. I usually try for something with a slightly wider leg and an elastic waist. For a 5 year old and under, 1 yard of your desired fabric is good, for older, you need 1 1/4 - 1 1/2 yards of fabric.
Take the fabric and fold it in half width wise- right sides facing. Turn the pants inside out, fold them in half along the crotch area, and lay them flat close to one side of the fabric. Trace, leaving about 1/2 " on the sides for the seam, 1 1/2 " on top for the waistband and another 1" on bottom for the hem. Then flip them over and trace again-leaving the same allotments for waist and hem.
With right sides together, sew the curved inner seams of the front and back pieces, zigzag to finish the edges and help stop fraying.
Open up the front and back pieces and lay them on top of each other, right sides together. Sew along the outer pant leg edge on both sides. Use a zigzag afterwards for a nice finish.
Sew the inner leg/crotch together. Make sure to go over the crotch area twice to make it stronger.
Iron down the top of the waistband about 1/4" all the way around and then again 1" to create the waist band.
Sew around the waistband and leave a 2 " opening for threading the elastic.
Thread in the elastic, then sew closed the opening on the waistband. Hem pants to desired length. When hemming, fold raw edge in about 1/4", then again to desired length. Sew in place. Pants are done!
Back:
Labels:
do it yourself,
girl clothes,
homemade gift idea,
sewing
Friday, November 30, 2012
Repurpose Your Pants to Girls' Leggings
Today's pants post is super easy! In 30 minutes, from start to finish, you can have a new pair of leggings for your daughter!
Start by finding a pair of your pants you no longer fit into, like, want, etc. If you just can't find something to get rid of, head to goodwill and buy a cheap pair of womens' stretch pants.
Lay your daughter's current sized leggings on top of the pants you are cutting up - outer leg edges lined up. Trace around your daughter's pants, leaving a 1/4-1/2 " seam allowance and about 1 1/4" on the top for the waist band. Here's the bonus of using a pair of pants for your fabric: THEY ARE ALREADY HEMMED (I wish I could make this blink). I raised my pants up about an inch from the hem, I wanted them to be a little longer, with room to grow.
Cut the piece out, flip the pants over and trace and cut out the other piece. Follow the instructions from my tutorial yesterday to sew the pants together. This is even easier because, like I said, no hemming!
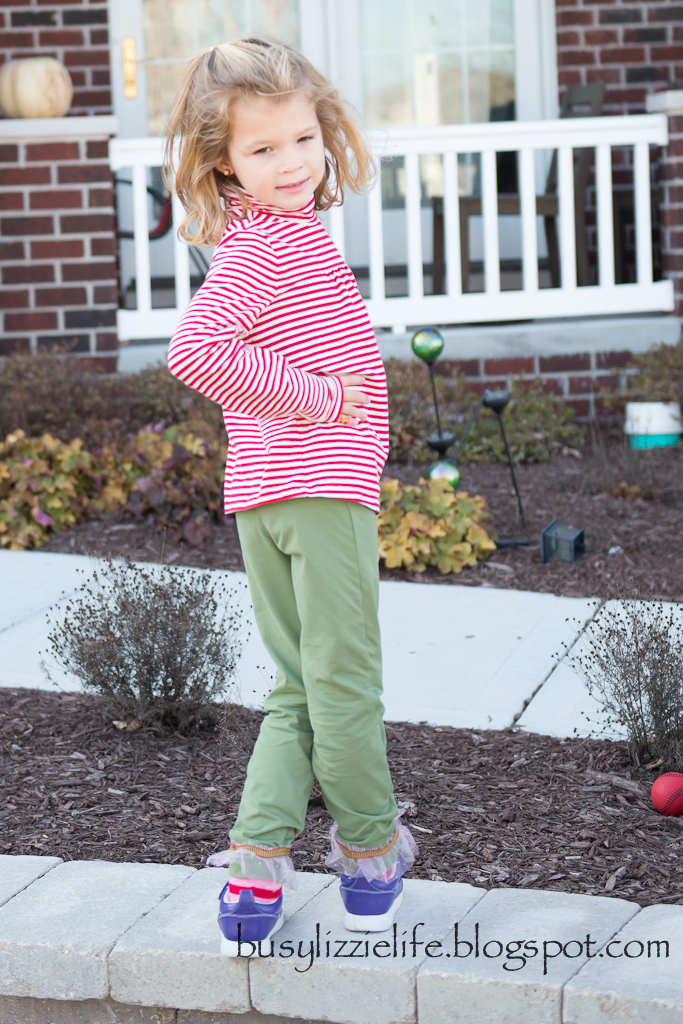
Hazel wasn't too keen on the green color, so I had some sparkly pink tulle ruffle left over from the sequin skirt, so I attached that around the bottom of the leg, along with some Christmas ribbon (what a pain, the leg opening is so small and hard to maneuver in the machine, I think it would be easier to attach by hand.
End result:
Plenty of stretch for play:
The back:
Sneak peek for tomorrow:
Start by finding a pair of your pants you no longer fit into, like, want, etc. If you just can't find something to get rid of, head to goodwill and buy a cheap pair of womens' stretch pants.
Lay your daughter's current sized leggings on top of the pants you are cutting up - outer leg edges lined up. Trace around your daughter's pants, leaving a 1/4-1/2 " seam allowance and about 1 1/4" on the top for the waist band. Here's the bonus of using a pair of pants for your fabric: THEY ARE ALREADY HEMMED (I wish I could make this blink). I raised my pants up about an inch from the hem, I wanted them to be a little longer, with room to grow.
Cut the piece out, flip the pants over and trace and cut out the other piece. Follow the instructions from my tutorial yesterday to sew the pants together. This is even easier because, like I said, no hemming!
Hazel wasn't too keen on the green color, so I had some sparkly pink tulle ruffle left over from the sequin skirt, so I attached that around the bottom of the leg, along with some Christmas ribbon (what a pain, the leg opening is so small and hard to maneuver in the machine, I think it would be easier to attach by hand.
End result:
Plenty of stretch for play:
The back:
Sneak peek for tomorrow:
Labels:
do it yourself,
girl clothes,
homemade gift idea,
recycling,
sewing
Wednesday, November 28, 2012
DIY Girls' Leggings
A few weeks ago, I gave myself some time to go back on pinterest and peruse my favorite blogs. I got sad by all the awesome stuff I saw people somehow finding the time to make that I could not. The good thing was it got the wheels in my brain turning and kept my thoughts inspiring me. I was particularly inspired by a series one blogger did for making kids' clothes and the challenge was to sew for one hour a day. I want to do that!
Now, that Christmas is about a month away, I want to devote more of my free time to my sewing machine. I have heard my oldest son say three times recently how he loves the homemade gifts I've made him and that he especially loved that because I made them, I'd be less likely to throw them away and he could keep them longer. I gave each of my kids a choice as to what homemade gift they'd like me to make them- this son: a secret room (we'll see about that). There's some things they won't get a choice in like the clothes I am making them.
I was telling my sister how I wanted to do more homemade and I know from year's past, that I need to start early if I want to finish my projects on time and not be rushing and stressed out. She was telling me the thing she'd like to make is pants for my niece. This got me inspired to incorporate not only an hour of sewing a day, but a week's worth of pants tutorials. Today I'm featuring a simple way to make girls' jersey knit leggings.
These leggings posted today are something I've been wanting to make FOREVER, but just never set aside the time. They were super easy and I LOVE LOVE how they came out. This pair of leggings was two pieces of fabric and took me 1 hour 5 minutes to make (I timed it)- that was with a few distractions from the kids along the way- best part?: NO PATTERN! Whenever I make pants, I usually do not use a pattern, but I usually have four pieces of fabric, so this was a little new for me and even easier than I could imagine. I was inspired to use this method by a post on make it and love it blog.
To start off, get a piece of jersey knit fabric, about 1/2 yard if the print goes any which way (this was for a size 5/6) AND a pair of your daughter's leggings that currently fit. Fold the fabric in on itself- just wide enough to lay the leggings on so you can trace them.
1) You want to place the leggings on the folded edge of the fabric- be sure to smooth them out and position them so the seams are flat. Using a kids' washable marker, trace around the leggings, leave about 1/4-1/2" border for your seam. On the bottom, you can leave more room if you want the leggings a bit longer and at the top, leave about 1 1/4" extra space, this is to make the waist band. (See the faint black line in photo 1 above- Also, the black pants are on the folded edge, for some reason, there was a piece of white paper under part of the fabric, so much for contrast.).
2) Cut out your first piece. Fold the fabric in again. Place the first cut out piece on the fold and cut out around it. Now you have your two pieces and you are ready to sew!
3) Open the two cut pieces and lay them on top of each other, right sides together.
4) Sew along the curved edges on the right side and then on the left side. You have now created the front and back seams. Jersey fabric will not fray- so do not worry about serging. I do not have a serger, but for extra strength, since kids are rough on their clothes. I went along the first stitch again with a zigzag stitch.
OK, just realized that I numbered the second picture 1, 2, 3, 4 as well- that's what I get for writing this at 5:30 am. So, I'll write the steps 1, 2, 3, 4 for this picture, just remember which picture you are following.
1) Open the pants up and lay them so the two seams you just sewed are on top of each other and you make a pants shape. Lay flat and line up the inside pant legs.
2) Sew along the inside pants legs, then to reinforce the stitch since this is the crotch, go back over with a zig zag.
3) Iron up a hem on bottom, about 1/4", then stitch and zigzag here again. You'll notice in some of my pictures, Hazel's looks a little ruffly. I did my zigzag stitch right at the edge instead of 1/4" up and it gave it that ruffled look.
4) Iron the waistband edge down 1/4" and then fold down again 1". Press. This will create a closed clean edge for your waist band. Sew along the lower edge of the waist band, but leave a 2" opening, so you can thread in the elastic waist band.
5) Measure your child's waist, cut a piece of elastic that size and thread it in through the waist band. I have a giant plastic needle that I use to pull the elastic through, makes life much easier. You can get those kid's crocheting needles at craft stores- I highly recommend it! Slightly overlap the ends of the elastic, pin them, and sew back and forth over them to keep them together. Pull the elastic back into the waistband and sew closed the opening that you pulled it through. You are done!
The front:
The back:
These are not only fun to wear alone, but under skirts- yes I know she has matching issues, what can I say- she marches to the beat of her own drum!:
Plenty of stretch for hours of play:
Now, that Christmas is about a month away, I want to devote more of my free time to my sewing machine. I have heard my oldest son say three times recently how he loves the homemade gifts I've made him and that he especially loved that because I made them, I'd be less likely to throw them away and he could keep them longer. I gave each of my kids a choice as to what homemade gift they'd like me to make them- this son: a secret room (we'll see about that). There's some things they won't get a choice in like the clothes I am making them.
I was telling my sister how I wanted to do more homemade and I know from year's past, that I need to start early if I want to finish my projects on time and not be rushing and stressed out. She was telling me the thing she'd like to make is pants for my niece. This got me inspired to incorporate not only an hour of sewing a day, but a week's worth of pants tutorials. Today I'm featuring a simple way to make girls' jersey knit leggings.
These leggings posted today are something I've been wanting to make FOREVER, but just never set aside the time. They were super easy and I LOVE LOVE how they came out. This pair of leggings was two pieces of fabric and took me 1 hour 5 minutes to make (I timed it)- that was with a few distractions from the kids along the way- best part?: NO PATTERN! Whenever I make pants, I usually do not use a pattern, but I usually have four pieces of fabric, so this was a little new for me and even easier than I could imagine. I was inspired to use this method by a post on make it and love it blog.
To start off, get a piece of jersey knit fabric, about 1/2 yard if the print goes any which way (this was for a size 5/6) AND a pair of your daughter's leggings that currently fit. Fold the fabric in on itself- just wide enough to lay the leggings on so you can trace them.
1) You want to place the leggings on the folded edge of the fabric- be sure to smooth them out and position them so the seams are flat. Using a kids' washable marker, trace around the leggings, leave about 1/4-1/2" border for your seam. On the bottom, you can leave more room if you want the leggings a bit longer and at the top, leave about 1 1/4" extra space, this is to make the waist band. (See the faint black line in photo 1 above- Also, the black pants are on the folded edge, for some reason, there was a piece of white paper under part of the fabric, so much for contrast.).
2) Cut out your first piece. Fold the fabric in again. Place the first cut out piece on the fold and cut out around it. Now you have your two pieces and you are ready to sew!
3) Open the two cut pieces and lay them on top of each other, right sides together.
4) Sew along the curved edges on the right side and then on the left side. You have now created the front and back seams. Jersey fabric will not fray- so do not worry about serging. I do not have a serger, but for extra strength, since kids are rough on their clothes. I went along the first stitch again with a zigzag stitch.
OK, just realized that I numbered the second picture 1, 2, 3, 4 as well- that's what I get for writing this at 5:30 am. So, I'll write the steps 1, 2, 3, 4 for this picture, just remember which picture you are following.
1) Open the pants up and lay them so the two seams you just sewed are on top of each other and you make a pants shape. Lay flat and line up the inside pant legs.
2) Sew along the inside pants legs, then to reinforce the stitch since this is the crotch, go back over with a zig zag.
3) Iron up a hem on bottom, about 1/4", then stitch and zigzag here again. You'll notice in some of my pictures, Hazel's looks a little ruffly. I did my zigzag stitch right at the edge instead of 1/4" up and it gave it that ruffled look.
4) Iron the waistband edge down 1/4" and then fold down again 1". Press. This will create a closed clean edge for your waist band. Sew along the lower edge of the waist band, but leave a 2" opening, so you can thread in the elastic waist band.
5) Measure your child's waist, cut a piece of elastic that size and thread it in through the waist band. I have a giant plastic needle that I use to pull the elastic through, makes life much easier. You can get those kid's crocheting needles at craft stores- I highly recommend it! Slightly overlap the ends of the elastic, pin them, and sew back and forth over them to keep them together. Pull the elastic back into the waistband and sew closed the opening that you pulled it through. You are done!
The front:
The back:
These are not only fun to wear alone, but under skirts- yes I know she has matching issues, what can I say- she marches to the beat of her own drum!:
Plenty of stretch for hours of play:
Labels:
do it yourself,
girl clothes,
homemade gift idea,
sewing
Friday, November 16, 2012
Homemade Oreo Ice Cream
I've been holding out. I've made variations of this ice cream since the spring over and over again, but I have not posted the recipe. It's not that I didn't want to, it's just that 1) the ice cream is so good, it does not last long enough to photograph, and 2) when I do have a bit of it hanging around, I don't have enough time to photograph it the way I'd like.
Tuesday was my daughter's birthday and she asked me to make her some ice cream. I decided to take the new candycane oreos I bought and use them as a mix -in to my favorite vanilla ice cream recipe. The result: AWESOME (although I bet Trader Joe's Candy Candy Jo Jos would be incredible!).
I've been having a hard time finding time to do anything lately and this blog is something I enjoy to help me be me. It seems as though I've let it fall by the wayside and I have TONS of things to share, so hopefully this will springboard me back in the swing of things.
If you get a chance to make this ice cream, it will work well on its own, or with a variety of mix ins, the key is to add the mix-ins at the very end of the ice cream churning process.
Treat yourself today- I know I am- (and tomorrow)!
Oreo Ice Cream-
1 vanilla bean (or 1 TBSP vanilla)
1 3/4 cups heavy cream
1 1/4 cups whole milk
1/2 cup plus 2 TBSP sugar
1/3 cup light corn syrup
1/4 tsp salt
6 egg yolks
1) Split vanilla bean lenghtwise, scrape out seeds. Place vanilla bean pod, seeds, cream, milk, 1/4 cup plus 2 TBSP sugar, corn syrup, and salt in medium sauce pan. Whisk, then heat to about 175' over medium heat.
2) Whisk egg yolks and remaining 1/4 cup sugar in medium bowl. Set aside.
3) When cream mixture has reached 175', remove pan from heat- remove vanilla bean pod. Slowly whisk 1 cup heated cream mixture into the bowl of the egg yolk mixture. This is tempering the egg yolks. Return this tempered egg yolk mixture back to the saucepan with the rest of the cream mixture.
4) Return the cream mixture to medium heat until it registers a temperature of about 180', the mixture will be slightly thickened like custard. Place a fine mesh sieve over a medium bowl- pour the custard mixture through the sieve and collect in the bowl. Let cool to room temp, then cover and refrigerate until completely cool, about 4 hours.
5) Remove custard from refrigerator. Start your ice cream maker, pour custard in, and churn according to directions. When the ice cream is beginning to firm up, before you stop the mixer, chop up the oreos into bite sized pieces and pour into ice cream maker for the last 30 seconds. Transfer ice cream to air tight container and freeze before serving.
Source: adapted from Cook's Illustrated Cookbook
Tuesday was my daughter's birthday and she asked me to make her some ice cream. I decided to take the new candycane oreos I bought and use them as a mix -in to my favorite vanilla ice cream recipe. The result: AWESOME (although I bet Trader Joe's Candy Candy Jo Jos would be incredible!).
I've been having a hard time finding time to do anything lately and this blog is something I enjoy to help me be me. It seems as though I've let it fall by the wayside and I have TONS of things to share, so hopefully this will springboard me back in the swing of things.
If you get a chance to make this ice cream, it will work well on its own, or with a variety of mix ins, the key is to add the mix-ins at the very end of the ice cream churning process.
Treat yourself today- I know I am- (and tomorrow)!
Oreo Ice Cream-
1 vanilla bean (or 1 TBSP vanilla)
1 3/4 cups heavy cream
1 1/4 cups whole milk
1/2 cup plus 2 TBSP sugar
1/3 cup light corn syrup
1/4 tsp salt
6 egg yolks
1) Split vanilla bean lenghtwise, scrape out seeds. Place vanilla bean pod, seeds, cream, milk, 1/4 cup plus 2 TBSP sugar, corn syrup, and salt in medium sauce pan. Whisk, then heat to about 175' over medium heat.
2) Whisk egg yolks and remaining 1/4 cup sugar in medium bowl. Set aside.
3) When cream mixture has reached 175', remove pan from heat- remove vanilla bean pod. Slowly whisk 1 cup heated cream mixture into the bowl of the egg yolk mixture. This is tempering the egg yolks. Return this tempered egg yolk mixture back to the saucepan with the rest of the cream mixture.
4) Return the cream mixture to medium heat until it registers a temperature of about 180', the mixture will be slightly thickened like custard. Place a fine mesh sieve over a medium bowl- pour the custard mixture through the sieve and collect in the bowl. Let cool to room temp, then cover and refrigerate until completely cool, about 4 hours.
5) Remove custard from refrigerator. Start your ice cream maker, pour custard in, and churn according to directions. When the ice cream is beginning to firm up, before you stop the mixer, chop up the oreos into bite sized pieces and pour into ice cream maker for the last 30 seconds. Transfer ice cream to air tight container and freeze before serving.
Source: adapted from Cook's Illustrated Cookbook
Wednesday, October 24, 2012
Furniture Repurpose- Before and After
So, I refuse to buy furniture full price (except for couches). I went to an antique store in town back in March. I was looking for some type of a bench seat to put at the end of my bed for Dave to sit down on to put on socks in the morning. When I got the shop, the owner brought me out back and directed me to this hideous long "coffee table"- had I not been perusing before and after furniture redo's online already, I would have snubbed my nose and walked away. Instead, I asked how much- she said "$10", so out I walked with this UGLY thing:
It has literally sat in my garage for the past 7 months, collecting dust. I finally decided to get it out and paint it before the cold weather settles in. I started by having Dave take that ugly looking slider door off the front, then by putting on one coat of primer. I use Benjamin Moore wall primer- I have a gallon of it- this is the fourth thing I've primed with it, and I'm still not even 1/3 way done, so it was worth the investment.
I let it sit over night to dry and the next day, I painted it with Benjamin Moore paint- Margarita was the color. I only bought a pint, and for two coats, I had about 1/4 of the can left.
The original intent was to go at the foot of my bed, but Hazel cannot keep her stuff together, and judging by the way stuff was gathering in her room, she needed something in there to help her keep her stuff organized, don't you agree?
And the after. I love the way this looks in here, don't you?
I am planning on making a pillow for the top of the bench so she can sit in read in comfort, but for now, I don't think she minds at all.
If you're looking for something to jazz up a room, or need something that serves a useful storage purpose, put down the Pottery Barn catalog and start looking around- you never know what removing a door or hardware, along with adding a fresh coat of colorful paint can do to a once ugly piece!
It has literally sat in my garage for the past 7 months, collecting dust. I finally decided to get it out and paint it before the cold weather settles in. I started by having Dave take that ugly looking slider door off the front, then by putting on one coat of primer. I use Benjamin Moore wall primer- I have a gallon of it- this is the fourth thing I've primed with it, and I'm still not even 1/3 way done, so it was worth the investment.
I let it sit over night to dry and the next day, I painted it with Benjamin Moore paint- Margarita was the color. I only bought a pint, and for two coats, I had about 1/4 of the can left.
The original intent was to go at the foot of my bed, but Hazel cannot keep her stuff together, and judging by the way stuff was gathering in her room, she needed something in there to help her keep her stuff organized, don't you agree?
And the after. I love the way this looks in here, don't you?
I am planning on making a pillow for the top of the bench so she can sit in read in comfort, but for now, I don't think she minds at all.
If you're looking for something to jazz up a room, or need something that serves a useful storage purpose, put down the Pottery Barn catalog and start looking around- you never know what removing a door or hardware, along with adding a fresh coat of colorful paint can do to a once ugly piece!
Subscribe to:
Posts (Atom)


