Showing posts with label homemade gift idea. Show all posts

Wednesday, December 5, 2012

Homemade Kid's Cotton Pants

Well, I slipped up and didn't get around to posting the third pair of pants for a few days, but that's life.  I can make the pants, just not everyday.  These are the pants (or shorts) that I make most often for my kids.  This is a no pattern pants as well.  There is a bit of guess work for width and length, but I've never had a pair that didn't fit.

The fun thing about these pants is you can choose your kids' favorite character or color and make them pants that they will really love!  I usually make each of my kids at least one pair of pants each year with this method.  They are light weight, easy to scrunch up into a tiny ziploc for travelling purposes, and most often chosen from my kids' wardrobes.

To start, find a pair of your kids' pants that fit them now.  I usually try for something with a slightly wider leg and an elastic waist.  For a 5 year old and under, 1 yard of your desired fabric is good, for older, you need 1 1/4 - 1 1/2 yards of fabric.

Take the fabric and fold it in half width wise- right sides facing.  Turn the pants inside out, fold them in half along the crotch area, and lay them flat close to one side of the fabric. Trace, leaving about 1/2 " on the sides for the seam, 1 1/2 " on top for the waistband and another 1" on bottom for the hem.   Then flip them over and trace again-leaving the same allotments for waist and hem.
With right sides together, sew the curved inner seams of the front and back pieces, zigzag to finish the edges and help stop fraying.
Open up the front and back pieces and lay them on top of each other, right sides together.  Sew along the outer pant leg edge on both sides.  Use a zigzag afterwards for a nice finish.
Sew the inner leg/crotch together.  Make sure to go over the crotch area twice to make it stronger.
Iron down the top of the waistband about 1/4" all the way around and then again 1" to create the waist band.
Sew around the waistband and leave a 2 " opening for threading the elastic.
Thread in the elastic, then sew closed the opening on the waistband.  Hem pants to desired length.  When hemming, fold raw edge in about 1/4", then again to desired length.  Sew in place.  Pants are done!
Back:


Friday, November 30, 2012

Repurpose Your Pants to Girls' Leggings

Today's pants post is super easy!  In 30 minutes, from start to finish, you can have a new pair of leggings for your daughter!

Start by finding a pair of your pants you no longer fit into, like, want, etc.  If you just can't find something to get rid of, head to goodwill and buy a cheap pair of womens' stretch pants.
Lay your daughter's current sized leggings on top of the pants you are cutting up - outer leg edges lined up.  Trace around your daughter's pants, leaving a 1/4-1/2 " seam allowance and about 1 1/4" on the top for the waist band.  Here's the bonus of using a pair of pants for your fabric:  THEY ARE ALREADY HEMMED (I wish I could make this blink).  I raised my pants up about an inch from the hem, I wanted them to be a little longer, with room to grow.
Cut the piece out, flip the pants over and trace and cut out the other piece.  Follow the instructions from my tutorial yesterday to sew the pants together.  This is even easier because, like I said, no hemming!

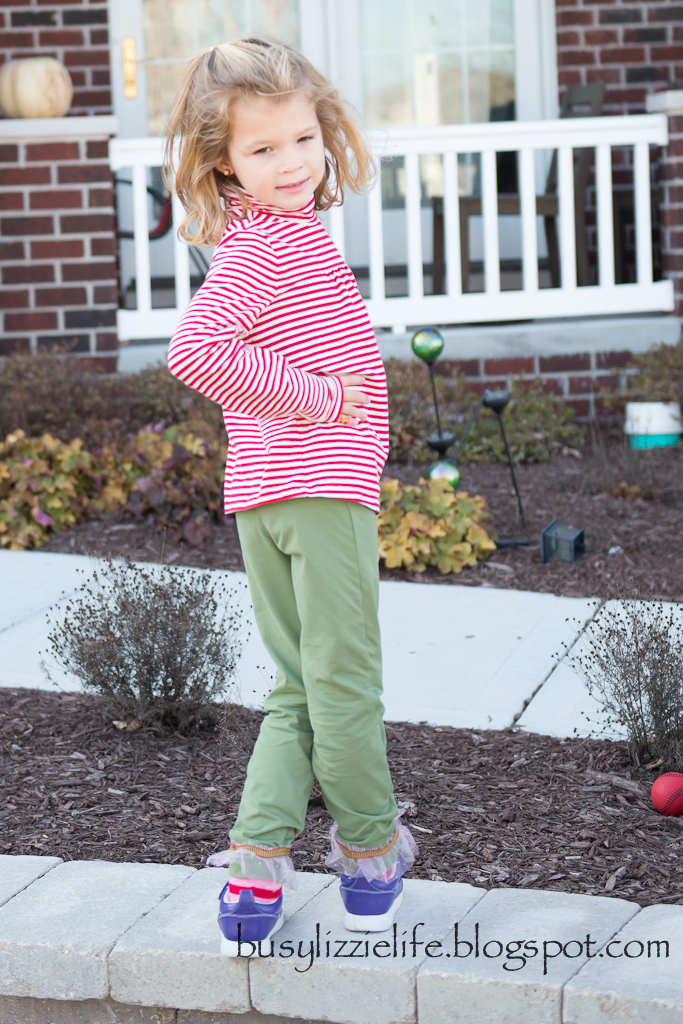
Hazel wasn't too keen on the green color, so I had some sparkly pink tulle ruffle left over from the sequin skirt, so I attached that around the bottom of the leg, along with some Christmas ribbon (what a pain, the leg opening is so small and hard to maneuver in the machine, I think it would be easier to attach by hand.
End result:
Plenty of stretch for play:
The back:
Sneak peek for tomorrow:


Wednesday, November 28, 2012

DIY Girls' Leggings

A few weeks ago, I gave myself some time to go back on pinterest and peruse my favorite blogs.  I got sad by all the awesome stuff I saw people somehow finding the time to make that I could not.  The good thing was it got the wheels in my brain turning and kept my thoughts inspiring me.  I was particularly inspired by a series one blogger did for making kids' clothes and the challenge was to sew for one hour a day. I want to do that!

Now, that Christmas is about a month away, I want to devote more of my free time to my sewing machine.  I have heard my oldest son say three times recently how he loves the homemade gifts I've made him and that he especially loved that because I made them, I'd be less likely to throw them away and he could keep them longer.  I gave each of my kids a choice as to what homemade gift they'd like me to make them- this son:  a secret room (we'll see about that). There's some things they won't get a choice in like the clothes I am making them.

I was telling my sister how I wanted to do more homemade and I know from year's past, that I need to start early if I want to finish my projects on time and not be rushing and stressed out.  She was telling me the thing she'd like to make is pants for my niece.  This got me inspired to incorporate not only an hour of sewing a day, but a week's worth of pants tutorials.  Today I'm featuring a simple way to make girls' jersey knit leggings.

These leggings posted today are something I've been wanting to make FOREVER, but just never set aside the time.  They were super easy and I LOVE LOVE how they came out.  This pair of leggings was two pieces of fabric and took me 1 hour 5 minutes to make (I timed it)- that was with a few distractions from the kids along the way- best part?:  NO PATTERN!  Whenever I make pants, I usually do not use a pattern, but I usually have four pieces of fabric, so this was a little new for me and even easier than I could imagine.  I was inspired to use this method by a post on make it and love it blog.

To start off, get a piece of jersey knit fabric, about 1/2 yard if the print goes any which way (this was for a size 5/6) AND a pair of your daughter's leggings that currently fit.  Fold the fabric in on itself- just wide enough to lay the leggings on so you can trace them.
1) You want to place the leggings on the folded edge of the fabric- be sure to smooth them out and position them so the seams are flat.  Using a kids' washable marker, trace around the leggings, leave about 1/4-1/2" border for your seam.  On the bottom, you can leave more room if you want the leggings a bit longer and at the top, leave about 1 1/4" extra space, this is to make the waist band. (See the faint black line in photo 1 above- Also, the black pants are on the folded edge, for some reason, there was a piece of white paper under part of the fabric, so much for contrast.).

2) Cut out your first piece.  Fold the fabric in again.  Place the first cut out piece on the fold and cut out around it.  Now you have your two pieces and you are ready to sew!

3) Open the two cut pieces and lay them on top of each other, right sides together.

4) Sew along the curved edges on the right side and then on the left side.  You have now created the front and back seams.  Jersey fabric will not fray- so do not worry about serging.  I do not have a serger, but for extra strength, since kids are rough on their clothes.  I went along the first stitch again with a zigzag stitch.
OK, just realized that I numbered the second picture 1, 2, 3, 4 as well- that's what I get for writing this at 5:30 am.  So, I'll write the steps 1, 2, 3, 4 for this picture, just remember which picture you are following.
1) Open the pants up and lay them so the two seams you just sewed are on top of each other and you make a pants shape.  Lay flat and line up the inside pant legs.

2) Sew along the inside pants legs, then to reinforce the stitch since this is the crotch, go back over with a zig zag.

3) Iron up a hem on bottom, about 1/4", then stitch and zigzag here again.  You'll notice in some of my pictures, Hazel's looks a little ruffly.  I did my zigzag stitch right at the edge instead of 1/4" up and it gave it that ruffled look.

4) Iron the waistband edge down 1/4" and then fold down again 1".  Press.  This will create a closed clean edge for your waist band.  Sew along the lower edge of the waist band, but leave a 2" opening, so you can thread in the elastic waist band.
5) Measure your child's waist, cut a piece of elastic that size and thread it in through the waist band.  I have a giant plastic needle that I use to pull the elastic through, makes life much easier.  You can get those kid's crocheting needles at craft stores- I highly recommend it!  Slightly overlap the ends of the elastic, pin them, and sew back and forth over them to keep them together.  Pull the elastic back into the waistband and sew closed the opening that you pulled it through.  You are done!

The front:
The back:
These are not only fun to wear alone, but under skirts- yes I know she has matching issues, what can I say- she marches to the beat of her own drum!:
Plenty of stretch for hours of play:


Wednesday, June 20, 2012

Pokemon Birthday Invitations (DIY Pokemon Cards)

Of course, now that we don't live in Japan anymore, my kids are obsessed with Pokemon.  Hello, it was all over Japan, and we had nothing to do with it for those four and a half years.  Gasp, if they only knew the Pokemon haven that is in Japan.  I love that Pokemon's name is a Japanese way of shortening an english phrase they didn't have a word for- pocket monster- pokemon.  (same for their word for laptop- pasokon (shortened personal computer) and dijikami (digital camera)).  

Anyways, the point is that my son is having a pokemon birthday for his 6th birthday.  I went online and found this awesome website, mypokecard.com, where you can upload your own image onto a pokemon card, you can even choose the genre, and fill in your own powers and weaknesses.  I just typed in the info for the party.   

Once you are done filling out the card, you just right click and save it to your computer.  I opened it in power point and pasted four in a document and resized to fit the paper and printed on card stock.  The whole thing took less than ten minutes and my son loved them so much, he didn't want to give them out.  Let's just say I started a revolution, and now I'm making trading cards for all my kids. If you size them right, you can glue them on the back of an existing card and make your own game.
I'm already thinking thank you cards!  You could even make a set of these for one of your kids' friends for a bday gift (if you have stock in printer ink;)

Saturday, June 2, 2012

Homemade Photo Bookmarks

I can't believe it, but today is my son's last day of Kindergarten.  I am in shock that it is already June and that the school year has already zoomed by.  This was not only his first year of Kindergarten, but it was also his teacher's first year teaching.  I thought she did an excellent job and wanted to give her something nice as a thank you.

I saw the idea for these bookmarks online at Pink and Green Mama and Creative Family Moments.  I saw it again in Family Fun magazine, April 2012 issue, it was like a sign that I needed to make them.  For a gift, I thought it would be fun for his teacher to have this bookmark to remember him and also, we attached a gift card for Barnes and Noble.  Who wants a bookmark without a book?

While I was at Barnes and Noble, I checked out their bookmarks, which were upwards of $5 each!  This bookmark cost me 19 cents to make (cost of 1 hour print).  I plan on making a lot more of these for my kids for their own use, and maybe even for Father's Day, who wouldn't love to receive a unique homemade photo bookmark?

Here are some step by step instructions, in case you want to make your own.  Don't skip the tassles, I think they make the bookmark!

Take a photo of your child in a pose like they are hanging on- the morning I did this, my son was less than cooperative, so I didn't get a great pose:
Print it out, cut around the silhouette, laminate the photo, and cut out around the laminated image.  If you don't have a laminator, you can buy sticky laminating sheets, or use clear contact paper.  I had my son write his name and the year on the back before we laminated.  You can play with it for a while too:
1) Wrap embroidery floss around a notecard, about 20 times.
2) Insert another piece of embroidery floss, about 10-12 inches long through the wrapped floss.  I used ten inches because I wanted my tassle a little bit shorter.

3) Tie the ends of the long floss together in a double or triple know.  Trim the ends off.

4) For the wrapped floss, cut through the top of the loop.  Once you remove the notecard, trim the ends of the top of the tassle, so they are even.
5) Using a small piece of embroidery floss, about 4 inches long, loop around the bottom of the tassle and tie into a double knot.  Trim the ends of the floss off.  This will help keep the tassle ends together.

6) Punch a hole in the top of the laminated bookmark.  Pull the end of the floss loop through the hole.

7) Take the top of the tassle and thread it through the floss loop.  Pull tight and now your tassle is attached and your bookmark is complete!

Have fun hanging around all summer, reading!
Peek-a-boo, I can still see you!
Hooray for wonderful teachers!

Saturday, March 3, 2012

Light Saber Party Favor Holders filled with Star Wars Freezer Paper T's

For my son's birthday party, he was very concerned about the favor bags because sometimes I don't make them.  I get sick of all the little trinkets they bring home from other parties, school, even the dentist, that they use for a few days, break, leave laying around for me to step on, etc.  So, I came up with an idea for something cool and functional- a t-shirt in a cardboard light saber that can also function as a real light saber!

For the light sabers, I found some awesome metallic paper on clearance at Michael's.  I was looking at the glitter paper, but this was even more awesome!!!

I cut each piece of 12x12 paper in half- so I had 2 6x12" pieces.  Then, I taped a piece of 8" x 5.5" piece of brown construction paper at the bottom of the metallic and rolled them up- I secured them at the back with packing tape.
Around the front where the metallic met the brown paper, I taped on a strip of silver paper, then I had gone to Target the day after Valentine's day and bought a ton of packs of 50% off Star Wars Valentine's.  Some came with stickers, so I taped them to the front to act like a button:
Then, I made 18 freezer paper t-shirts, which I rolled up and stuffed inside the tubes.  These were a huge hit and it was hard to keep the kids away from them at the party, so I would recommend hiding them until the party is over!
For the t-shirts, I did yoda, darth vader, c3po, and r2d2.  I found the images on the internet by googling free star wars coloring pages, I right clicked and saved the image to my desktop- you can click on the links above to access the same pages.  I used power point to paste the image and make it the size I wanted, then I used the star wars font I downloaded for free here, to write star wars across the top.

I printed the images onto the precut freezer paper printer sheets (now you know why I didn't want to cut them out of the roll of freezer paper).
I cut them out with an exacto knife and ironed them onto the shirts (beware if you use hanes or fruit of the loom t-shirts, they shrink a lot while washing, so size up (prob xl for 1st grade boys, and men's s for 2nd and 3rd).
Then, I painted them and hung them around the house to dry. I actually heat set all the shirts but Darth Vader (when I heat set one, the paint got all bubbly and kind of burnt looking).  I prewashed all the shirts before putting them into the sabers and I didn't notice any fading of the non-heat set black ones.

Voila!
Yoda and Darth Vader were the definite preferred choices, but I HAD to do the r2d2 and c3po because I really wanted an excuse to use the AWESOME metallic paint I bought.  That paint came out sooo awesome!

Yoda is glow in the dark (my dark photo skills are bad, but you get the idea)- yes, the rocking glow in the dark paint worked and awesome at that!!!!

Wednesday, February 29, 2012

Star Wars Birthday Shirt

Yesterday I posted about the Star Wars paper snowflakes I was making for my son's birthday decorations.  Today, I'm showing you how I made one of them into a stencil for a t-shirt for him.

A tradition in our house is that I always make each of the kids a special birthday shirt to wear that day.  I have been reading about freezer paper stencils forever and just never looked into it.  I have used freezer paper to cut out quilt patterns and it works awesome, so I actually had some in the house.  You can buy it at the grocery store in the aisle with the cling wrap, etc.  (I could not find it at Target.)  Anyways, freezer paper has two sides, one paper side and one slightly shiny, smooth side.  You can sketch or print your stencil template onto the paper side, and after you cut it out, the shiny side, can temporarily adhere to fabric when ironed on.  This will anchor it and allow you to use fabric paint to fill in your picture.  I read one description of freezer paper stencils as "poor man's screen printing".  I am totally hooked, call me poor man if you will!

Oh, and you can totally cheat like me, I bought a 30 pack of freezer paper printer sheets on amazon.com (you'll see why tomorrow).  If you have the time, you can take the roll of freezer paper and cut out an 8.5x11 sheet to fit in your printer- I did not feel like cutting out 20+.

When searching for ideas of what to print on the shirt, I came across a great tutorial at Dana Made It- clearly she's more advanced than me;)

Here's what you need to do:

Find a picture you want to stencil on a shirt, something without a lot of detail- unless you are a true picasso.  Print or draw the picture onto the paper side of the freezer paper.  I printed the template for the yoda snowflake on the freezer paper and cut it out with the exacto knife.  Hazel wanted to do a shirt too, so we printed out a big silhouette of Hello Kitty and cut it out.
Once your template is cut out, iron it onto a t-shirt, with the shiny side down, so it will adhere to the fabric:
Place a piece of cardboard under the layer of t-shirt you are stenciling, so the paint will not run into the other side of the shirt.  Using fabric paint (acrylic will work, but will fade a lot during washing)- you can get fabric paint at Michael's or Hobby Lobby- fill in the cut out part of your stencil.  We used sponge brushes to dab the paint in.
Let the paint dry for a few minutes, then peel the paper away and you will see your stenciled image on the shirt, hang it up to dry for several hours.  Once it is dry, place a thin piece of fabric over it, and iron it for about 30 seconds to heat set the paint so it will not fade during washing.

Here is the finished Hello Kitty, she insisted on putting a giant heart on it, since we did this the day before Valentine's Day.
Since my son was turning 7, I needed to add 1 more yoda into the picture, so I cut out a stencil of his head and place it in the center:
Considering he has worn this shirt about 7 times in the last two weeks, I'd say he loves it!

Stay tuned tomorrow for more Star Wars t-shirts!