I keep finding myself at the end of a boxing match and I've been beaten up...by myself.
I keep noticing many people doing the same thing, it's so easy to win a fight when you are beating up your own self.
Well. I stepped out of the ring. So should you.
It's just so easy to sell yourself short, to feel like you've done wrong, that you're never going to be good enough.
Trust me, I know when I've done something I wish I did not do. This afternoon, for example, my daughter, who is going to send me to my grave early by the way, was climbing on a stool after I said no, and in slow motion, I saw her falling down- which was followed by about 20 minutes of tears, that I just didn't want to deal with. I got really really mad at her, then that was followed by 10 minutes of guilt.
Guilt, it's pretty much the black belt of the ring.
This morning, at crossfit, I was not going to add too much weight on my barbell, I always sell myself short- I do not want to get hurt, I'm not sure I can do that, I will play it safe-. "Self, you've been doing this for 2 years now, that is not out of your possibility", is what I should have been saying.
That's where my friend stepped in and told me that I had to do it. She gave me the confidence to stand up and do what I knew I could do. Had I left without attempting what I did, I would have spent the rest of the day wondering if I could have done it or maybe even slapping myself on the cheek a couple of times for backing out of it.
Slaps on the face, no one wants them, but yet, we just keep going in for more. Seriously- stop!
You are not a bad person. You are human. We are going to do things, things we regret, things that make us guilty, we are going to back away from challenges- it's just going to happen.
But it's your choice, your right, and your necessity to step out of the ring, to stop taking hits to the jaw, accept what you have or have not done and move on.
Things happen and things end- MOVE ON! Stop talking about it, stop analyzing it, you did or didn't do it and that's a fact- next time you have the chance to do it differently. Forgive yourself for the wrong, and encourage yourself for the challenges.
If this is hard for you, get a friend. Friends are awesome- they do things that are wrong too and they also see things in you that you do not.
No one is perfect- but no one deserves to get their ass kicked-- from their own self.
Get out of the ring and move on!
Showing posts with label writing. Show all posts
Friday, November 14, 2014
Friday, September 7, 2012
Lunchbox Order Forms
I get up at 4:30 most days of the week. I like to hit the gym early- it's my way of starting the day on a good note. By the time I get home from the gym, it's 6:45 and I've been up for over two hours. IF I take a shower and make myself coffee, I'll be pushing it to get the kids out the door in time for school. Most days, I barely have time to make them all breakfast, make sure they're dressed, get their bags ready, and pack healthy lunches and snacks. Add to the equation, there is no more bus, and we bike to school everyday-we've got to get out the door earlier to make sure there's enough time to get the bikes out, helmets on, and allot for stopping time along the way or unforseen "emergencies".
Fast forward to the kids coming home: the two boys come home from school complaining that they are STARVING- for various reasons, but the number one annoying reason to me is: " I DIDN'T like my lunch Mom!" I do not like to waste time, or food, so I had to put a stop to the complaints and came up with an order form system for my kids.
I got a magnetic white board (in the dollar bin at Target). Each Sunday night, I write down the menu choices for the week, based on what we have available. I set the board on the table and the kids fill out their forms for the week. (Great to keep them busy while I'm making dinner Sunday night).
I went into power point, and made a strip of order forms with five boxes, one for each day of the week. The kids can choose their lunch, a dessert, and their fruit of choice. This way, if they come home complaining about their lunch, it all falls back on them, because that's what THEY chose.
This also saves me time because I am no longer stuck in the kitchen wondering "what should I pack today?". I can make better use of my time now, like drinking my coffee while it's hot!
An added bonus: Writing and reading practice!
Fast forward to the kids coming home: the two boys come home from school complaining that they are STARVING- for various reasons, but the number one annoying reason to me is: " I DIDN'T like my lunch Mom!" I do not like to waste time, or food, so I had to put a stop to the complaints and came up with an order form system for my kids.
I got a magnetic white board (in the dollar bin at Target). Each Sunday night, I write down the menu choices for the week, based on what we have available. I set the board on the table and the kids fill out their forms for the week. (Great to keep them busy while I'm making dinner Sunday night).
I went into power point, and made a strip of order forms with five boxes, one for each day of the week. The kids can choose their lunch, a dessert, and their fruit of choice. This way, if they come home complaining about their lunch, it all falls back on them, because that's what THEY chose.
An added bonus: Writing and reading practice!
Saturday, January 28, 2012
Kid Friendly Letter Writing Center
This has been on my "to do list" for over three years now. We have always lived apart from our families, and I thought having a special place set up for the kids to write letters to their family and friends that live far away was essential.
I have always been a letter writer. I have so much stationery that I could probably write a letter a day to everyone I know for a year and still not be out of it. We rarely buy cards. I encourage the kids to make their own, so for the little ones that can't spell yet, I am constantly telling them what to write and how to spell it.
Last year, when shopping for homeschool stuff, one of the main things I wanted to buy for my second grader was a book of letter writing etiquette. I searched online and went into a few teaching stores, and such an item was not available. I had the idea to make my own basic templates, but never sat down to do it.
I am currently taking an e-course at Playful Learning Spaces to help me create playful spaces for my kids throughout the house and as a major motivator to unpack. My first week was very successful because it motivated me to finally create this letter writing center for the kids. About two weeks ago, I saw a similar idea on pinkandgreenmama blog, which made me want to make mine even more.
The idea is to create places the are fun and inviting to the kids where they want to sit and create. This is great because they have all the things they need to do it on their own, while I'm cooking dinner or changing the baby ;)
In the letter writing center, I included normal and very small sized notecards. The very small ones are for our Valentine's mailboxes that I posted about earlier in the week. The kids are SOOO excited to use them and get mail. The normal ones are for sending to family and friends. We love getting mail, but so do other people- sometimes if you want to get mail, you've got to send it. We love supporting the US Postal Service because we have a lot of family members (a lot) that work for them !
Here's a quick tour:
In the top left, I hung a calendar, family and friend's birthdays are marked down so the kids can decide if they want to send someone a card.
I used a five drawer organizer that I had from homeschooling, you can get them at Target, Michael's, JoAnn's for around $12. I used adhesive velcro to attach the labels to the drawers.
Here's a close up of some of the drawers:
Stickers- we use them to decorate homemade cards and the outsides of envelopes. For the time of year, I only put out Valentine's and Birthday stickers:
Mini notecards:
The top drawer houses our Addresses. I created a 4x2 table in power point and put a picture and the name of the people in the picture in each grid. After I printed the pictures, I turned the paper over and printed the addresses on the backs. (If you do this, when creating the tables, whoever is on the right in the picture table, their address would be typed in on the left in the address table, remember it will print on the opposite side when printing on the back).
I cut the pictures out and laminated them. I placed them all in the top drawer, now readers and non-readers can identify who they want to write to. There are family and friends new and old included.
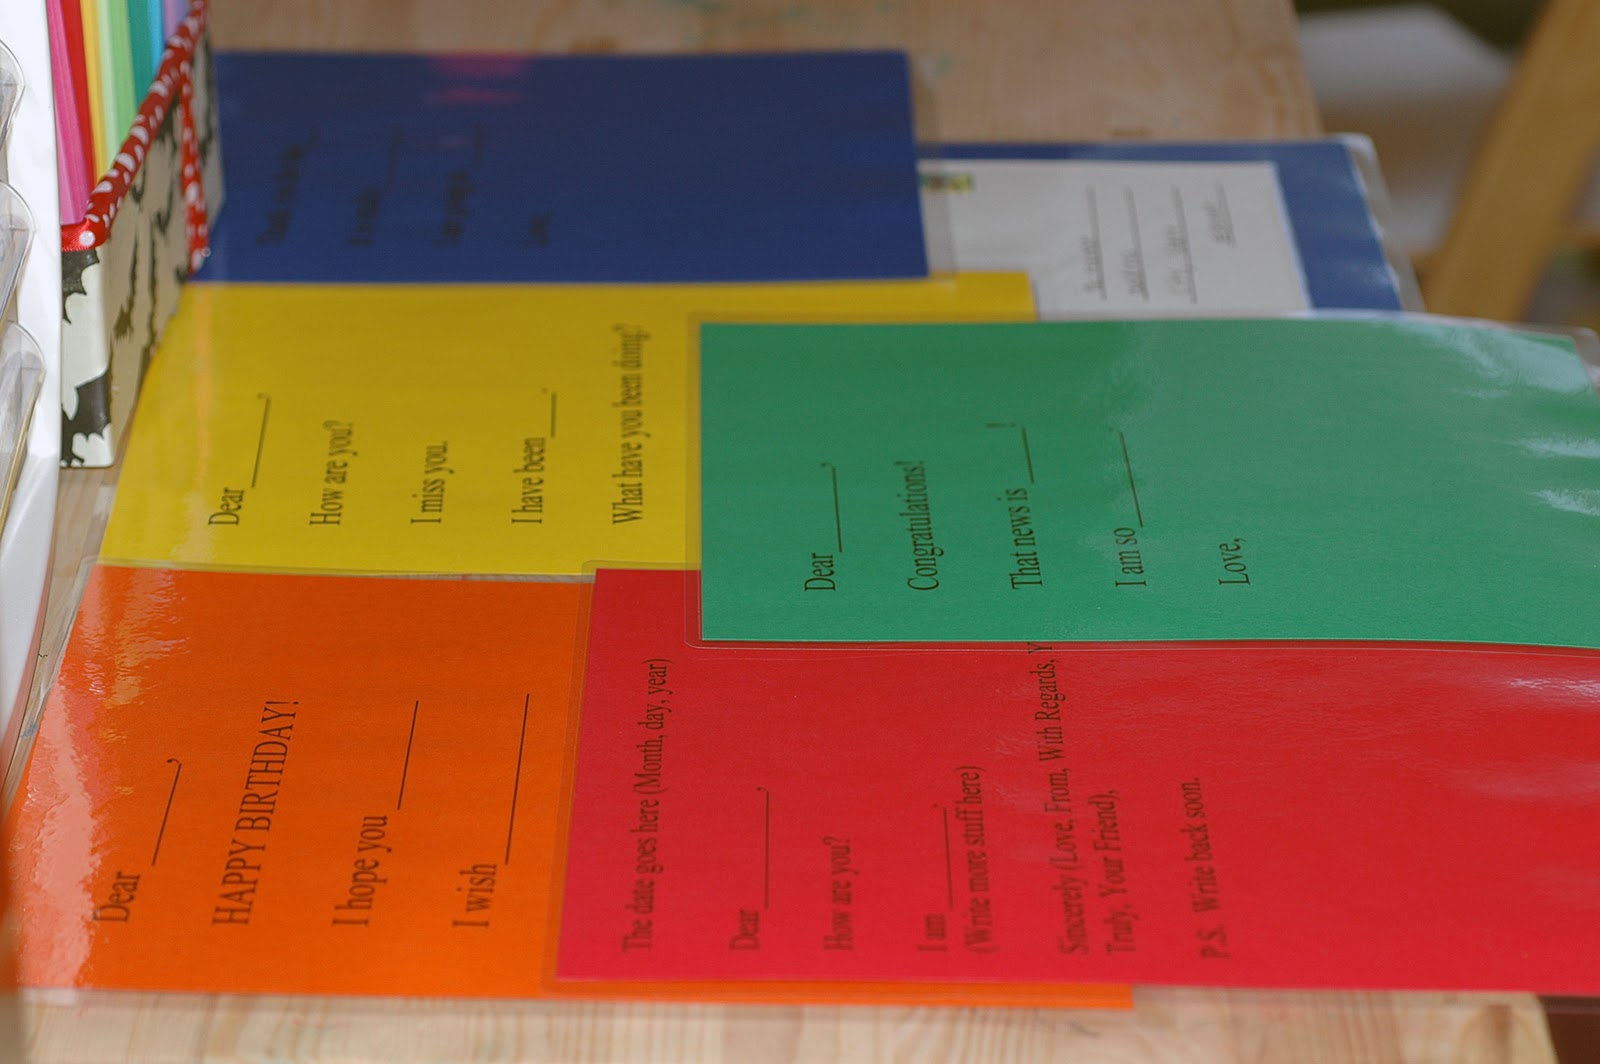
On the top of the organizer, I put laminated letter writing templates. Sorry about the shot, I tried to rotate it and it was making me sick to look at it. I didn't have time to take another photo. There are templates for birthday, thank you, miss you, congratulations, and a general letter.
An envelope guide:
A caddy full of writing and coloring supplies:
A box full of pretty blank cards. We reused a cardboard box that our garbage bags came in to make this from scrapbook paper and ribbon.
The front white cards are homemade from my kids' artwork. I scan in the pictures, save them as jpeg, then I paste them into power point to make the cards. In the bottom right hand corner of each, it says "from the desk of...." The kids have been eyeballing these all week! (These would also make great homemade gifts!)
Under the table where the writing center is, I put a basket of books about mail:
Dear Mrs. LaRue
Millie Waits for the Mail
The Jolly Postman
Click Clack Moo, Cows that Type
The Post Office Book
I hope this inspires you to create something great in your house too.
I have always been a letter writer. I have so much stationery that I could probably write a letter a day to everyone I know for a year and still not be out of it. We rarely buy cards. I encourage the kids to make their own, so for the little ones that can't spell yet, I am constantly telling them what to write and how to spell it.
Last year, when shopping for homeschool stuff, one of the main things I wanted to buy for my second grader was a book of letter writing etiquette. I searched online and went into a few teaching stores, and such an item was not available. I had the idea to make my own basic templates, but never sat down to do it.
I am currently taking an e-course at Playful Learning Spaces to help me create playful spaces for my kids throughout the house and as a major motivator to unpack. My first week was very successful because it motivated me to finally create this letter writing center for the kids. About two weeks ago, I saw a similar idea on pinkandgreenmama blog, which made me want to make mine even more.
The idea is to create places the are fun and inviting to the kids where they want to sit and create. This is great because they have all the things they need to do it on their own, while I'm cooking dinner or changing the baby ;)
In the letter writing center, I included normal and very small sized notecards. The very small ones are for our Valentine's mailboxes that I posted about earlier in the week. The kids are SOOO excited to use them and get mail. The normal ones are for sending to family and friends. We love getting mail, but so do other people- sometimes if you want to get mail, you've got to send it. We love supporting the US Postal Service because we have a lot of family members (a lot) that work for them !
Here's a quick tour:
In the top left, I hung a calendar, family and friend's birthdays are marked down so the kids can decide if they want to send someone a card.
I used a five drawer organizer that I had from homeschooling, you can get them at Target, Michael's, JoAnn's for around $12. I used adhesive velcro to attach the labels to the drawers.
Here's a close up of some of the drawers:
Stickers- we use them to decorate homemade cards and the outsides of envelopes. For the time of year, I only put out Valentine's and Birthday stickers:
Mini notecards:
The top drawer houses our Addresses. I created a 4x2 table in power point and put a picture and the name of the people in the picture in each grid. After I printed the pictures, I turned the paper over and printed the addresses on the backs. (If you do this, when creating the tables, whoever is on the right in the picture table, their address would be typed in on the left in the address table, remember it will print on the opposite side when printing on the back).
I cut the pictures out and laminated them. I placed them all in the top drawer, now readers and non-readers can identify who they want to write to. There are family and friends new and old included.
On the top of the organizer, I put laminated letter writing templates. Sorry about the shot, I tried to rotate it and it was making me sick to look at it. I didn't have time to take another photo. There are templates for birthday, thank you, miss you, congratulations, and a general letter.
An envelope guide:
A caddy full of writing and coloring supplies:
A box full of pretty blank cards. We reused a cardboard box that our garbage bags came in to make this from scrapbook paper and ribbon.
The front white cards are homemade from my kids' artwork. I scan in the pictures, save them as jpeg, then I paste them into power point to make the cards. In the bottom right hand corner of each, it says "from the desk of...." The kids have been eyeballing these all week! (These would also make great homemade gifts!)
Under the table where the writing center is, I put a basket of books about mail:
Dear Mrs. LaRue
Millie Waits for the Mail
The Jolly Postman
Click Clack Moo, Cows that Type
The Post Office Book
I hope this inspires you to create something great in your house too.
Labels:
creative play,
do it yourself,
homemade gift idea,
homeschool,
learning,
writing
Thursday, January 26, 2012
DIY Valentine's Mailboxes
About a month ago, I began to have Valentine's Day on the brain. I went crazy pinning stuff on my pinterest board that I wanted to make. One thing in particular was these Valentine's mailboxes.
Um, who doesn't love opening up the mailbox and finding a crisp envelope - preferably a colored envelope, with a real stamp on it, and handwritten addressed to you? OK, I sound desperate, but sorry, it's sad getting so much junk mail and catalogs and nothing fun.
If the mail isn't coming to us, we'll send it to ourselves for now. So, the day after I pinned them, I went to Target dollar bin and bought 7 mailboxes. I didn't have much choice in the colors, all they had was turquoise and white ones.
The next day, we went to Goodwill and for the first time, instead of dropping stuff off, we went in. We got seven candle sticks for $0.99 each!
I let Hazel choose the paint colors, and just like I would have, she chose rainbow colors.
She painted all the candle sticks by herself, it took about two weeks to finish - we've been busy. We did all surfaces, wood, metal, and glass with the acrylic paints we had- we did not sand or prime any of them.
I hot glued all the mailboxes onto the stands.
I cut out letters for their initials out of the scrapbooking paper that I've had laying around for 8 years, thinking it'll actually make it into an album - chuckle! In my perfect world, I would have done all solids- doesn't this one look so nice?
But they are for the kids, so I let them choose which paper they wanted me to use.
Except dad, I chose his ;)
There have been many communal gatherings around these lately, wondering when we can use them. I think I have created a monster here.
When will I open mine and find something inside?
Send my kids some mail already!
This project has motivated me to finish something I've wanted to do for the kids for the past three years. Stay tuned tomorrow to see the new Letter Center I made for the kids.
Um, who doesn't love opening up the mailbox and finding a crisp envelope - preferably a colored envelope, with a real stamp on it, and handwritten addressed to you? OK, I sound desperate, but sorry, it's sad getting so much junk mail and catalogs and nothing fun.
If the mail isn't coming to us, we'll send it to ourselves for now. So, the day after I pinned them, I went to Target dollar bin and bought 7 mailboxes. I didn't have much choice in the colors, all they had was turquoise and white ones.
The next day, we went to Goodwill and for the first time, instead of dropping stuff off, we went in. We got seven candle sticks for $0.99 each!
I let Hazel choose the paint colors, and just like I would have, she chose rainbow colors.
She painted all the candle sticks by herself, it took about two weeks to finish - we've been busy. We did all surfaces, wood, metal, and glass with the acrylic paints we had- we did not sand or prime any of them.
I hot glued all the mailboxes onto the stands.
I cut out letters for their initials out of the scrapbooking paper that I've had laying around for 8 years, thinking it'll actually make it into an album - chuckle! In my perfect world, I would have done all solids- doesn't this one look so nice?
But they are for the kids, so I let them choose which paper they wanted me to use.
Except dad, I chose his ;)
There have been many communal gatherings around these lately, wondering when we can use them. I think I have created a monster here.
When will I open mine and find something inside?
Send my kids some mail already!
Tuesday, January 24, 2012
Gratitude Journals
The other day I was talking with some friends about whether or not our kids really appreciate things they have. One friend suggested starting a gratitude journal. I thought that would be an excellent activity for my kids. As soon as I left the house, I went straight to Barnes and Noble to look for some cool journals.
All the day planners and calendars are 75% off right now! Hello!, can they be more perfect, there's a space for every single day of the year, most of them even have lines.
Here's the idea: each night, to keep the kids occupied while I'm getting dinner on the table, they will write two things from the day that they are thankful for. I even got one for Dave and I. Not only is this giving them an opportunity to really think about things large and small that they might be thankful for, it helps them practice writing, it is a conversation starter when they read them aloud at dinner, and it gives me a little peace while I'm getting the food out.
Actually, yesterday I was also challenged by another friend to really listen to people and figure out what they need without just assuming you know. Seeing what they are thankful for versus what I think they should be will be an interesting way for me to learn more about my family.
Last summer, I started the name journals with my kids. These would also make excellent journals for practicing name and phone number writing on a daily basis. For the price I paid, you can't beat it. If you miss them this year, write yourself a note to hit up the sale next year.
Hazel is the most excited about hers. It came with a bookmark, stickers, note paper, and photo pockets. She was absolutely thrilled (and I love the Japanese theme):
I write the words, then she copies:
Nathaniel is very interested in elements, could this be more perfect? A different element a day:
Addison can write in sentences:
and Owen is almost there:
And today I'm thankful for a caring and helpful husband and five healthy kids. What about you?
All the day planners and calendars are 75% off right now! Hello!, can they be more perfect, there's a space for every single day of the year, most of them even have lines.
Here's the idea: each night, to keep the kids occupied while I'm getting dinner on the table, they will write two things from the day that they are thankful for. I even got one for Dave and I. Not only is this giving them an opportunity to really think about things large and small that they might be thankful for, it helps them practice writing, it is a conversation starter when they read them aloud at dinner, and it gives me a little peace while I'm getting the food out.
Actually, yesterday I was also challenged by another friend to really listen to people and figure out what they need without just assuming you know. Seeing what they are thankful for versus what I think they should be will be an interesting way for me to learn more about my family.
Last summer, I started the name journals with my kids. These would also make excellent journals for practicing name and phone number writing on a daily basis. For the price I paid, you can't beat it. If you miss them this year, write yourself a note to hit up the sale next year.
Hazel is the most excited about hers. It came with a bookmark, stickers, note paper, and photo pockets. She was absolutely thrilled (and I love the Japanese theme):
I write the words, then she copies:
Nathaniel is very interested in elements, could this be more perfect? A different element a day:
Addison can write in sentences:
and Owen is almost there:
And today I'm thankful for a caring and helpful husband and five healthy kids. What about you?
Tuesday, January 3, 2012
Family Survey of 2011
I was searching around on the internet the other day, trying to find something fun to do with the kids on New Year's Eve. I always start with the Crafty Crow, since it's packed with lots of ideas and has links to many great blogs on the side bar. Sure enough, I found something on Teach Mama, via the Crafty Crow, that I thought was just perfect for a new family New Year's Eve tradition: filling out a survey about our year.
I typed up a sheet full of questions and printed out seven copies, yes- I filled one out for Maeve too (her New Year's Resolution is to sleep through the night - every night!). After dinner, we sat at the table and filled out our answers. Then, one by one, we went around the table and said our answers out loud to each question. It was fun to hear the different answers and to see how they were different from what I predicted from everyone.
I am punching holes in these and storing them in a three ring binder labelled New Year's family surveys. Each year, I will add a new tab, with the year on it, and put our new papers in. It will be fun to see how each person's answers will change, how the handwriting will change, how different our resolutions will become, how personalities start to develop.
Here is a sample of one of my favorite's for the year, Owen's. I love that he wants to be SANTA when he grows up:
I also love the zebra he drew. I added the drawing of their favorite animal on the back, because I love to save copies of my kids' drawings.
Hazel's was fun too, she's just learning how to write, so it will be neat to compare to next year, to see if she can do it all on her own (she had help from Owen and me too).
It's not too late to do a survey of your own. What questions can you ask that will be interesting to learn about every year?
I typed up a sheet full of questions and printed out seven copies, yes- I filled one out for Maeve too (her New Year's Resolution is to sleep through the night - every night!). After dinner, we sat at the table and filled out our answers. Then, one by one, we went around the table and said our answers out loud to each question. It was fun to hear the different answers and to see how they were different from what I predicted from everyone.
I am punching holes in these and storing them in a three ring binder labelled New Year's family surveys. Each year, I will add a new tab, with the year on it, and put our new papers in. It will be fun to see how each person's answers will change, how the handwriting will change, how different our resolutions will become, how personalities start to develop.
Here is a sample of one of my favorite's for the year, Owen's. I love that he wants to be SANTA when he grows up:
I also love the zebra he drew. I added the drawing of their favorite animal on the back, because I love to save copies of my kids' drawings.
Hazel's was fun too, she's just learning how to write, so it will be neat to compare to next year, to see if she can do it all on her own (she had help from Owen and me too).
It's not too late to do a survey of your own. What questions can you ask that will be interesting to learn about every year?
Thursday, July 21, 2011
Busy Playing and Learning: Fun at the Beach
Today's way to beat the heat was a trip to the beach. If you aren't lucky enough to live in a coastal state, you could always visit a pond, lake, or river nearby. With temperatures upwards of 90', the ocean breeze and water was a perfect way to spend the day.
Most of the times at the beach, we dig holes and build sand castles. Today, we skipped the sand castle building and instead drew pictures and practiced writing.
You can use your finger:
Or be creative with a sea gull feather (it was the first time my nephew was ever excited to write- I foreshadow tons of feather pens making their way into my sister's house):
You can use your hand as an "eraser":
We skipped the name books today and went straight for the sand:
I drew the ABC's and had the kids fill the letters in with rocks (we didn't get to the end before the tide rolled in):
Nathaniel was very excited to have lots of space to draw his room filled with 1,000,000 video games and lots of prizes and he was even more excited to explain it to me- in fact, he told me it was the most fun he's had at the beach all year.
You can play dress up at the beach too ;)
And of course, there was lots of swimming and wave hopping:
Something else I thought of (on the way home of course) was to use rocks to create life sized dot to dots for your child to trace - how fun would that be?
Most of the times at the beach, we dig holes and build sand castles. Today, we skipped the sand castle building and instead drew pictures and practiced writing.
You can use your finger:
Or be creative with a sea gull feather (it was the first time my nephew was ever excited to write- I foreshadow tons of feather pens making their way into my sister's house):
You can use your hand as an "eraser":
We skipped the name books today and went straight for the sand:
I drew the ABC's and had the kids fill the letters in with rocks (we didn't get to the end before the tide rolled in):
Nathaniel was very excited to have lots of space to draw his room filled with 1,000,000 video games and lots of prizes and he was even more excited to explain it to me- in fact, he told me it was the most fun he's had at the beach all year.
You can play dress up at the beach too ;)
And of course, there was lots of swimming and wave hopping:
Something else I thought of (on the way home of course) was to use rocks to create life sized dot to dots for your child to trace - how fun would that be?
Saturday, July 2, 2011
Busy Learning: Name Book Journals
I'm participating in Smart Summer Challenge and one of the blogs I discovered from it is Teachmama. I love her simple ideas! I've had simple ideas, but never wrote about them before because I thought they were too simple. It is really nice to see them written out and with pictures- it helps motivate me to want to do them, and I hope I help you want to do them too.
This name book is such a great idea and is something very simple to do with your child every day! I went to the store, bought a blank journal for each of my kids and had them write their names on the front:
Then, I told them that everyday, they would open to the next page and practice writing their name, birthday, and my cell phone number. Going through security one time, my youngest son was asked his birthday, and he couldn't recall the year, so I feel like this is important information. My hope is that by writing these three things every day, by the end of the summer, it will be committed to memory.
When we lived in Japan, my son's teachers had all the kids' names written on small strips with their mom's cell phone numbers under them in the writing station. My son would come home with about ten each week and guess what?, he knew my number and sometimes I wasn't even that sure of it (11 digit number over there!). Lately, my two youngest kids have been humming a commercial 1800 (xxx) LUNA, and they asked me can they call it and one day, I caught my 3 year old trying to dial the number. They had no idea what it was for, but the TV told them. So, I hope by the end of the summer, they will all know my cell phone (and my two oldest will also be writing my husband's)- in case of emergency, you just never know.
Speaking of the LUNA commercial, sometimes when we are driving in the car, I sing my cell phone number to my kids to the tune of the song that is my cell phone ring tone. I think that is beginning to catch on too.
For my three year old, I wrote her name across the top in capital letters. She can write one or two, which is fine by me, the rest, she draws circles. I didn't write her birthday or my phone number.
For my five year old, I wrote his name, birthday, and my phone number. He is practicing properly forming/sizing his letters and using lower case when needed:
For my six year old, I had to spell out his birthday month, February, but besides that, he could do it all himself. He is working on using lower case letters when necessary, writing the letters the proper size, and allowing for the proper amount of space to fit the word on the line.
For my seven year old, he is just trying to write neatly and will be using cursive by the end of the summer.
For the six and seven year old, I might change it up a bit a few days a week and say write it in rainbow letters, write your name in the shape of a question mark, write it in a spiral, or use only one specific color.
We are keeping all of the books on the floor under our tiny table, so they are easily accessible. They are free to doodle or draw at the bottom of the page after they finished their writing for the day.
Happy writing!
This name book is such a great idea and is something very simple to do with your child every day! I went to the store, bought a blank journal for each of my kids and had them write their names on the front:
Then, I told them that everyday, they would open to the next page and practice writing their name, birthday, and my cell phone number. Going through security one time, my youngest son was asked his birthday, and he couldn't recall the year, so I feel like this is important information. My hope is that by writing these three things every day, by the end of the summer, it will be committed to memory.
When we lived in Japan, my son's teachers had all the kids' names written on small strips with their mom's cell phone numbers under them in the writing station. My son would come home with about ten each week and guess what?, he knew my number and sometimes I wasn't even that sure of it (11 digit number over there!). Lately, my two youngest kids have been humming a commercial 1800 (xxx) LUNA, and they asked me can they call it and one day, I caught my 3 year old trying to dial the number. They had no idea what it was for, but the TV told them. So, I hope by the end of the summer, they will all know my cell phone (and my two oldest will also be writing my husband's)- in case of emergency, you just never know.
Speaking of the LUNA commercial, sometimes when we are driving in the car, I sing my cell phone number to my kids to the tune of the song that is my cell phone ring tone. I think that is beginning to catch on too.
For my three year old, I wrote her name across the top in capital letters. She can write one or two, which is fine by me, the rest, she draws circles. I didn't write her birthday or my phone number.
For my five year old, I wrote his name, birthday, and my phone number. He is practicing properly forming/sizing his letters and using lower case when needed:
For my six year old, I had to spell out his birthday month, February, but besides that, he could do it all himself. He is working on using lower case letters when necessary, writing the letters the proper size, and allowing for the proper amount of space to fit the word on the line.
For my seven year old, he is just trying to write neatly and will be using cursive by the end of the summer.
For the six and seven year old, I might change it up a bit a few days a week and say write it in rainbow letters, write your name in the shape of a question mark, write it in a spiral, or use only one specific color.
We are keeping all of the books on the floor under our tiny table, so they are easily accessible. They are free to doodle or draw at the bottom of the page after they finished their writing for the day.
Happy writing!
Subscribe to:
Posts (Atom)