My son loves cars, especially police cars! When trying to decide what to do for his school Valentine's, it wasn't hard to guess it would have to do with cars.
The one challenge was he wanted to give Peppermint Patties as a treat with his Valentine's cards.
This is what I came up with:
We got the pj's at BabyGap last summer (I've seen similar ones at many stores). The hat is part of our dress up collection. I had him point to me like he was going to arrest me.
The police car is from another picture that I cut and pasted in using photoshop, which if you don't have it, you should be able to download a free 30-day trial and I know a lot of people use picnic.com to do photo editing. I printed them as 4x6 pictures at Walmart 1 hour photo.
I used an exacto knife to cut a line across the top of the police car (I left about 1/2 inch at the edge of the card).
I cut out red rectangles, 2.5" by 3.5" and attached them to the back of the card to create a pocket. I found stapling to the bottom, and taping to the top right corner worked best.
I flipped the card around, slipped a Valentine's Peppermint Patty into the slot, then closed the right side of the card with a small piece of tape.
If you look closely at this picture, you can see in the front card, on his arm on the right, there is a tiny heart punched out. I had a mini heart punch and I wanted to punch out a heart (you stole my heart), but the punch didn't reach far enough in to his chest and I didn't want to wrinkle the card.
I totally love how these cards turned out and I think I'm going to arrest him if he doesn't put this picture on a mug for me for my birthday ;)
Showing posts with label valentines day. Show all posts
Sunday, February 12, 2012
Friday, February 10, 2012
Cherry M+M Chocolate Cupcakes with Cherry Vanilla Bean Icing
Two weeks ago, I went to the store and just happened to end up in the Valentine's aisle. I found cherry M+M's (and raspberry ones too)- have you noticed the weird seasonal varieties of M+M's that are on the rise around your stores too? It reminds me of the Japan and their weird flavors of Kit Kats (green tea, corn, and potato to name a few).
I decided to buy them. For some reason, I love buying cherry flavored stuff, but I don't eat cherries. It was love at first bite. They are good to eat on their own, but add a nice zing to a chocolate cupcake.
Did you know that February is National Cherry Month? Well, now you do, so go on, make something cherry today.
Source: Chocolate cupcakes adapted from Martha Stewart Cupcakes, icing- my own recipe
Oven: 350
Chocolate Cupcakes:
1/4 cup + 1/8 cup cocoa powder
1/4 cup + 1/8 cup hot water
1 1/2 cups flour
1/2 tsp baking soda
1/2 tsp baking powder
1/2 tsp sea or kosher salt
3/4 cup ( 1 1/2 sticks) unsalted butter
1 1/8 cup sugar
2 eggs
2 1/2 tsp vanilla
1/2 cup sour cream
1 1/2 cups cherry M+M's
Icing:
10 TBSP unsalted butter
4 1/2 cups confectioner's sugar
1 1/2 tsp cherry extract (you can use maraschino cherry juice if you can't find the extract)
1 vanilla bean, split and scraped
3-5 TBSP milk
1) Preheat oven to 350. Prepare cupcake pans with liners.
2) In small bowl, whisk together hot water and cocoa powder until smooth, set aside.
3) In another small bowl, whisk together flour, baking soda, baking powder, and salt- set aside.
4) Melt butter and sugar in saucepan, until combined. Place in bowl of mixer with paddle attachment. Beat on medium-low until cool, about 4-5 minutes.
5) Add eggs to sugar mixture, one at a time. Scrape down sides.
6) Add vanilla to sugar mixture. Then, add chocolate, scrape down sides, mix.
7) With mixer on low, add half of the flour mixture, then half of the sour cream, scrape down sides. Add the remaining flour mixture and then remaining sour cream. Scrape down sides, mix once more. Fold in the M+M's.
8) Fill cupcake liners about 2/3 full of batter. Bake 18-22 minutes for large cupcakes, 14-17 minutes for mini cupcakes. Rotate the pans 180' halfway through cooking. Cupcakes are done when a toothpick inserted in the center comes out clean.
For the icing:
1) Cut butter into 1 TBSP sized squares. Place in bowl of mixer and beat. Add 1 cup confecioner's sugar, mix, make a paste.
2) Add in vanilla bean and cherry extract.
3) Mix in 1 more cup confectioner's sugar, scrape down sides.
4) Add 1 TBSP milk and 1 more cup confectioner's sugar, beat on medium.
5) Add 1 TBSP milk and 1 more cup confectioner's sugar. Scrape down sides, beat again. Try the icing, you may need to add 1/2-1 cup more confectioner's sugar for taste, and 1 or 2 more TBSP milk for consistency. You want it to be thick enough to hold it's shape, but thin and fluffy enough to work with when piping it on top of the cupcakes. Beat additional 2-3 minutes before using, this will help get it nice and fluffy
6) Pipe icing onto cupcakes, dot tops with a cherry m+m or two.
Happy National Cherry Month!
I decided to buy them. For some reason, I love buying cherry flavored stuff, but I don't eat cherries. It was love at first bite. They are good to eat on their own, but add a nice zing to a chocolate cupcake.
Did you know that February is National Cherry Month? Well, now you do, so go on, make something cherry today.
Source: Chocolate cupcakes adapted from Martha Stewart Cupcakes, icing- my own recipe
Oven: 350
Chocolate Cupcakes:
1/4 cup + 1/8 cup cocoa powder
1/4 cup + 1/8 cup hot water
1 1/2 cups flour
1/2 tsp baking soda
1/2 tsp baking powder
1/2 tsp sea or kosher salt
3/4 cup ( 1 1/2 sticks) unsalted butter
1 1/8 cup sugar
2 eggs
2 1/2 tsp vanilla
1/2 cup sour cream
1 1/2 cups cherry M+M's
Icing:
10 TBSP unsalted butter
4 1/2 cups confectioner's sugar
1 1/2 tsp cherry extract (you can use maraschino cherry juice if you can't find the extract)
1 vanilla bean, split and scraped
3-5 TBSP milk
1) Preheat oven to 350. Prepare cupcake pans with liners.
2) In small bowl, whisk together hot water and cocoa powder until smooth, set aside.
3) In another small bowl, whisk together flour, baking soda, baking powder, and salt- set aside.
4) Melt butter and sugar in saucepan, until combined. Place in bowl of mixer with paddle attachment. Beat on medium-low until cool, about 4-5 minutes.
5) Add eggs to sugar mixture, one at a time. Scrape down sides.
6) Add vanilla to sugar mixture. Then, add chocolate, scrape down sides, mix.
7) With mixer on low, add half of the flour mixture, then half of the sour cream, scrape down sides. Add the remaining flour mixture and then remaining sour cream. Scrape down sides, mix once more. Fold in the M+M's.
8) Fill cupcake liners about 2/3 full of batter. Bake 18-22 minutes for large cupcakes, 14-17 minutes for mini cupcakes. Rotate the pans 180' halfway through cooking. Cupcakes are done when a toothpick inserted in the center comes out clean.
For the icing:
1) Cut butter into 1 TBSP sized squares. Place in bowl of mixer and beat. Add 1 cup confecioner's sugar, mix, make a paste.
2) Add in vanilla bean and cherry extract.
3) Mix in 1 more cup confectioner's sugar, scrape down sides.
4) Add 1 TBSP milk and 1 more cup confectioner's sugar, beat on medium.
5) Add 1 TBSP milk and 1 more cup confectioner's sugar. Scrape down sides, beat again. Try the icing, you may need to add 1/2-1 cup more confectioner's sugar for taste, and 1 or 2 more TBSP milk for consistency. You want it to be thick enough to hold it's shape, but thin and fluffy enough to work with when piping it on top of the cupcakes. Beat additional 2-3 minutes before using, this will help get it nice and fluffy
6) Pipe icing onto cupcakes, dot tops with a cherry m+m or two.
Happy National Cherry Month!
Thursday, February 2, 2012
DIY Homemade Little Debbie Be My Valentine's Cakes
Yay, it's February, bring on the heart related stuff!
I may have a slight obsession with hearts- my birthday is on Valentine's Day, do you blame me?
The downfall of the heart obsession is my weakness for Little Debbie Be My Valentine cakes. When I lived in Japan, I would get so excited to receive a box of them as a birthday gift from home.
I have been thinking about attempting to make a homemade version for quite some time now. Yesterday, I had three sick kids, so there wasn't a whole lot going on around here, so I finally made them!
The Little Debbie cakes have become quite a favorite of my oldest son. When I was done, I called him over to show him them. His response : "Wow Mom, they look really good, but um don't you think it kind of makes you look like a copy cat?" Ha ha. After eating them, he decided mine were really delicious and he likes them better.
The pink chocolate doesn't taste quite the same as Little Debbie's, but homemade is always better- you know what ingredients you put in. I searched for a recipe to follow, and I found one of a homemade zebra cake, so I used the filling recipe only from Confessions of a Cookbook Queen.
Be My Valentine Cakes:
Cake- use your favorite vanilla cake recipe (box or from scratch)- I used this one, but I only used half batch
Filling:
1/4 cup shortening (crisco)
1/8 cup marshmallow fluff
1/4 tsp vanilla
1/2 cup confectioner's sugar
1-2 TBSP half and half
Shell:
1 14 oz bag pink melting chocolates
1/4 cup white chocolate chips
canola oil
1) Preheat oven to 350' for cake. Make cake according to recipe you are using. Grease and flour a rimmed cookie sheet (2 if using a full cake batch). ( I made half batch of the cake recipe, so the filling amounts and shell amounts shown are for a half batch of cake. If using a boxed cake, you need to double the filling and shell amounts).
2) Spread cake batter into cookie sheet. Bake for 12-14 minutes, until toothpick inserted in center comes out clean.
3) Let cake cool completely. While it is cooling, prepare the filling.
4) For the filling, mix together the shortening, fluff, and vanilla. Add confectioner's sugar and beat until combined. Add in half and half, beat until light and fluffy. If necessary, add in a tiny bit more half and half.
5) Using a heart shaped cookie cutter, cut heart shaped pieces of cake and set them on a platter. Try to cut an even number of shapes.
6) Once cooled, spread filling on tops of half of the hearts. Place remaining hearts on top to create a "sandwich". Set the filled hearts on a platter and place in the refrigerator for about 20 minutes.
7) Place the pink chocolates in a microwave safe bowl. Microwave for 20 seconds, stir, repeat, until chocolate is melted and smooth. Add a few teaspoons of oil - I used canola- to thin it out and make it appear smoother when dipping the hearts.
8) Remove heart cakes from the refrigerator. Place a heart in the bowl of melted chocolate, using a spoon, pour the chocolate over the top of the heart and let it run down the sides. Smooth it with the back of the spoon. Using a fork, lift the heart from the bottom, and take it out of the bowl, hold it in the air for a moment to let chocolate drip off. Place the cake on waxed or parchment paper to let the chocolate harden. (If during the process, the chocolate begins to harden in the bowl, remicrowave for 20 seconds, then mix.)
9) When all cakes are coated with pink chocolate, melt the white chocolate chips in the microwave for 20 seconds, then mix, continue until melted and smooth. Place in a ziploc bag with the corner slightly cut off. Squeeze white lines back and forth across the tops of the cakes. Let it harden and enjoy!
Here's a little side by side comparison, which would you choose?
I may have a slight obsession with hearts- my birthday is on Valentine's Day, do you blame me?
The downfall of the heart obsession is my weakness for Little Debbie Be My Valentine cakes. When I lived in Japan, I would get so excited to receive a box of them as a birthday gift from home.
I have been thinking about attempting to make a homemade version for quite some time now. Yesterday, I had three sick kids, so there wasn't a whole lot going on around here, so I finally made them!
The Little Debbie cakes have become quite a favorite of my oldest son. When I was done, I called him over to show him them. His response : "Wow Mom, they look really good, but um don't you think it kind of makes you look like a copy cat?" Ha ha. After eating them, he decided mine were really delicious and he likes them better.
The pink chocolate doesn't taste quite the same as Little Debbie's, but homemade is always better- you know what ingredients you put in. I searched for a recipe to follow, and I found one of a homemade zebra cake, so I used the filling recipe only from Confessions of a Cookbook Queen.
Be My Valentine Cakes:
Cake- use your favorite vanilla cake recipe (box or from scratch)- I used this one, but I only used half batch
Filling:
1/4 cup shortening (crisco)
1/8 cup marshmallow fluff
1/4 tsp vanilla
1/2 cup confectioner's sugar
1-2 TBSP half and half
Shell:
1 14 oz bag pink melting chocolates
1/4 cup white chocolate chips
canola oil
1) Preheat oven to 350' for cake. Make cake according to recipe you are using. Grease and flour a rimmed cookie sheet (2 if using a full cake batch). ( I made half batch of the cake recipe, so the filling amounts and shell amounts shown are for a half batch of cake. If using a boxed cake, you need to double the filling and shell amounts).
2) Spread cake batter into cookie sheet. Bake for 12-14 minutes, until toothpick inserted in center comes out clean.
3) Let cake cool completely. While it is cooling, prepare the filling.
4) For the filling, mix together the shortening, fluff, and vanilla. Add confectioner's sugar and beat until combined. Add in half and half, beat until light and fluffy. If necessary, add in a tiny bit more half and half.
5) Using a heart shaped cookie cutter, cut heart shaped pieces of cake and set them on a platter. Try to cut an even number of shapes.
6) Once cooled, spread filling on tops of half of the hearts. Place remaining hearts on top to create a "sandwich". Set the filled hearts on a platter and place in the refrigerator for about 20 minutes.
7) Place the pink chocolates in a microwave safe bowl. Microwave for 20 seconds, stir, repeat, until chocolate is melted and smooth. Add a few teaspoons of oil - I used canola- to thin it out and make it appear smoother when dipping the hearts.
8) Remove heart cakes from the refrigerator. Place a heart in the bowl of melted chocolate, using a spoon, pour the chocolate over the top of the heart and let it run down the sides. Smooth it with the back of the spoon. Using a fork, lift the heart from the bottom, and take it out of the bowl, hold it in the air for a moment to let chocolate drip off. Place the cake on waxed or parchment paper to let the chocolate harden. (If during the process, the chocolate begins to harden in the bowl, remicrowave for 20 seconds, then mix.)
9) When all cakes are coated with pink chocolate, melt the white chocolate chips in the microwave for 20 seconds, then mix, continue until melted and smooth. Place in a ziploc bag with the corner slightly cut off. Squeeze white lines back and forth across the tops of the cakes. Let it harden and enjoy!
Here's a little side by side comparison, which would you choose?
Thursday, January 26, 2012
DIY Valentine's Mailboxes
About a month ago, I began to have Valentine's Day on the brain. I went crazy pinning stuff on my pinterest board that I wanted to make. One thing in particular was these Valentine's mailboxes.
Um, who doesn't love opening up the mailbox and finding a crisp envelope - preferably a colored envelope, with a real stamp on it, and handwritten addressed to you? OK, I sound desperate, but sorry, it's sad getting so much junk mail and catalogs and nothing fun.
If the mail isn't coming to us, we'll send it to ourselves for now. So, the day after I pinned them, I went to Target dollar bin and bought 7 mailboxes. I didn't have much choice in the colors, all they had was turquoise and white ones.
The next day, we went to Goodwill and for the first time, instead of dropping stuff off, we went in. We got seven candle sticks for $0.99 each!
I let Hazel choose the paint colors, and just like I would have, she chose rainbow colors.
She painted all the candle sticks by herself, it took about two weeks to finish - we've been busy. We did all surfaces, wood, metal, and glass with the acrylic paints we had- we did not sand or prime any of them.
I hot glued all the mailboxes onto the stands.
I cut out letters for their initials out of the scrapbooking paper that I've had laying around for 8 years, thinking it'll actually make it into an album - chuckle! In my perfect world, I would have done all solids- doesn't this one look so nice?
But they are for the kids, so I let them choose which paper they wanted me to use.
Except dad, I chose his ;)
There have been many communal gatherings around these lately, wondering when we can use them. I think I have created a monster here.
When will I open mine and find something inside?
Send my kids some mail already!
This project has motivated me to finish something I've wanted to do for the kids for the past three years. Stay tuned tomorrow to see the new Letter Center I made for the kids.
Um, who doesn't love opening up the mailbox and finding a crisp envelope - preferably a colored envelope, with a real stamp on it, and handwritten addressed to you? OK, I sound desperate, but sorry, it's sad getting so much junk mail and catalogs and nothing fun.
If the mail isn't coming to us, we'll send it to ourselves for now. So, the day after I pinned them, I went to Target dollar bin and bought 7 mailboxes. I didn't have much choice in the colors, all they had was turquoise and white ones.
The next day, we went to Goodwill and for the first time, instead of dropping stuff off, we went in. We got seven candle sticks for $0.99 each!
I let Hazel choose the paint colors, and just like I would have, she chose rainbow colors.
She painted all the candle sticks by herself, it took about two weeks to finish - we've been busy. We did all surfaces, wood, metal, and glass with the acrylic paints we had- we did not sand or prime any of them.
I hot glued all the mailboxes onto the stands.
I cut out letters for their initials out of the scrapbooking paper that I've had laying around for 8 years, thinking it'll actually make it into an album - chuckle! In my perfect world, I would have done all solids- doesn't this one look so nice?
But they are for the kids, so I let them choose which paper they wanted me to use.
Except dad, I chose his ;)
There have been many communal gatherings around these lately, wondering when we can use them. I think I have created a monster here.
When will I open mine and find something inside?
Send my kids some mail already!
Monday, January 16, 2012
Valentine's Handprint Canvas Wallhanging
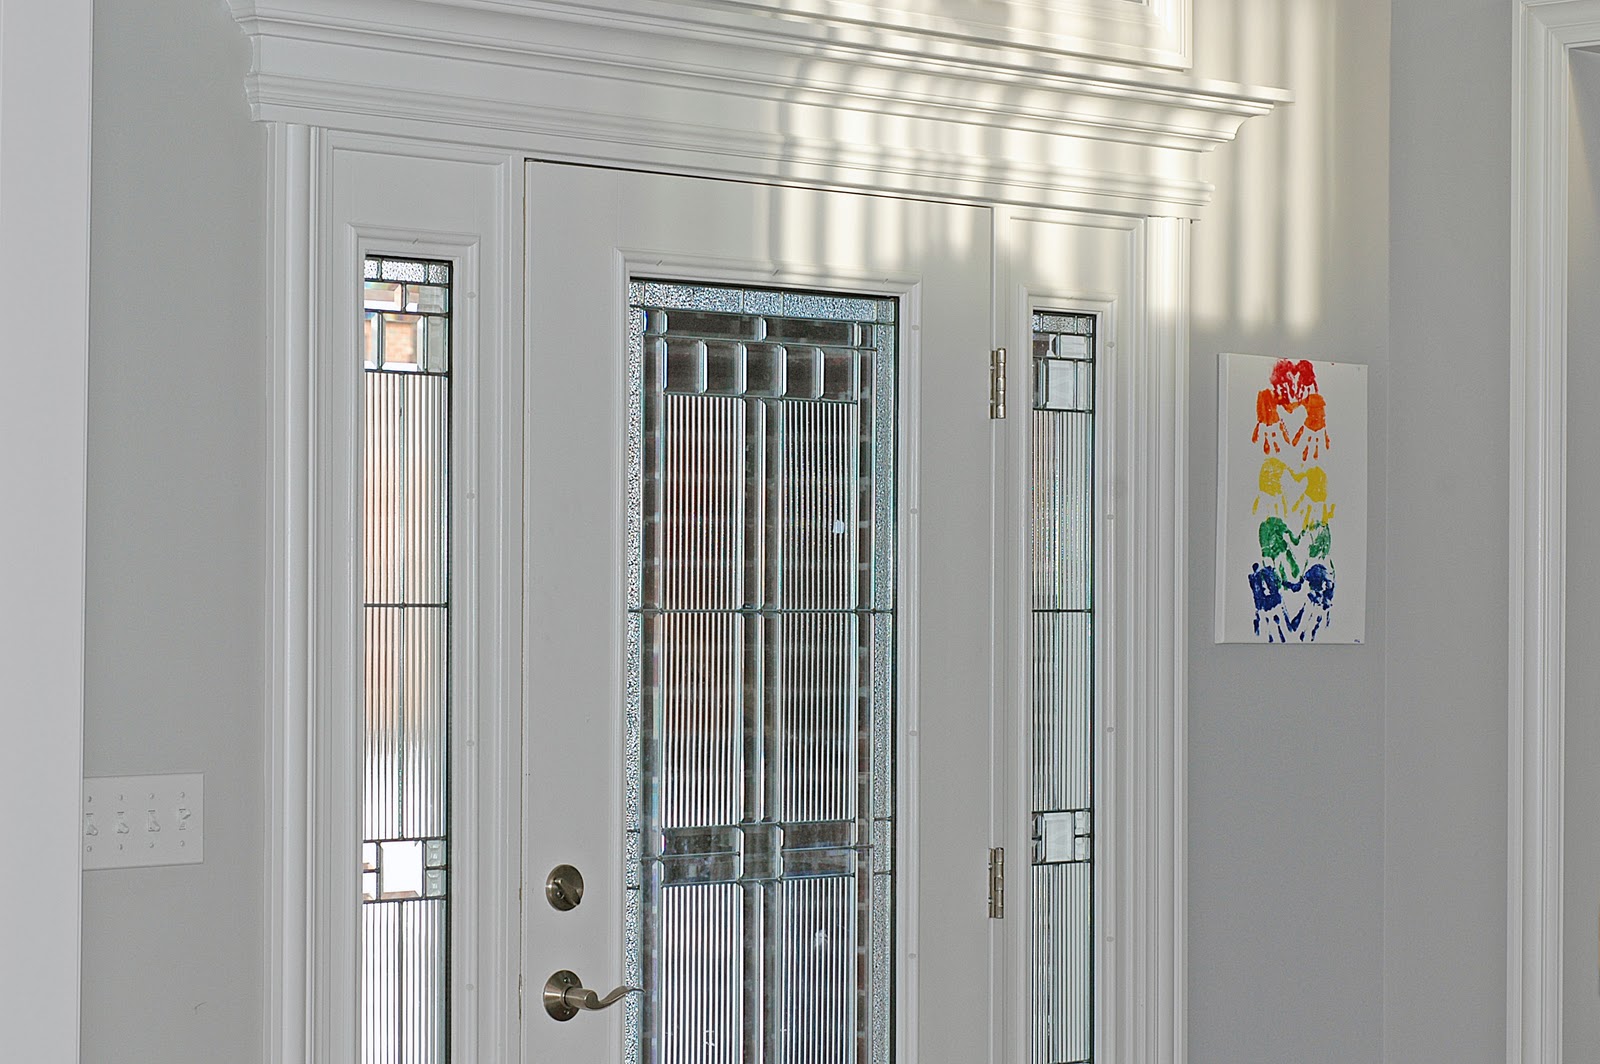
Every year I like to do a craft with a kids that involves their hand prints. I initially bought this canvas to make a handprint Christmas tree wall hanging, but I never got around to taking it out of the bag. My entry way is quite drab, grey paint with white trim- we are slow for hanging up decorations, so I thought a nice bright canvas would make the area more fun and inviting.
Using acrylic paints that I already had, I painted the kids' hands, one at a time and pressed them onto the canvas. You can buy the canvas at Michael's with a 50% off coupon and it's not that expensive.
I started at the top with the baby- holding her fingers slightly spread out and tilted her hand slightly, so that when they were both on, they'd form a heart shape between the thumb and pointer finger, when the hands are upside down.
After everyone's hand prints were on, I used my colored sharpies and wrote their names on the inside of their hearts. I put the year in the bottom right hand corner and hung it up. This was an easy, cheap, and quick way to add some personal touch to our new home.
I love how the color pops in my entryway, I get to look at this everytime I come down the stairs :)
Using acrylic paints that I already had, I painted the kids' hands, one at a time and pressed them onto the canvas. You can buy the canvas at Michael's with a 50% off coupon and it's not that expensive.
I started at the top with the baby- holding her fingers slightly spread out and tilted her hand slightly, so that when they were both on, they'd form a heart shape between the thumb and pointer finger, when the hands are upside down.
After everyone's hand prints were on, I used my colored sharpies and wrote their names on the inside of their hearts. I put the year in the bottom right hand corner and hung it up. This was an easy, cheap, and quick way to add some personal touch to our new home.
I love how the color pops in my entryway, I get to look at this everytime I come down the stairs :)
Saturday, January 7, 2012
Busy Creating: Homemade Star Wars Valentine's Card
I know Valentine's Day is over a month away, but I am so not going to be last minute for it. For the past several holidays, I had a lot of things I wanted to do, but never got around to it. Not this holiday!!! I plan on posting each of my kids' homemade Valentine's ideas, one per week, for the next four weeks. You know what they say, Prior Planning Prevents Poor Performance.
My son is REALLY into Star Wars this year. For Halloween, he was Darth Vader. I saw lots of ideas online where you take your kid's picture, with their hand extended, print it, cut out slots, and stick a lollipop in, like they are handing it to you from the picture. I had this photo of my son from Halloween, so I thought it would be cute along the same lines, but with a glow stick or pixie stick in his hand, as a 3-D light saber.
Here's what you do: Get a photo of your child in costume (if they have it), holding a light saber or such object (if they have it), or pretending to hold a light saber- try to get a close up shot, I only wish I cropped it, so he was larger in the photo.
If you have photo editing software (you can use picnik online free), add text (I downloaded the Star Wars font here), I did a play on the most famous Star Wars quote I know ("Luke, I am your father"). :
Print them out.
Using a sharp cutting tool, make a slice about an inch long across the top of the hands and another one below the hands, this is where you will slide the candy in.
I was going to use pixie sticks or light sticks, until I found these on clearance at Walmart for $0.50 a box!!!
Slide the candy into the slots (I hope Darth Vader is strong enough to carry this):
Make a lot!
I hope this inspired you to start working on your Valentine's too! I just love homemade ones, don't you?
Thursday, January 6, 2011
Melted crayon window decorations
Guess what happens when you are home with the third sick kid in a week? You take the leftover crayons you peeled yesterday and grate them with your cheese grater:
Then, put them between two sheets of waxed paper, with a towel on the bottom to catch drippings:
Place a thin towel on top, take your hot iron and press to melt the crayon shavings:
(I do wish I put a bit less shavings on at once because if you do get them to melt to almost liquid, they do spread, the speckled areas could have used a bit more melting, but they were at the edge of the paper. Also, the darker colors blended together and made a brown- not very Valentiny :( )
Then, you cut out your desired shapes, we chose hearts since Valentine's Day will be here before we know it:
Then, put them between two sheets of waxed paper, with a towel on the bottom to catch drippings:
Place a thin towel on top, take your hot iron and press to melt the crayon shavings:
(I do wish I put a bit less shavings on at once because if you do get them to melt to almost liquid, they do spread, the speckled areas could have used a bit more melting, but they were at the edge of the paper. Also, the darker colors blended together and made a brown- not very Valentiny :( )
Then, you cut out your desired shapes, we chose hearts since Valentine's Day will be here before we know it:
Thursday, February 11, 2010
H is for heart crayons
I've read about these in magazines before and always wanted to make them. We got a cheap silicon pan at IKEA and have oodles of broken old crayons that were waiting to be revived. Warning: if you use a silicon pan, it gets floppy when you take it out of the oven and liquid crayon all over the bottom of an oven can't be pleasant to clean up, if you do this, put a pizza stone under the pan before putting it in the oven. It took some crafty maneuvering on my part to get this out of the oven onto the pan with no spills. We put them in a preheated 275' oven for 10 minutes, then put them outside to cool, they popped right out of the pan, no greasing was necessary (at least with the silicon pan).
Getting ready to go in the oven:

Coming out of the oven:

Finished:

Using the new crayons:

Beware, my husband thought they were candy and he almost ate one for dessert, they look delicious!
Getting ready to go in the oven:
Coming out of the oven:
Finished:
Using the new crayons:
Beware, my husband thought they were candy and he almost ate one for dessert, they look delicious!
We HEART heart shaped food
Last night's dinner and can I say my ingenious idea to add Hersey's cinnamon chips to these delights was soooo good. And, if anyone loves me and ever wants to get me a gift, get me some more cinnamon chips before they aren't in stores anymore, mine are almost gone :( What can't you do with a bag of cinnamon chips?


Tonight's dinner and some for the freezer for next week ;) Best chicken pot pie recipe ever! It makes enough for about three meals for our family, can't beat that! I tried my new tart maker from William sonoma tonight (haven't used the star yet)- at first I was skeptical because it didn't hold much pie, but the serving was just right for the kids and they held their own in the oven. If you like to make your food fun, you can get them here.


Tonight's dinner and some for the freezer for next week ;) Best chicken pot pie recipe ever! It makes enough for about three meals for our family, can't beat that! I tried my new tart maker from William sonoma tonight (haven't used the star yet)- at first I was skeptical because it didn't hold much pie, but the serving was just right for the kids and they held their own in the oven. If you like to make your food fun, you can get them here.
We HEART cupcakes!
It's my neighbor's 40th birthday today and I volunteered to make the cake for her surprise party (secretly because I wanted to make these) cupcakes I found on bakerella. I was thinking maybe of making them for A's bday next week and I figured what better way to try and see if they're good first. I made dad's homemade chocolate cake recipe, had Dave crush it up in our food processor, mixed in a can of betty crocker vanilla icing (not cream cheese), and rolled into balls and let sit in fridge overnight.
Here's my lame attempt at making the "cupcake" shape. I didn't have a small enough flower shaped cookie cutter to do the shape on the bottom, I was going to use an apple and it was messy and time consuming. Secretly, I was thinking of doing a heart shaped bottom, so close to vday and all, but my smallest heart was too big ;)
This was messy.

Here is the first chocolate dipping, I was going to skip this step, but glad I didn't, I think it helps them stay on the stick better. By the way, I used skewers, they were too long for the weight of the cake on top, next time, I will be sure to have lollipop sticks around.

Finished finally, this was time consuming, but so cute, I tried two and sooo good. I think if you have two people working, it would go a LOT quicker (one for dipping in chocolate, one for decorating)- oh and I didn't think about what to put them in to let the chocolate dry so they wouldn't stick, next time I think I'd have a big piece of styrofoam to stick them in.

Bet you wish you could have one!
Here's my lame attempt at making the "cupcake" shape. I didn't have a small enough flower shaped cookie cutter to do the shape on the bottom, I was going to use an apple and it was messy and time consuming. Secretly, I was thinking of doing a heart shaped bottom, so close to vday and all, but my smallest heart was too big ;)
This was messy.
Here is the first chocolate dipping, I was going to skip this step, but glad I didn't, I think it helps them stay on the stick better. By the way, I used skewers, they were too long for the weight of the cake on top, next time, I will be sure to have lollipop sticks around.
Finished finally, this was time consuming, but so cute, I tried two and sooo good. I think if you have two people working, it would go a LOT quicker (one for dipping in chocolate, one for decorating)- oh and I didn't think about what to put them in to let the chocolate dry so they wouldn't stick, next time I think I'd have a big piece of styrofoam to stick them in.
Bet you wish you could have one!
Wednesday, February 10, 2010
Homemade heart games
I got the idea to make these games here. I knew the kids would love this with the smiley hearts. I have a folder full of old tomica car magazines and in the spirit of using my heart punch, I couldn't help but punch out cars in the shape of hearts. The cardboard used to make the gameboards was from the inside of our new calendars. I bought the spinners (they were cheap and I've tried to make my own that work well unsuccessfully). I bought them here at skybluepink and they were cheap and shipped here FAST.
The heart game in action, he loved isolating 2 colors at a time and seeing who would win first.

The car game waiting for the paint to dry. In the essence of H week, it is a highway game with heart shaped pieces.
The heart game in action, he loved isolating 2 colors at a time and seeing who would win first.
The car game waiting for the paint to dry. In the essence of H week, it is a highway game with heart shaped pieces.
We HEART Books!
At our house, we just LOVE books!! I came up with the idea for our valentine's card to punch out Heart shapes from our old book order forms. Those things alone keep the kids busy for hours, looking at all the colorful book covers. The kids LOVED the hearts from the book order and didn't want to give them away. At first all the cards they made were for each other (all 30)!!! Looking at the hearts, has kept them busy for HOURS!
Using a heart punch, I cut these out, there are many more!!!

I cut these out with scissors, so colorful and fun.

Hard at work assembling:

Using a paint brush to put on glue freed me from having to be the main gluer, now everyone can do it "neatly".

Which one will show up in your mailbox:

PS- yours will be late since they're not in the mail yet, but they'll be worth the wait.
Using a heart punch, I cut these out, there are many more!!!
I cut these out with scissors, so colorful and fun.
Hard at work assembling:
Using a paint brush to put on glue freed me from having to be the main gluer, now everyone can do it "neatly".
Which one will show up in your mailbox:
PS- yours will be late since they're not in the mail yet, but they'll be worth the wait.
Subscribe to:
Posts (Atom)