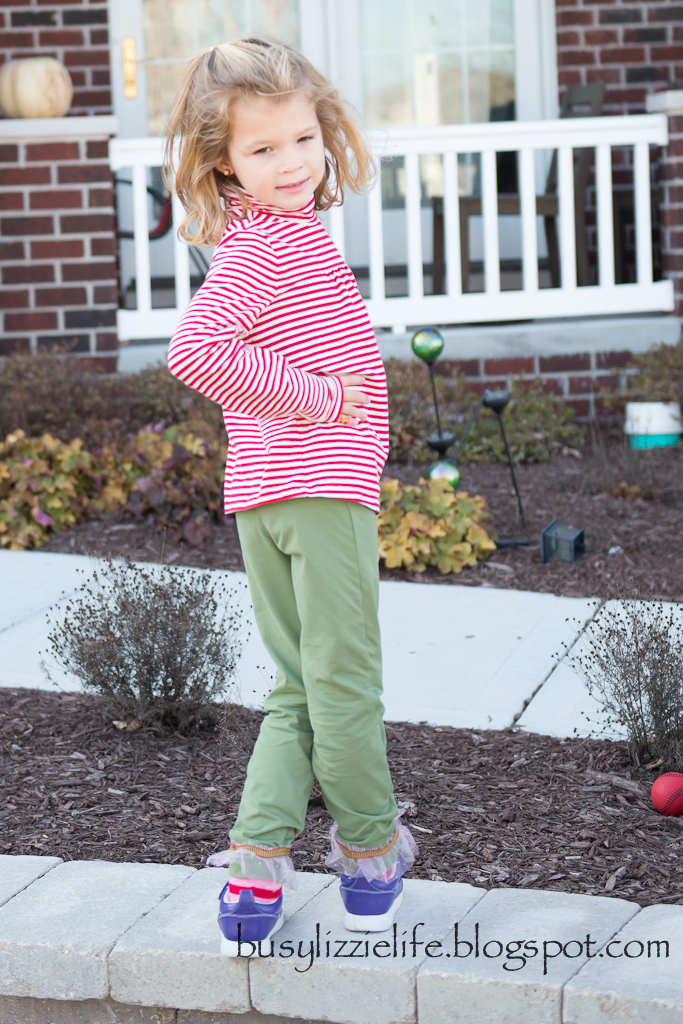
Today's pants post is super easy! In 30 minutes, from start to finish, you can have a new pair of leggings for your daughter!
Start by finding a pair of your pants you no longer fit into, like, want, etc. If you just can't find something to get rid of, head to goodwill and buy a cheap pair of womens' stretch pants.
Lay your daughter's current sized leggings on top of the pants you are cutting up - outer leg edges lined up. Trace around your daughter's pants, leaving a 1/4-1/2 " seam allowance and about 1 1/4" on the top for the waist band. Here's the bonus of using a pair of pants for your fabric: THEY ARE ALREADY HEMMED (I wish I could make this blink). I raised my pants up about an inch from the hem, I wanted them to be a little longer, with room to grow.
Cut the piece out, flip the pants over and trace and cut out the other piece. Follow the instructions from my tutorial yesterday to sew the pants together. This is even easier because, like I said, no hemming!
Hazel wasn't too keen on the green color, so I had some sparkly pink tulle ruffle left over from the sequin skirt, so I attached that around the bottom of the leg, along with some Christmas ribbon (what a pain, the leg opening is so small and hard to maneuver in the machine, I think it would be easier to attach by hand.
End result:
Plenty of stretch for play:
The back:
Sneak peek for tomorrow:
Showing posts with label recycling. Show all posts
Friday, November 30, 2012
Saturday, December 24, 2011
Busy Creating: Cardboard Ornaments
Are you trying to get last minute stuff done and you need something to keep your kids busy? Me too.
We're at my parent's and we don't have our car, so most of the time, we are at the house. Looking for things besides video games and TV to keep the kids busy can be a challenge, especially when all of my craft stuff is not here.
Do you have lots of cardboard boxes from your online orders, scissors, glue, and hopefully pompoms (scraps of paper are a great substitute).
Ask your kids what shapes they want to decorate and cut them out (don't shoot yourself in the foot and offer to do a reindeer). Let your kids color or paint them (however- use marker if you want to leave them unattended).
Put some glue in a recycled container and put the pompoms in a bowl. They can dip the pompoms in the glue and attach them themselves with almost no mess.
Let the glue dry and hang them on the tree.
So now, if the baby crawls in and knocks down the tree, I won't have to be as worried about her breaking an ornament ;)
We're at my parent's and we don't have our car, so most of the time, we are at the house. Looking for things besides video games and TV to keep the kids busy can be a challenge, especially when all of my craft stuff is not here.
Do you have lots of cardboard boxes from your online orders, scissors, glue, and hopefully pompoms (scraps of paper are a great substitute).
Ask your kids what shapes they want to decorate and cut them out (don't shoot yourself in the foot and offer to do a reindeer). Let your kids color or paint them (however- use marker if you want to leave them unattended).
Put some glue in a recycled container and put the pompoms in a bowl. They can dip the pompoms in the glue and attach them themselves with almost no mess.
Let the glue dry and hang them on the tree.
So now, if the baby crawls in and knocks down the tree, I won't have to be as worried about her breaking an ornament ;)
Tuesday, December 6, 2011
Busy Sewing: Crinkly Baby Play Mat
Do you have one of these (or do you know someone who does?):
Then, this post is for you. This idea has been brewing in my head for a while now. My mom got a bunch of wacky baby toys when she visited us in Japan several years ago. When Maeve was born, she gave me one, it looked just like a piece of cloth with the design of a Japanese newspaper. I thought it was going to be just a soothing soft toy. BUT, then we opened it...
This has got to be one of her favorite toys! It is crinkly, lightweight, easy to hold, chewable, all the things a baby could ask for and more. I have been wanting to have one of her other crinkly toys take one for the team, so I could see what was on the inside doing the crinkling.
Well, the other day, I was unpacking a box of clothes I ordered online, she was having a ball grabbing, shaking, and tossing the plastic bags of clothes. The lightbulb went off- reuse plastic shopping bags and sew them in between fabric. Yes, at that instant, I abandoned unpacking the box, went into my stash found two cute girly half yards of fabric, got a giant plastic shopping bag I was no longer using and...(yes it is conveniently a bag from my FAVORITE craft store from Japan):
I laid the two fabrics on top of each other, with the right sides together, then I placed the shopping bag on top. I trimmed around the edges so the fabric was the same size as the bag. Then I pinned them together.
I sewed around the edges (bag could be on top or bottom while sewing, will work fine either way, your preference):
I left a four inch gap to right side out the fabric:
Once fabric was inverted, I fold the fabric in at the gaps and pinned it, then I topstitched over it and around the whole mat to give it a finished look:
The whole thing took maybe 30 minutes.
How fun would this be for a homemade Christmas gift? You can make it as large or small as you want, I think it would be fun to do one with bubble wrap on the inside, or long like a runway for the baby to crawl on. You can even put the bag between two old pieces of cut up clothes to be totally green! Happy sewing!
Then, this post is for you. This idea has been brewing in my head for a while now. My mom got a bunch of wacky baby toys when she visited us in Japan several years ago. When Maeve was born, she gave me one, it looked just like a piece of cloth with the design of a Japanese newspaper. I thought it was going to be just a soothing soft toy. BUT, then we opened it...
This has got to be one of her favorite toys! It is crinkly, lightweight, easy to hold, chewable, all the things a baby could ask for and more. I have been wanting to have one of her other crinkly toys take one for the team, so I could see what was on the inside doing the crinkling.
Well, the other day, I was unpacking a box of clothes I ordered online, she was having a ball grabbing, shaking, and tossing the plastic bags of clothes. The lightbulb went off- reuse plastic shopping bags and sew them in between fabric. Yes, at that instant, I abandoned unpacking the box, went into my stash found two cute girly half yards of fabric, got a giant plastic shopping bag I was no longer using and...(yes it is conveniently a bag from my FAVORITE craft store from Japan):
I laid the two fabrics on top of each other, with the right sides together, then I placed the shopping bag on top. I trimmed around the edges so the fabric was the same size as the bag. Then I pinned them together.
I sewed around the edges (bag could be on top or bottom while sewing, will work fine either way, your preference):
I left a four inch gap to right side out the fabric:
Once fabric was inverted, I fold the fabric in at the gaps and pinned it, then I topstitched over it and around the whole mat to give it a finished look:
The whole thing took maybe 30 minutes.
How fun would this be for a homemade Christmas gift? You can make it as large or small as you want, I think it would be fun to do one with bubble wrap on the inside, or long like a runway for the baby to crawl on. You can even put the bag between two old pieces of cut up clothes to be totally green! Happy sewing!
Labels:
babies,
creative play,
going green,
homemade gift idea,
recycling,
sewing
Saturday, July 9, 2011
Busy Travelling: License Plates and learning States
This week, my kids and I have been reading "If I were Alive During the American Revoution". We have been talking about wars, the pledge of allegiance, the thirteen original colonies, and more. Given that we are driving across the country to Massachusetts, I thought it would be fun to do a license plate game. On the way here, we tried to remember the plates we saw, but kept losing track. I wanted to print out little license plates for the kids to fill in, but my printer is still at my parent's house.
We have been chosing paint colors for our house and one day, I was staring at the color strip and was like these are perfect sized for a license plate game. I took 7 color shade strips for each of my kids' favorite colors, cut them in half horizontally, and glued them to the back of a CEREAL BOX!
For the big kids, I wrote the full names of the states:
For the little kids, I just wrote the two letter state abbreviation. Each of the thirteen colonies has a star over the top, we are trying to see if we can see each one. Also, I attached a pen to each board so they can check them off:
I hope this makes the 17+ hours in the car more fun for the kids- wish me luck!
**POST EDIT on July 11, 2011- I was rushing to post this because of course, I was finishing the project last minute before the drive, and I wanted to post photos of the before product, because after the drive, they would be all colored and crossed out. I realized that the two letter abbreviations for Kansas (should be KS) and Kentucky (should be KY) were written incorrectly on the two letter abbreviation charts. I corrected them for my kids- corrected photo unavailable because the kids HAD A BLAST with these in the car. I apologize, and yes, I AM quite certain I am smarter than a fifth grade, just busier and more scatterbrained. This was such an awesome thing to have in the car, the kids didn't want to go to bed because they were afraid they'd miss something, in fact, they are still in the car, and we have been able to cross off a few more since our trip. This is HIGHLY recommended for a trip in the car if you are taking one!!!
Saturday, May 14, 2011
Bird Nest Supply Balls
For the month of May, we are studying birds, butterflies, and rocks (outdoor things). I've been reading around trying to find ideas for projects having to do with birds. This post that popped up on my facebook page from The Crafty Crow was too perfect. Have you ever been on the Crafty Crow? It is a great place to find projects to keep your kids busy- on the side bar, you can search through categories by theme or type of project. On the bottom sidebar, you can search through the different blogs who contributed to the site, and this is where you really spend a lot of time, there are some great blogs that contribute here. This is a great place to start if you are beginning to look for ideas for summer activities for your kids.
For the bird nest supply balls, you will need:
about 9-12 feet of craft wire (22 gage, we used 20)
fabric scraps
yarn
thread
cotton ball
lint
hair
soft remnants
(nothing sharp, glass or plastic)
First, cut the wire, and bend the edges in with a pair of pliers so little hands will not get cut or poked. Take the wire in your hands and smoosh it together like you are making a snowball:
Push open some of the wire at the top of the ball, so it's like a little nest:
Put a pile of "fillers" on the table, we used lint from the dryer, stuffing from a stuffed animal with a hole in it, fleece, fabric scraps, and yarn):
Gently fill the center of the ball with the fillers and squeeze closed:
Loop a small piece of wire through the ball and twist ends together to make a loop for hanging- find a good spot in your yard, hang the ball and wait for birds to come looking for house building supplies:
Pictured below is a rat's nest turned bird's nest. My cousin conveniently had a HUGE tangle in her hair this week, and I took some of the pieces that didn't make it through the detangling, enough to fill a whole ball:
This project is great for little fingers to practice cutting the remnants, filling the balls, squeezing, and hanging. It's a great way to be green with your kids! We are just waiting to see a bird fly in and take something out, there's been a few robins scoping it out already! Happy Birding!
For the bird nest supply balls, you will need:
about 9-12 feet of craft wire (22 gage, we used 20)
fabric scraps
yarn
thread
cotton ball
lint
hair
soft remnants
(nothing sharp, glass or plastic)
First, cut the wire, and bend the edges in with a pair of pliers so little hands will not get cut or poked. Take the wire in your hands and smoosh it together like you are making a snowball:
Push open some of the wire at the top of the ball, so it's like a little nest:
Put a pile of "fillers" on the table, we used lint from the dryer, stuffing from a stuffed animal with a hole in it, fleece, fabric scraps, and yarn):
Gently fill the center of the ball with the fillers and squeeze closed:
Loop a small piece of wire through the ball and twist ends together to make a loop for hanging- find a good spot in your yard, hang the ball and wait for birds to come looking for house building supplies:
Pictured below is a rat's nest turned bird's nest. My cousin conveniently had a HUGE tangle in her hair this week, and I took some of the pieces that didn't make it through the detangling, enough to fill a whole ball:
This project is great for little fingers to practice cutting the remnants, filling the balls, squeezing, and hanging. It's a great way to be green with your kids! We are just waiting to see a bird fly in and take something out, there's been a few robins scoping it out already! Happy Birding!
Subscribe to:
Posts (Atom)