As part of my New Year's Resolutions, I want to continue to get better at food photography. A friend of mine and I decided to do a food photography challenge to hold each other accountable. I had seen another blog that did a challenge where they made every recipe out of a food magazine- while it appealed to me, there are just a lot of recipes, I know I couldn't stomach, particularly those involving seafood. I do want to expand my taste palate, so we are using food magazines as our source, and this month we chose a Honey Apple Almond Layer Cake from the Food Network Magazine. I'm not usually keen on making cakes from magazines- I like to stick to my favorite cook books (Cook's Illustrated, Baked, Pastry Queen)- so not only was this a completely new flavor of cake, it was a new cake recipe source.
My overall review is that the cake came out pretty good. I think it was not as sweet as your traditional vanilla or chocolate cake and for those of you looking for something different, give this a try. My favorite part of the cake was the frosting. It is almond flavored swiss meringue butter cream- for those of you unfamiliar with swiss meringue butter cream, it is a very fluffy light frosting, that you can pile on high without feeling disgusting from the sweetness. However, in this case, the cake was very dense, almost like a pound cake, so if I made the cake again, I would use a thicker frosting, such as a traditional buttercream. The apple butter layer in the middle was not overwhelming and complimented the cake well. I feel like the brushed honey could almost be skipped, I'm not sure it made that much of a flavor difference. I opted to top the cake with cinnamon red hots, because I just thought it would compliment the apple butter, as opposed to slivered almonds.
The thing that excited me most about this cake was frosting it. My husband got me a rotating cake stand for Christmas and I am wondering how I lived without it. It is definitely awesome and any serious cake baker should add it to their wishlist now!
Honey Apple Almond Layer Cake
Oven: 350
Cake:
2 sticks unsalted butter
2 cups all purpose flour
1 TBSP baking powder
1/2 tsp salt
1 1/4 cup sugar
4 eggs
1 TBSP vanilla
1 1/4 cup whole milk
Frosting:
4 egg whites
1 1/4 cup sugar
1 tsp almond extract
1 tsp vanilla
2 sticks unsalted butter (room temp** see note below)
Filling:
3/4 cup apple butter
3 TBSP honey
2 TBSP water
1) Preheat the oven to 350. Grease 2 9" cake pans and line the bottoms with parchment paper.
2) In a medium bowl, whisk together the flour, baking powder, and salt. Set aside.
3) In mixer, beat the butter with the sugar on medium-high until fluffy (~3 minutes). Scrape down the sides of the bowl. Add the eggs one at a time. Scrape down the sides, then beat in the vanilla.
4) In alternating batches, starting and ending with the flour mixture, add in flour mixture and milk. Scrape down sides after last flour addition and give one final mix until smooth- do not overmix or cake will be very dense.
5) Evenly divide the batter in the two prepared cake pans. Bake in oven for 30-35 minutes, rotating halfway through- a cake tester inserted in the center should come out clean. Let cakes cool for a few minutes, then invert to remove cakes and let cool on baking rack.
6) Once cakes are completely cool, make the frosting. In heatproof pan (or double boiler) set over a saucepan of simmering water, whisk egg whites and sugar. Heat until sugar is dissolved and mixture reaches a temperature of 160'. Remove from heat and pour into bowl of your stand mixer with the whisk attachment. Beat on medium high until completely cool and stiff white peaks form- will sort of look like marshmallow fluff. (If you have never made swiss meringue buttercream before, here is a great tutorial/video). Once it is at this stage, switch to the paddle attachment. One TBSP at a time, drop in the butter and beat on medium. Eventually the frosting will thicken like pudding and you will notice a different sound of it slapping against the paddle. After you have added all the butter, scrape down the sides and beat in the almond extract and vanilla.
**If you run into a problem where the frosting is too runny or looks curdled because you did not use room temp butter - like I did- go here to find out how to save your frosting- it saved mine!
7) To assemble the cake, use a bread knife and level off the bottom layer- place it on a plate or cake stand. Heat the honey and water in a saucepan until simmering. Brush half of the honey mixture onto the bottom cake layer. Drop the 3/4 cup of apple butter onto this layer, and spread out to about 1/2" from the edges. Place the top layer of the cake on. Brush the remaining honey onto the top layer. Frost the cake, starting the the sides. Set some frosting aside for decorative edges, if you want.
Source: Adapted from Food Network Magazine, Jan/Feb 2013
Enjoy the cake! If you make it, let me know if you liked it or not.
Showing posts with label cake. Show all posts
Tuesday, January 15, 2013
Sunday, May 13, 2012
Lemon layer cake with Lemon mousse and Raspberry curd Filling
Now, thats a title for a cake, isn't it? Well, I just realized it's been over two weeks since I've made a post. For that I'm sorry, but with my husband's awesome travel schedule and the two photography classes I've been taking, I haven't had time to do anything else but make it through the day. Also, now that I know how to take a good picture, stuff that I had already shot and had waiting to be posted doesn't seem good enough anymore. I just got a new mega camera and I'm still playing around with it. I hope to get some awesomely delicious shots up this week.
This is a cake I have made several times (and also it is my go to lemon cupcake recipe) and I can't believe I have yet to post it. I actually made it and brought it to class for everyone to shoot. I originally made it about one year ago for my dad on his first day back to work after his hip replacement and it was a big hit with the family. My mom really loved it and she even made it herself, and if I remember correctly, it may have been her first attempt at a cake from scratch. For that, I am proud to have inspired her to do so. So, since she liked it so much, I figured why not post the cake for a Mother's Day treat.
Yes, I am an awful daughter and still have her Mother's Day card sitting on my coffee table. I had every intention of sending it on Thursday, but I was preparing for my three wisdom teeth to be pulled on Friday and totally forgot. Since I can't eat food, I'll write about it and since I didn't send her a gift, I'll post the recipe in an easy to find place for her as her gift.
This is a 3-layer lemon cake, filled with a fluffly lemon mousse and homemade raspberry curd, and topped off with a freshly whipped cream icing. I didn't use a standard buttercream because I think it makes the cake too sweet. I was even thinking about skipping the icing all together and just putting a large dollop of the lemon mousse on top. The lemon mousse is so good, I could swan dive into it (seriously)!
Lemon Layer Cake with Lemon Mousse Raspberry curd and Whipped Cream Icing:
Oven: 325
Lemon Cake:
3 cups flour
1 TBSP baking powder
1/2 tsp salt
1 cup (2 sticks) unsalted butter, room temp
2 cups sugar
4 eggs, room temp
3 TBSP lemon zest (from about 2 lemons)
2 TBSP lemon juice (from 1 lemon)
1 cup buttermilk (you can make your own w/ 1 cup milk and 1 tsp of either white vinegar or lemon juice)
Raspberry Curd:
1/2 cup (1 stick butter)
12 oz raspberries (frozen or fresh)
5 egg yolks
3/4 cup sugar
pinch salt
2-3 tsp fresh lemon juice
Lemon Mousse Filling:
4 oz. cream cheese or marscapone cheese (I used cream cheese)
2 1/2 TBSP unsalted butter, room temp
1 1/4 cup confectioner's sugar
2 tsp lemon extract (I didn't have this, so I used lemon juice)
zest of 1/2 lemon
1 cup heavy cream
Whipped cream Icing:
2 cups heavy cream
1/4 cup confectioner's sugar
1/4 tsp vanilla
For the cake:
1) In bowl of mixer, fitted with paddle attachment, cream butter and sugar on medium, until light and fluffy, about 5 minutes.
2) Add in eggs one at a time, scrape sides of bowl, mix, then add lemon zest and lemon juice, mix until combined.
3) In small bowl, combine flour, baking powder, and salt. In three additions, add dry ingredients, alternating with two additions for the buttermilk. When finished adding final addition of dry ingredients, stop mixer, scrape sides of bowl, and give it one final mix.
4) Line the bottoms of 3 cake pans with parchment paper and grease and flour the sides. I used 9 inch cake pans because that's all I have. You can use 8 inch pans, but you might need to increase the bake time to accomodate for the slightly thicker cake.
5) Bake for 25-35 minutes. Rotate halfway through. Cakes are done when a tester inserted in the center comes out clean. Let cakes cool on a rack for ten minutes, then invert pan, remove cakes and let them cool completely before frosting.
For the raspberry curd:
1) Melt the butter in a medium sauce pan. Add the raspberries, sugar, salt, and egg yolks. Cook over medium heat, mashing the berries. Stir frequently, until mixture has thickened, about ten minutes.
2) Remove mixture from heat, pour mixture through a fine mesh sieve, set over a bowl. Press the berries to make sure to get as much liquid out as possible. Cool to room temp, it will thicken as it cools. Stir in lemon juice to taste. Cover and refrigerate until ready to use. This can be made a few days ahead of time.
For the lemon mousse filling:
1) In bowl of mixer, fitted with paddle, beat butter and cream cheese on medium until smooth. Add in confectioner's sugar, mix at low until combined. Add in the lemon juice and zest until combined. Increase mixer speed to medium-high and beat until fluffy, about 2 minutes. Scrape sides of bowl, mix once more, then set aside.
2) Put heavy cream in a medium bowl and beat with electric mixer until stiff peaks form. Slowly fold the whipped cream mixture into the lemon cream cheese mixture until well combined.
For the Whipped Cream Icing:
1) Beat the heavy cream until stiff peaks form. Mix in the confectioner's sugar and vanilla until smooth.
To assemble:
Place one cake layer on a 10" cake board. Spread 1/3 of the lemon mousse filling on the cake. Place 1/3 of the filling in a piping bag with a large tip. Pipe a circle of the filling around the circumference of the cake (save the rest for the next layer). Spoon raspberry curd in the center of the piped circle and spread it in atop the layer of mousse. (You can view a photo of how I learned about this technique in this post I found on Bake at 350 blog). The circle of lemon mousse will help keep the curd in place. Place the second cake layer on top of this. Refrigerate for about ten minutes to let it set. Remove from the refrigerator and repeat laying the mousse, piping the circle of mousse around the circumference, and filling in with the raspberry curd. Place the third cake layer on top. Refrigerate for about ten more minutes.
Spread a very thin layer of icing around the edges of the cake and the top. This is a crumb coat. Refrigerate to let it set and then remove and continue frosting. By adding the crumb coat, you will eliminate stray crumbs from appearing in your frosting. Use the extra frosting to pipe on edging. Refrigerate until ready to serve.
Adapted from:
Lemon cake from Confections of Foodie Bride, Raspberry Curd from Beantown Baker, Lemon Mousse from Annie's Eats, Whipped Cream Icing from Pastry Queen cookbook
This is a cake I have made several times (and also it is my go to lemon cupcake recipe) and I can't believe I have yet to post it. I actually made it and brought it to class for everyone to shoot. I originally made it about one year ago for my dad on his first day back to work after his hip replacement and it was a big hit with the family. My mom really loved it and she even made it herself, and if I remember correctly, it may have been her first attempt at a cake from scratch. For that, I am proud to have inspired her to do so. So, since she liked it so much, I figured why not post the cake for a Mother's Day treat.
Yes, I am an awful daughter and still have her Mother's Day card sitting on my coffee table. I had every intention of sending it on Thursday, but I was preparing for my three wisdom teeth to be pulled on Friday and totally forgot. Since I can't eat food, I'll write about it and since I didn't send her a gift, I'll post the recipe in an easy to find place for her as her gift.
This is a 3-layer lemon cake, filled with a fluffly lemon mousse and homemade raspberry curd, and topped off with a freshly whipped cream icing. I didn't use a standard buttercream because I think it makes the cake too sweet. I was even thinking about skipping the icing all together and just putting a large dollop of the lemon mousse on top. The lemon mousse is so good, I could swan dive into it (seriously)!
Lemon Layer Cake with Lemon Mousse Raspberry curd and Whipped Cream Icing:
Oven: 325
Lemon Cake:
3 cups flour
1 TBSP baking powder
1/2 tsp salt
1 cup (2 sticks) unsalted butter, room temp
2 cups sugar
4 eggs, room temp
3 TBSP lemon zest (from about 2 lemons)
2 TBSP lemon juice (from 1 lemon)
1 cup buttermilk (you can make your own w/ 1 cup milk and 1 tsp of either white vinegar or lemon juice)
Raspberry Curd:
1/2 cup (1 stick butter)
12 oz raspberries (frozen or fresh)
5 egg yolks
3/4 cup sugar
pinch salt
2-3 tsp fresh lemon juice
Lemon Mousse Filling:
4 oz. cream cheese or marscapone cheese (I used cream cheese)
2 1/2 TBSP unsalted butter, room temp
1 1/4 cup confectioner's sugar
2 tsp lemon extract (I didn't have this, so I used lemon juice)
zest of 1/2 lemon
1 cup heavy cream
Whipped cream Icing:
2 cups heavy cream
1/4 cup confectioner's sugar
1/4 tsp vanilla
For the cake:
1) In bowl of mixer, fitted with paddle attachment, cream butter and sugar on medium, until light and fluffy, about 5 minutes.
2) Add in eggs one at a time, scrape sides of bowl, mix, then add lemon zest and lemon juice, mix until combined.
3) In small bowl, combine flour, baking powder, and salt. In three additions, add dry ingredients, alternating with two additions for the buttermilk. When finished adding final addition of dry ingredients, stop mixer, scrape sides of bowl, and give it one final mix.
4) Line the bottoms of 3 cake pans with parchment paper and grease and flour the sides. I used 9 inch cake pans because that's all I have. You can use 8 inch pans, but you might need to increase the bake time to accomodate for the slightly thicker cake.
5) Bake for 25-35 minutes. Rotate halfway through. Cakes are done when a tester inserted in the center comes out clean. Let cakes cool on a rack for ten minutes, then invert pan, remove cakes and let them cool completely before frosting.
For the raspberry curd:
1) Melt the butter in a medium sauce pan. Add the raspberries, sugar, salt, and egg yolks. Cook over medium heat, mashing the berries. Stir frequently, until mixture has thickened, about ten minutes.
2) Remove mixture from heat, pour mixture through a fine mesh sieve, set over a bowl. Press the berries to make sure to get as much liquid out as possible. Cool to room temp, it will thicken as it cools. Stir in lemon juice to taste. Cover and refrigerate until ready to use. This can be made a few days ahead of time.
For the lemon mousse filling:
1) In bowl of mixer, fitted with paddle, beat butter and cream cheese on medium until smooth. Add in confectioner's sugar, mix at low until combined. Add in the lemon juice and zest until combined. Increase mixer speed to medium-high and beat until fluffy, about 2 minutes. Scrape sides of bowl, mix once more, then set aside.
2) Put heavy cream in a medium bowl and beat with electric mixer until stiff peaks form. Slowly fold the whipped cream mixture into the lemon cream cheese mixture until well combined.
For the Whipped Cream Icing:
1) Beat the heavy cream until stiff peaks form. Mix in the confectioner's sugar and vanilla until smooth.
To assemble:
Place one cake layer on a 10" cake board. Spread 1/3 of the lemon mousse filling on the cake. Place 1/3 of the filling in a piping bag with a large tip. Pipe a circle of the filling around the circumference of the cake (save the rest for the next layer). Spoon raspberry curd in the center of the piped circle and spread it in atop the layer of mousse. (You can view a photo of how I learned about this technique in this post I found on Bake at 350 blog). The circle of lemon mousse will help keep the curd in place. Place the second cake layer on top of this. Refrigerate for about ten minutes to let it set. Remove from the refrigerator and repeat laying the mousse, piping the circle of mousse around the circumference, and filling in with the raspberry curd. Place the third cake layer on top. Refrigerate for about ten more minutes.
Spread a very thin layer of icing around the edges of the cake and the top. This is a crumb coat. Refrigerate to let it set and then remove and continue frosting. By adding the crumb coat, you will eliminate stray crumbs from appearing in your frosting. Use the extra frosting to pipe on edging. Refrigerate until ready to serve.
Adapted from:
Lemon cake from Confections of Foodie Bride, Raspberry Curd from Beantown Baker, Lemon Mousse from Annie's Eats, Whipped Cream Icing from Pastry Queen cookbook
Monday, April 2, 2012
Tuxedo Cake (take two)
Last year, before I moved from Japan, I made and posted about this triple layer chocolate Tuxedo cake from the Pastry Queen cookbook. Well, the cake had tipped off the stand that was too small and I didn't know what I was doing with my camera, as far as lighting goes. Seeing as I've come a bit further with my photo skills, I thought I'd remake the cake and use it as my subject for my still life assignment for my class.
Last night, Dave and I were having fun photographing the cake until 11 pm. I'm teaching him everything I know so that when (and if) my new camera arrives, and I pass on my old one to him, he will be skilled. I hope you like the new pictures as much as I do.
And, I just can't help but include this one- my daughter's ultimate favorite doll, sad baby- the other still life I submitted:
Last night, Dave and I were having fun photographing the cake until 11 pm. I'm teaching him everything I know so that when (and if) my new camera arrives, and I pass on my old one to him, he will be skilled. I hope you like the new pictures as much as I do.
And, I just can't help but include this one- my daughter's ultimate favorite doll, sad baby- the other still life I submitted:
Tuesday, March 20, 2012
Rainbow Cake and Cake Push Pops
For Maeve's first birthday, I wanted nothing but a rainbow cake. For the past few months, I've been looking for ideas, and even tried a few different ways of decorating cupcakes. In the end, the decision was easy, once I searched for rainbow cakes on pinterest and found the idea for THIS cake on Bakingdom blog.
My heart didn't come out quite as nice as hers, but hey, I had a migraine while I was doing this.
I was so excited to try and make the cake, but honestly, as the day approached, I began to get nervous. I felt like such a cake was WAY out of my league! I was thinking I'd have to make three batches of batter just to make all the cakes for the layers. Then, I went to Sur La Table and I found the cutest little cake pans- they are only like 4-5 inches.
About two weeks ago, I decided to try to make the rainbow cake. To make it, you have to make two 6-layer cakes! I used the recipe I posted a few weeks ago for vanilla bean cupcakes with vanilla bean icing.
Here are the mini cakes:
Then, I frosted them with a coordinating color frosting, and stacked them into layers of three:
I refrigerated them to let the set about 20 minutes, before cutting out the centers to do the internal switch. Then, I stacked the cakes to make the two 6-layer cakes. I frosted the outside with a thin layer of plain white frosting.
The way I did this is explained here at I Am Baker. I found the link from the Bakingdom blog.
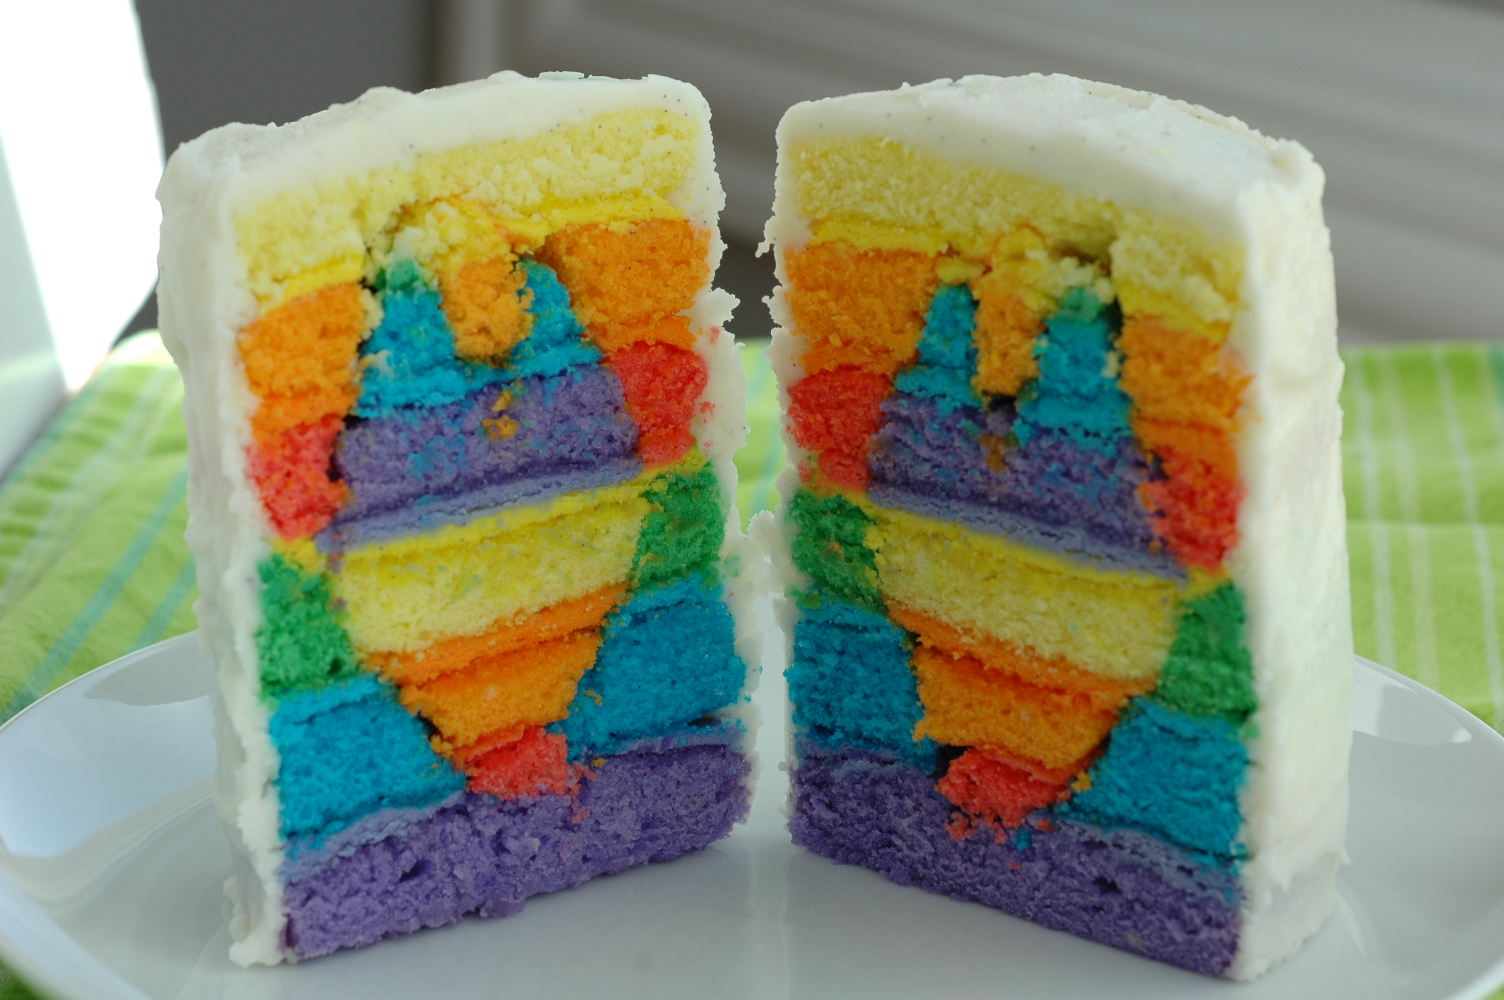
The big reveal:
Since it came out the way I wanted, I froze the second cake. It was in a tupperware in the freezer for almost 2 weeks. I put it in the fridge the night before her bday, then on the counter about 3 hours before the party, and it tasted GREAT! Huge time saver for a future birthday-make the cake ahead of time and freeze it!
I spent so much time putting them together and making sure they were in the right order, but failed to take into account that once you cut into the cakes, the top layers would be flipped over to connect them, so that is why my layers are not red, orange, yellow, green, blue, and purple. In the end, I don't care, they came out better than I thought, so I was very happy.
Since the cake was rather tiny to feed all of us at the party, there needed to be more cake. So, let there be cake push pops!
For the push pops, I used the same cake recipe (doubled) as for the layer cakes and the same vanilla bean icing recipe. I lined the bottom of my rimmed cookie sheets with parchment paper and greased the sides with butter. I divided the cake batter into six pans, and used Americolor food color gels to color them. Then, I was able to spread 2 colors in each cookie sheet, 1 on each half and spread them to meet in the middle. It was only about 1/4 inch of batter in the pan. I wanted it to be thin. I baked each pan about 5 minutes, then rotated it, and baked for 6 minutes more.
Once the cakes were cool, I used a shot sized measuring cup to punch out cake circles. I layered the cake circles into the push pops, starting with purple, and ending with red. Between each layer, I put a circle of vanilla icing around the cake circle, then I'd add in another circle. On top, I made a bigger swirl of frosting topped with rainbow non-pareil sprinkles. These were such a huge hit with the kids, assured that all cake was eaten, and NOT just frosting and was so much less messy.
I got the push pop containers on amazon.com.
My heart didn't come out quite as nice as hers, but hey, I had a migraine while I was doing this.
I was so excited to try and make the cake, but honestly, as the day approached, I began to get nervous. I felt like such a cake was WAY out of my league! I was thinking I'd have to make three batches of batter just to make all the cakes for the layers. Then, I went to Sur La Table and I found the cutest little cake pans- they are only like 4-5 inches.
About two weeks ago, I decided to try to make the rainbow cake. To make it, you have to make two 6-layer cakes! I used the recipe I posted a few weeks ago for vanilla bean cupcakes with vanilla bean icing.
Here are the mini cakes:
Then, I frosted them with a coordinating color frosting, and stacked them into layers of three:
The way I did this is explained here at I Am Baker. I found the link from the Bakingdom blog.
The big reveal:
We had a practice birthday that night, since I had already cut the cake:
I spent so much time putting them together and making sure they were in the right order, but failed to take into account that once you cut into the cakes, the top layers would be flipped over to connect them, so that is why my layers are not red, orange, yellow, green, blue, and purple. In the end, I don't care, they came out better than I thought, so I was very happy.
Since the cake was rather tiny to feed all of us at the party, there needed to be more cake. So, let there be cake push pops!
For the push pops, I used the same cake recipe (doubled) as for the layer cakes and the same vanilla bean icing recipe. I lined the bottom of my rimmed cookie sheets with parchment paper and greased the sides with butter. I divided the cake batter into six pans, and used Americolor food color gels to color them. Then, I was able to spread 2 colors in each cookie sheet, 1 on each half and spread them to meet in the middle. It was only about 1/4 inch of batter in the pan. I wanted it to be thin. I baked each pan about 5 minutes, then rotated it, and baked for 6 minutes more.
I got the push pop containers on amazon.com.
Thursday, February 2, 2012
DIY Homemade Little Debbie Be My Valentine's Cakes
Yay, it's February, bring on the heart related stuff!
I may have a slight obsession with hearts- my birthday is on Valentine's Day, do you blame me?
The downfall of the heart obsession is my weakness for Little Debbie Be My Valentine cakes. When I lived in Japan, I would get so excited to receive a box of them as a birthday gift from home.
I have been thinking about attempting to make a homemade version for quite some time now. Yesterday, I had three sick kids, so there wasn't a whole lot going on around here, so I finally made them!
The Little Debbie cakes have become quite a favorite of my oldest son. When I was done, I called him over to show him them. His response : "Wow Mom, they look really good, but um don't you think it kind of makes you look like a copy cat?" Ha ha. After eating them, he decided mine were really delicious and he likes them better.
The pink chocolate doesn't taste quite the same as Little Debbie's, but homemade is always better- you know what ingredients you put in. I searched for a recipe to follow, and I found one of a homemade zebra cake, so I used the filling recipe only from Confessions of a Cookbook Queen.
Be My Valentine Cakes:
Cake- use your favorite vanilla cake recipe (box or from scratch)- I used this one, but I only used half batch
Filling:
1/4 cup shortening (crisco)
1/8 cup marshmallow fluff
1/4 tsp vanilla
1/2 cup confectioner's sugar
1-2 TBSP half and half
Shell:
1 14 oz bag pink melting chocolates
1/4 cup white chocolate chips
canola oil
1) Preheat oven to 350' for cake. Make cake according to recipe you are using. Grease and flour a rimmed cookie sheet (2 if using a full cake batch). ( I made half batch of the cake recipe, so the filling amounts and shell amounts shown are for a half batch of cake. If using a boxed cake, you need to double the filling and shell amounts).
2) Spread cake batter into cookie sheet. Bake for 12-14 minutes, until toothpick inserted in center comes out clean.
3) Let cake cool completely. While it is cooling, prepare the filling.
4) For the filling, mix together the shortening, fluff, and vanilla. Add confectioner's sugar and beat until combined. Add in half and half, beat until light and fluffy. If necessary, add in a tiny bit more half and half.
5) Using a heart shaped cookie cutter, cut heart shaped pieces of cake and set them on a platter. Try to cut an even number of shapes.
6) Once cooled, spread filling on tops of half of the hearts. Place remaining hearts on top to create a "sandwich". Set the filled hearts on a platter and place in the refrigerator for about 20 minutes.
7) Place the pink chocolates in a microwave safe bowl. Microwave for 20 seconds, stir, repeat, until chocolate is melted and smooth. Add a few teaspoons of oil - I used canola- to thin it out and make it appear smoother when dipping the hearts.
8) Remove heart cakes from the refrigerator. Place a heart in the bowl of melted chocolate, using a spoon, pour the chocolate over the top of the heart and let it run down the sides. Smooth it with the back of the spoon. Using a fork, lift the heart from the bottom, and take it out of the bowl, hold it in the air for a moment to let chocolate drip off. Place the cake on waxed or parchment paper to let the chocolate harden. (If during the process, the chocolate begins to harden in the bowl, remicrowave for 20 seconds, then mix.)
9) When all cakes are coated with pink chocolate, melt the white chocolate chips in the microwave for 20 seconds, then mix, continue until melted and smooth. Place in a ziploc bag with the corner slightly cut off. Squeeze white lines back and forth across the tops of the cakes. Let it harden and enjoy!
Here's a little side by side comparison, which would you choose?
I may have a slight obsession with hearts- my birthday is on Valentine's Day, do you blame me?
The downfall of the heart obsession is my weakness for Little Debbie Be My Valentine cakes. When I lived in Japan, I would get so excited to receive a box of them as a birthday gift from home.
I have been thinking about attempting to make a homemade version for quite some time now. Yesterday, I had three sick kids, so there wasn't a whole lot going on around here, so I finally made them!
The Little Debbie cakes have become quite a favorite of my oldest son. When I was done, I called him over to show him them. His response : "Wow Mom, they look really good, but um don't you think it kind of makes you look like a copy cat?" Ha ha. After eating them, he decided mine were really delicious and he likes them better.
The pink chocolate doesn't taste quite the same as Little Debbie's, but homemade is always better- you know what ingredients you put in. I searched for a recipe to follow, and I found one of a homemade zebra cake, so I used the filling recipe only from Confessions of a Cookbook Queen.
Be My Valentine Cakes:
Cake- use your favorite vanilla cake recipe (box or from scratch)- I used this one, but I only used half batch
Filling:
1/4 cup shortening (crisco)
1/8 cup marshmallow fluff
1/4 tsp vanilla
1/2 cup confectioner's sugar
1-2 TBSP half and half
Shell:
1 14 oz bag pink melting chocolates
1/4 cup white chocolate chips
canola oil
1) Preheat oven to 350' for cake. Make cake according to recipe you are using. Grease and flour a rimmed cookie sheet (2 if using a full cake batch). ( I made half batch of the cake recipe, so the filling amounts and shell amounts shown are for a half batch of cake. If using a boxed cake, you need to double the filling and shell amounts).
2) Spread cake batter into cookie sheet. Bake for 12-14 minutes, until toothpick inserted in center comes out clean.
3) Let cake cool completely. While it is cooling, prepare the filling.
4) For the filling, mix together the shortening, fluff, and vanilla. Add confectioner's sugar and beat until combined. Add in half and half, beat until light and fluffy. If necessary, add in a tiny bit more half and half.
5) Using a heart shaped cookie cutter, cut heart shaped pieces of cake and set them on a platter. Try to cut an even number of shapes.
6) Once cooled, spread filling on tops of half of the hearts. Place remaining hearts on top to create a "sandwich". Set the filled hearts on a platter and place in the refrigerator for about 20 minutes.
7) Place the pink chocolates in a microwave safe bowl. Microwave for 20 seconds, stir, repeat, until chocolate is melted and smooth. Add a few teaspoons of oil - I used canola- to thin it out and make it appear smoother when dipping the hearts.
8) Remove heart cakes from the refrigerator. Place a heart in the bowl of melted chocolate, using a spoon, pour the chocolate over the top of the heart and let it run down the sides. Smooth it with the back of the spoon. Using a fork, lift the heart from the bottom, and take it out of the bowl, hold it in the air for a moment to let chocolate drip off. Place the cake on waxed or parchment paper to let the chocolate harden. (If during the process, the chocolate begins to harden in the bowl, remicrowave for 20 seconds, then mix.)
9) When all cakes are coated with pink chocolate, melt the white chocolate chips in the microwave for 20 seconds, then mix, continue until melted and smooth. Place in a ziploc bag with the corner slightly cut off. Squeeze white lines back and forth across the tops of the cakes. Let it harden and enjoy!
Here's a little side by side comparison, which would you choose?
Saturday, January 14, 2012
Busy Cooking: Chocolate Fudge Cake with Salted Caramel Filling
When deciding which cake to make for the chocolate layers, I was flipping through Baking Illustrated and it was no longer a decision once I saw Sour Cream Fudge Layer Cake. I adapted the filling from Salted Caramel Icing I had seen on Sprinkle Bakes blog and I used a Chocolate Icing recipe from Martha Stewart. With a sprinkle of sea salt a top the chocolate icing, this cake has it all, salty and sweet (and rich- so don't cut a big piece). I'm thinking Dave will be trained and ready to make it for my birthday next year!
Sour Cream Fudge Layer Cake:
1 1/4 c all purpose flour
1 cup cocoa powder (says non-Dutch processed)- I used Hersey's
2 tsp instant espresso or coffee powder
1 cup boiling water
1/2 cup sour cream
2 tsp vanilla
1 cup (2 sticks) unsalted butter, almost at room temp
1 3/4 cup sugar
2 eggs
3/4 tsp baking soda
1/2 tsp salt
Salted Caramel Layer:
1/8 c salted butter (1/4 stick)
1/8 c unsalted butter (1/4 stick)
1/4 tsp sea salt
3/4 cup confectioner's sugar
1/3-1/2 c salted caramel sauce
Dark Chocolate Frosting:
1/4 cup cocoa powder
1/4 cup boiling water
1/2 cup (1 stick) unsalted butter
1/2 cup confectioner's sugar
12 oz. semi-sweet chocolate, melted and cooled
Sour Cream Fudge Cake
1) Cut out parchment paper rounds and place them in the bottom of two 9-inch round cake pans. Lightly grease and flour the sides. Set aside. Preheat the oven to 350.
2) Mix cocoa and instant espresso powder in a small bowl, add boiling water, and whisk until smooth, set aside.
3) Mix flour, baking soda, and salt in small bowl, set aside for later.
4) Beat butter in mixer with paddle attachment, about 30 seconds. Add in sugar, beat until fluffy and light. This can take 3-5 minutes, be sure to scrape down sides.
5) Add eggs to butter/sugar mixture, one at a time, be sure to scrape down sides.
6) Once cocoa mixture is cooled, whisk in vanilla and sour cream until smooth.
7) Add 1/3 of dry ingredient mixture to mixer bowl, mix on low, immediately add 1/3 cocoa mixture. Mix another 1/3 of dry ingredients, followed by more cocoa mixture. Repeat one more time so that all of the flour ingredients and cocoa mixture have been added. Scrape down sides of bowl, mix about 15 seconds more to make sure all ingredients have been incorporated.
8) Add batter evenly to the two prepared cake pans. Smooth the tops with a rubber spatula. Bake 23-30 minutes (depending on the type of oven you have). After 12 minutes, rotate the cakes 180'. Cook another 11 minutes, and insert toothpick or skewer into the center. If it comes out clean, or with a few crumbs, take the cakes out, otherwise, check again every 5 minutes.
9) Let cakes cool ten minutes, run a knife around the edges, flip the pan and let the cakes sit on a wire rack. Remove the parchment paper and let the cakes cool completely before frosting.
Salted Caramel Layer
1) While cakes are cooling, make the salted caramel sauce (if you don't have any sitting in your fridge)- you can use store bought caramel sauce in a pinch.
to make the salted caramel sauce, in small sauce pan, mix 1 TBSP corn syrup, 1 cup sugar, 1/4 cup water. Bring to a boil, swirling pan gently, let cook at simmer until it turns an amber color. Remove from heat, add 1 1/2 tsp sea salt, 2 TBSP unsalted butter, 1/2 cup heavy cream. It will foam a bit, so beware. Let sit and cool.
2) Beat butters and salt in mixer, fitted with paddle attachment. Add in confectioner's sugar, scrape down sides. Add in cooled caramel sauce until you reach desired consistency. You want this to be slightly thick, but spreadable, because it's going between two cake layers.
Dark Chocolate Frosting
1) In heat proof bowl set over a pot of boiling water, melt chocolate, stirring often. Once melted, set aside to cool.
2) Stir cocoa and boiling water in a small bowl until cocoa has dissolved, set aside.
3) In a large bowl, beat butter, confectioner's sugar, and salt until fluffy and light, using hand electric mixer.
4) Turn speed to low, add in melted chocolate, beating until combined, scrape down sides.
5) Beat in cocoa mixture, scrape down sides, beat again.
To assemble the cake: Place one cake round on a cake stand or plate. Put all the caramel filling on the cake and evenly spread it across the top. (Optional: drizzle caramel sauce on top of the caramel filling after its spread out). Place the second cake on top. Spread chocolate frosting on the sides of the cakes into a smooth even layer, using a spatula. Scoop frosting onto the top of the cake and spread into a smooth, even layer. If you need to set it, you can refrigerate it, mine seemed to harden pretty quickly and didn't need refrigeration. Sprinkle sea salt on top for garnish.
Wednesday, November 16, 2011
Busy Partying: Princess Birthday Party
How time flies, it seems like just yesterday I was excited that after three boys, I was FINALLY having a girl. Now, here it is, her fourth birthday. She is very much a girly girl and loves to wear dresses and princess things. However, she loves batman, superheroes, power rangers, toy guns, and getting dirty too.
For her birthday outfit, she wanted the batman dress I had been planning to make for her. Add ruffles and ties and any fabric can be fit for the daintiest princess. Here she is sporting the dress, complete with coordinating ruffle bottom pants. The pattern I used for the dress is my favorite one, Claire by Portabellopixie.
I didn't do much in the way of decorations, for several reasons- but the main one is that time is just so limited in my days right now, I put mine into making that outfit and the cake. I went ahead and made a little "bunting" of princess dresses cut out of construction paper and wrote the letters of her name on them:
Then, I wrapped garland around the columns in our main floor, killing two birds with one stone: birthday, and some Christmas.
For the cake, she kept insisting she wanted a pony cake (weird- she never plays with ponies, but ok). Then she'd say princess. So, I found this Cinderella set at Target, with princess and ponies (doubling as a bday gift/cake topper- I thought it was a score). Of course, I was rushing to finish decorating the cake an hour before we were supposed to eat it, but here's how it turned out:
It's a rectangle topped with a 6 inch circle cake, with four mini cupcakes, one in each corner of the rectangle, posing as pedestals for the princesses to stand on. The cake was a total hit with all the kids.
Happy Birthday Princess Hazel!
For her birthday outfit, she wanted the batman dress I had been planning to make for her. Add ruffles and ties and any fabric can be fit for the daintiest princess. Here she is sporting the dress, complete with coordinating ruffle bottom pants. The pattern I used for the dress is my favorite one, Claire by Portabellopixie.
I think she thinks she is batman because she is getting ready to run really fast!
I didn't do much in the way of decorations, for several reasons- but the main one is that time is just so limited in my days right now, I put mine into making that outfit and the cake. I went ahead and made a little "bunting" of princess dresses cut out of construction paper and wrote the letters of her name on them:
Then, I wrapped garland around the columns in our main floor, killing two birds with one stone: birthday, and some Christmas.
For the cake, she kept insisting she wanted a pony cake (weird- she never plays with ponies, but ok). Then she'd say princess. So, I found this Cinderella set at Target, with princess and ponies (doubling as a bday gift/cake topper- I thought it was a score). Of course, I was rushing to finish decorating the cake an hour before we were supposed to eat it, but here's how it turned out:
It's a rectangle topped with a 6 inch circle cake, with four mini cupcakes, one in each corner of the rectangle, posing as pedestals for the princesses to stand on. The cake was a total hit with all the kids.
Happy Birthday Princess Hazel!
Saturday, October 22, 2011
Busy Cooking: Malted Milk Ball Layer Cake
My oldest son chose this cake as his special dessert last week. On his first day at his new school here, he came home, and was asking me if I had ever heard of a whopper. He told me how the two boys sitting near him were eating them and they looked so good, but when they offered him one, he said "no" because he hadn't finished eating his apples. They told him to throw them away, but he said I would get mad, so he didn't (ah, yes, my kids do listen sometimes :) ). Of course, I immediately went to the store to get him a box for his honesty.
As soon as I saw this cake, when flipping through Baked: New Frontiers in Baking, I knew it had his name written all over it. I may have convinced him he really wanted this cake because I wanted to make it. How can you not want to try a cake with three layers of whipped milk chocolate icing sandwiched between layers of vanilla malt cake, topped with whoppers? How?
Even the baby wanted some- you may have noticed an out of place whopper in the first photo, and some fingerprints. Here's what happened just before:
Oven: 325
Malt Cake:
2 1/4 cup cake flour
3/4 cup flour
1 TBSP baking powder
1 tsp baking soda
3/4 tsp salt
1/4 tsp nutmeg
1 cup malted milk powder (I got mine at King Arthur Flour- you could use ovaltine)
1/2 cup (1 stick) unsalted butter
1/2 cup crisco (vegetable shortening)
2 cups sugar
1 TBSP vanilla
2 cups ice cold water
4 large egg whites
Frosting:
8 oz bittersweet chocolate, chopped
8 oz milk chocolate, chopped
1 1/2 cups heavy cream
2 TBSP light corn syrup
1 cup (2 sticks) unsalted butter
1) Preheat the oven to 325. Prepare the cake pans- 3 round pans, you can use either 8" or 9". Cut parchment paper rounds for the bottoms of the pans, grease and flour the sides, set aside.
2) Mix flours (I didn't have cake flour, so a substitute I used was 1 3/4 cup all purpose flour and 1/4 cup cornstarch to replace 2 cup cake flour), baking powder, baking soda, salt, nutmeg, and malted milk powder together in medium bowl, set aside.
3) In mixer, using paddle attachment, beat butter and shortening until creamy, about 3-4 minutes. Add in sugar and vanilla, beat on high until fluffy, about 3 minutes.
4) Prepare a bowl of ice water. In alternating additions, add flour mixture to creamed butter/sugar, then add 1 cup ice water, then more flour, remaining 1 cup ice water, then the rest of the flour mixture. Scrape the sides of the bowl, give it another quick mix.
5) Beat the egg whites with hand mixer until peaks form. Fold the egg whites into the cake batter.
6) Divide the batter among the cake pans. Bake 40-45 minutes, be sure to rotate the pans halfway through for even cooking. When cake tester inserted in center comes out clean, remove from oven. Let cool on wire rack. Once completely cool, invert pans and remove cakes. This cake is a bit fragile and crumbly, so you may want to refrigerate or freeze the cakes for a few minutes before assembling, I did not but they recommended it in the recipe, and I did notice the cakes were a bit more fragile than normal.
7) Make the icing while the cakes are cooling. Place the chocolate in the bowl of your mixer, with the whisk attachment. In a small saucepan, heat the cream and corn syrup until boiling. Remove from heat and pour over chocolate, let sit 2-3 minutes. Whisk on high until chocolate mixture is smooth.
8) Cut butter into 1 TBSP pieces. Put paddle attachment on mixer. Slowly add butter 1 piece at a time and mix until smooth. Mix on medium and once all butter is added, stop, scrape down sides, then turn up to high for about 5-6 minutes. It will thicken like pudding. If it's not thick enough, beat on high for a few more minutes, you can also set in the refrigerator for about 5-10 minutes to thicken it as well.
9) Put the first cake layer on a plate or cake stand. Add 1 1/4 cup icing to the top of the layer, spread it out. Refrigerate for 5-10 minutes to let it set, Repeat with second layer. With the third layer, add a light coat of icing to the whole cake, so it is coated, but very lightly. Refrigerate for 10 minutes. This is crumb coating, so now, when you remove the cake to finish icing it, you won't have any pesky crumbs getting in the way. Garnish the top with malted milk balls and enjoy!
As soon as I saw this cake, when flipping through Baked: New Frontiers in Baking, I knew it had his name written all over it. I may have convinced him he really wanted this cake because I wanted to make it. How can you not want to try a cake with three layers of whipped milk chocolate icing sandwiched between layers of vanilla malt cake, topped with whoppers? How?
Even the baby wanted some- you may have noticed an out of place whopper in the first photo, and some fingerprints. Here's what happened just before:
Oven: 325
Malt Cake:
2 1/4 cup cake flour
3/4 cup flour
1 TBSP baking powder
1 tsp baking soda
3/4 tsp salt
1/4 tsp nutmeg
1 cup malted milk powder (I got mine at King Arthur Flour- you could use ovaltine)
1/2 cup (1 stick) unsalted butter
1/2 cup crisco (vegetable shortening)
2 cups sugar
1 TBSP vanilla
2 cups ice cold water
4 large egg whites
Frosting:
8 oz bittersweet chocolate, chopped
8 oz milk chocolate, chopped
1 1/2 cups heavy cream
2 TBSP light corn syrup
1 cup (2 sticks) unsalted butter
1) Preheat the oven to 325. Prepare the cake pans- 3 round pans, you can use either 8" or 9". Cut parchment paper rounds for the bottoms of the pans, grease and flour the sides, set aside.
2) Mix flours (I didn't have cake flour, so a substitute I used was 1 3/4 cup all purpose flour and 1/4 cup cornstarch to replace 2 cup cake flour), baking powder, baking soda, salt, nutmeg, and malted milk powder together in medium bowl, set aside.
3) In mixer, using paddle attachment, beat butter and shortening until creamy, about 3-4 minutes. Add in sugar and vanilla, beat on high until fluffy, about 3 minutes.
4) Prepare a bowl of ice water. In alternating additions, add flour mixture to creamed butter/sugar, then add 1 cup ice water, then more flour, remaining 1 cup ice water, then the rest of the flour mixture. Scrape the sides of the bowl, give it another quick mix.
5) Beat the egg whites with hand mixer until peaks form. Fold the egg whites into the cake batter.
6) Divide the batter among the cake pans. Bake 40-45 minutes, be sure to rotate the pans halfway through for even cooking. When cake tester inserted in center comes out clean, remove from oven. Let cool on wire rack. Once completely cool, invert pans and remove cakes. This cake is a bit fragile and crumbly, so you may want to refrigerate or freeze the cakes for a few minutes before assembling, I did not but they recommended it in the recipe, and I did notice the cakes were a bit more fragile than normal.
7) Make the icing while the cakes are cooling. Place the chocolate in the bowl of your mixer, with the whisk attachment. In a small saucepan, heat the cream and corn syrup until boiling. Remove from heat and pour over chocolate, let sit 2-3 minutes. Whisk on high until chocolate mixture is smooth.
8) Cut butter into 1 TBSP pieces. Put paddle attachment on mixer. Slowly add butter 1 piece at a time and mix until smooth. Mix on medium and once all butter is added, stop, scrape down sides, then turn up to high for about 5-6 minutes. It will thicken like pudding. If it's not thick enough, beat on high for a few more minutes, you can also set in the refrigerator for about 5-10 minutes to thicken it as well.
9) Put the first cake layer on a plate or cake stand. Add 1 1/4 cup icing to the top of the layer, spread it out. Refrigerate for 5-10 minutes to let it set, Repeat with second layer. With the third layer, add a light coat of icing to the whole cake, so it is coated, but very lightly. Refrigerate for 10 minutes. This is crumb coating, so now, when you remove the cake to finish icing it, you won't have any pesky crumbs getting in the way. Garnish the top with malted milk balls and enjoy!
Sunday, October 9, 2011
Busy Cooking: 1000 eyed Monster Grasshopper Cake
A couple weeks ago, my daughter got stitches in her eyebrow. I let her be the "special person" of the week and choose the dessert that I'd make for Friday night. The next week, my son wanted to choose the special dessert, and thus a tradition was born that each week, one of my kids gets to choose a dessert for Friday night. The pictures of Hazel's cake didn't come out that great and Addison chose a hot fudge cake last week, which wasn't anything to write home about. This one, however- WOW!
Owen wanted a chocolate cake with turquoise frosting and decorated like a monster. I had just bought some candy eyeballs for decorating at the grocery store, love those things! My son is reading a book called the Beast with the 1000 Eyes, hence the other inspiration for the cake decor. I figured it'd be appropriate to have my first Halloween post be something in the kitchen;)
I was thumbing through my cookbooks looking for a new chocolate layer cake recipe to try, when I remembered reading the title "Grasshopper cake" in my new favorite dessert cookbook, Baked, New Frontiers in Baking. If you like dessert and want recipes that come out delicious, get this cookbook, you won't be disappointed. The Brownies are AMAZING!!! If I ever get a good picture of them, I'll post it.
This chocolate cake was really good, good enough that I could have eaten it on its own without icing. It was a recipe for a triple layer cake, but that seemed like too much to me. I ended up making a double layer cake and seven cupcakes. The cake layers were each topped with a small layer of mint chocolate ganache, followed by mint buttercream icing. The icing was really light and fluffy, kind of like a swiss meringue buttercream, but without having to go through the hassle of cooking the egg whites to a certain temperature. I've never made icing this way and it came out soo good, in fact, my husband told me it's the best frosting I've ever made.
If you have the time, I'd highly recommend giving this one a whirl, it won't disappoint the chocolate and mint lovers out there. It's not too overwhelming either, it's just the right balance.
Oven: 325
Cake:
3/4 cup unsweetened cocoa powder
1 1/4 cup hot water
2/3 cup sour cream
2 2/3 cup flour
2 tsp baking powder
1 tsp baking soda
1/2 tsp salt
3/4 cup (1 1/2 sticks) unsalted butter
1/2 cup crisco
1 1/2 cup sugar
1 cup brown sugar, firmly packed
3 large eggs
1 TBSP vanilla
Mint Buttercream Icing:
2 1/4 cup sugar
1/2 cup flour
2 1/4 cup milk
1/2 cup heavy cream
3 sticks butter (they used 4 1/2 sticks- I cannot use that much butter, just can't)
2 TBSP vanilla (they used creme de menthe)
2 1/4 tsp peppermint extract
food coloring (if desired)
Chocolate Mint Ganache:
6 oz bittersweet chocolate, chopped
1/2 cup heavy cream
1 TBSP vanilla (they used creme de menthe)
1/2 tsp peppermint extract
For the cake:
1) Preheat the oven, line the bottoms of your cake pans with parchment paper, grease and flour the sides. (This is enough for 3 8 inch cakes or 2 cakes and 7-8 large cupcakes).
2) In medium bowl, combine flour, baking powder, baking soda, and salt, set aside.
3) In another medium bowl, combine cocoa powder, sour cream, and hot water, set aside.
4) In bowl of mixer with paddle attachment, cream sugar, brown sugar, butter, and crisco on medium high until light and fluffy. Scrape down sides. Add in eggs one by one, scrape down sides. Beat in vanilla.
5) Alternating with the flour mixture, add cocoa mixture in three additions. Mix lightly until just combined. Scrape down sides, mix one more time. Divide batter between cake pans (about 2/3 full). Bake for 35-40 minutes, until tester inserted in the center comes out clean. Cupcakes bake about 18-22 minutes.
6) Remove cakes from oven, let cool on wire rack about 20 minutes before removing from pan, let cool rest of way on racks.
For the ganache:
1) While cake is cooling, heat cream in small sauce pan until comes to a light simmer. Put chocolate in a heatproof bowl. Pour hot cream over chocolate and let sit about 2 minutes. Add vanilla and peppermint extract, whisk together until smooth. Set aside
For the mint buttercream:
1) Put sugar and flour in a medium saucepan, whisk to combine. Stir in milk and cream, heat over medium to boiling. Stir occasionally, scraping the bottom. Once it boils, mixture will thicken. Once mixture thickens, remove from burner and place in bowl of mixer with paddle and mix on high until it cools (mine turned a slightly greyish color).
2) Once the mixture cools, add in pats of butter slowly at medium low speed. Once butter is added, turn mixing speed up to medium high, after a few minutes, you should notice the icing gets thicker and jiggly like jello. Stop the mixer, add in vanilla, peppermint extract, and food coloring, beat on high one minute longer to get it all combined. When you stop mixing, the icing should look soft and shiny, but retain it's shape, for instance, if you put your finger in and pull it out, there should remain a little point from where your finger left the icing. (You can chill it slightly to thicken it, but then it will probably soften again at room temp or heat it over a double boiler to thin it if it's too thick).
Assemble the cake:
1) Put your first layer on a plate or cake stand. Trim the top to make it straight and flat. Put about 1/4 cup of the mint ganache on and spread it out to the edges. Refrigerate for 10-15 minutes to let it set. Put 1 1/4 cups mint butter cream on top and spread to the edges. Put second layer on and repeat ganache and butter cream- repeat with a third layer if you chose to use one.
2) Put a light coat of frosting all around the edges and smooth down (this is a crumb coat)- refrigerate for about 10 minutes to let it set. Now, frost the edges and top. I too the icing in a decorating bag with a star tip and dolloped it randomly all over the top and sides to give it a monster fur look. Then, I took the remaining mint ganache and did the same. The kids put eyeballs in the ganache. You can refrigerate or leave at room temp for up to 3 days.
This cake was so good, it almost tops my favorite over chocolate chip cookie dough cake (almost).
Owen wanted a chocolate cake with turquoise frosting and decorated like a monster. I had just bought some candy eyeballs for decorating at the grocery store, love those things! My son is reading a book called the Beast with the 1000 Eyes, hence the other inspiration for the cake decor. I figured it'd be appropriate to have my first Halloween post be something in the kitchen;)
I was thumbing through my cookbooks looking for a new chocolate layer cake recipe to try, when I remembered reading the title "Grasshopper cake" in my new favorite dessert cookbook, Baked, New Frontiers in Baking. If you like dessert and want recipes that come out delicious, get this cookbook, you won't be disappointed. The Brownies are AMAZING!!! If I ever get a good picture of them, I'll post it.
This chocolate cake was really good, good enough that I could have eaten it on its own without icing. It was a recipe for a triple layer cake, but that seemed like too much to me. I ended up making a double layer cake and seven cupcakes. The cake layers were each topped with a small layer of mint chocolate ganache, followed by mint buttercream icing. The icing was really light and fluffy, kind of like a swiss meringue buttercream, but without having to go through the hassle of cooking the egg whites to a certain temperature. I've never made icing this way and it came out soo good, in fact, my husband told me it's the best frosting I've ever made.
If you have the time, I'd highly recommend giving this one a whirl, it won't disappoint the chocolate and mint lovers out there. It's not too overwhelming either, it's just the right balance.
Oven: 325
Cake:
3/4 cup unsweetened cocoa powder
1 1/4 cup hot water
2/3 cup sour cream
2 2/3 cup flour
2 tsp baking powder
1 tsp baking soda
1/2 tsp salt
3/4 cup (1 1/2 sticks) unsalted butter
1/2 cup crisco
1 1/2 cup sugar
1 cup brown sugar, firmly packed
3 large eggs
1 TBSP vanilla
Mint Buttercream Icing:
2 1/4 cup sugar
1/2 cup flour
2 1/4 cup milk
1/2 cup heavy cream
3 sticks butter (they used 4 1/2 sticks- I cannot use that much butter, just can't)
2 TBSP vanilla (they used creme de menthe)
2 1/4 tsp peppermint extract
food coloring (if desired)
Chocolate Mint Ganache:
6 oz bittersweet chocolate, chopped
1/2 cup heavy cream
1 TBSP vanilla (they used creme de menthe)
1/2 tsp peppermint extract
For the cake:
1) Preheat the oven, line the bottoms of your cake pans with parchment paper, grease and flour the sides. (This is enough for 3 8 inch cakes or 2 cakes and 7-8 large cupcakes).
2) In medium bowl, combine flour, baking powder, baking soda, and salt, set aside.
3) In another medium bowl, combine cocoa powder, sour cream, and hot water, set aside.
4) In bowl of mixer with paddle attachment, cream sugar, brown sugar, butter, and crisco on medium high until light and fluffy. Scrape down sides. Add in eggs one by one, scrape down sides. Beat in vanilla.
5) Alternating with the flour mixture, add cocoa mixture in three additions. Mix lightly until just combined. Scrape down sides, mix one more time. Divide batter between cake pans (about 2/3 full). Bake for 35-40 minutes, until tester inserted in the center comes out clean. Cupcakes bake about 18-22 minutes.
6) Remove cakes from oven, let cool on wire rack about 20 minutes before removing from pan, let cool rest of way on racks.
For the ganache:
1) While cake is cooling, heat cream in small sauce pan until comes to a light simmer. Put chocolate in a heatproof bowl. Pour hot cream over chocolate and let sit about 2 minutes. Add vanilla and peppermint extract, whisk together until smooth. Set aside
For the mint buttercream:
1) Put sugar and flour in a medium saucepan, whisk to combine. Stir in milk and cream, heat over medium to boiling. Stir occasionally, scraping the bottom. Once it boils, mixture will thicken. Once mixture thickens, remove from burner and place in bowl of mixer with paddle and mix on high until it cools (mine turned a slightly greyish color).
2) Once the mixture cools, add in pats of butter slowly at medium low speed. Once butter is added, turn mixing speed up to medium high, after a few minutes, you should notice the icing gets thicker and jiggly like jello. Stop the mixer, add in vanilla, peppermint extract, and food coloring, beat on high one minute longer to get it all combined. When you stop mixing, the icing should look soft and shiny, but retain it's shape, for instance, if you put your finger in and pull it out, there should remain a little point from where your finger left the icing. (You can chill it slightly to thicken it, but then it will probably soften again at room temp or heat it over a double boiler to thin it if it's too thick).
Assemble the cake:
1) Put your first layer on a plate or cake stand. Trim the top to make it straight and flat. Put about 1/4 cup of the mint ganache on and spread it out to the edges. Refrigerate for 10-15 minutes to let it set. Put 1 1/4 cups mint butter cream on top and spread to the edges. Put second layer on and repeat ganache and butter cream- repeat with a third layer if you chose to use one.
2) Put a light coat of frosting all around the edges and smooth down (this is a crumb coat)- refrigerate for about 10 minutes to let it set. Now, frost the edges and top. I too the icing in a decorating bag with a star tip and dolloped it randomly all over the top and sides to give it a monster fur look. Then, I took the remaining mint ganache and did the same. The kids put eyeballs in the ganache. You can refrigerate or leave at room temp for up to 3 days.
This cake was so good, it almost tops my favorite over chocolate chip cookie dough cake (almost).
Wednesday, March 2, 2011
Super Mario Brothers Birthday Party 2- Luigi
Luckily for me, another one of my sons wanted a Super Mario Brothers birthday party, and even more luckily, he likes Luigi better than Mario. For his birthday, of course, I made him a shirt (fire Mario is lighting the 6 candles):
The back:
The party was the night before we were leaving Japan, so it was a quickie and wasn't as elaborate as it would have been if we were not moving the next day. For the table, I used my giant roll of paper, and then I cut out printouts of Mario, Luigi, Toad, and Princess Peach and scattered them about. It turns out, the kids had fun picking which ones they wanted to have near them while they ate their cake. I found the images for the printouts by googling the character names and then I right clicked and saved them as clipart. I put them in a word document multiple times and made them each about 2 inches tall.
They made great cupcake picks too:
For napkins, I bought plain yellow ones (much cheaper than design ones) at Target and using my sharpie, drew question marks on them, like hint boxes:
I bought plain green plates and bowls too, since Luigi wears green.
I had my brother and his wife, who are much more artistic than me, draw a Luigi on a piece of cardboard and we cut out the face, so the kids could "pose" as Luigi:
And for the crazy part of the party, if you didn't know, Luigi is a plumber. I cannot stand that my kids are always saying "poo" and "toilet", so I thought since Luigi is a plumber, I'd take the party to a different level than I normally would. I decided to go for the plumber/toilet aspect of Luigi and for a game, we played pin the poo in the toilet:
Yes, unkachan is an actual cartoony character in Japan, so I googled unkachan and downloaded some pics, cut them out, and we were good to go.
I even found some unkachan lollipops at our grocery store for party favors (don't you just love Japan and it's kawaii factor?):
I wanted to do so much more, but there just wasn't time, if you want to have a plumber Super Mario party, I'm sure the possibilities are endless. The game got lots of giggles and my kids didn't take it overboard, so I was happy.
For the cake for our family, I had strict instructions it had to be a Luigi face. Using the images I found for the wooden dolls I painted the kids for Christmas, here's what I came up with:
The cake was a double layer chocolate chip cookie dough, turns out the icing for that cake is the perfect flesh tone (in case you ever need to make a face cake ;) I made the whole amount listed on the link, it was enough to make 24 mini cupcakes (which I'd recommend with this recipe since they are rich) and 2 shallow 9" round cakes. I smeared the dough filling in between the two round cakes and used cone filling method to fill the mini cupcakes. Yum yum yum.
Here is a link to the other Super Mario party we had last summer.
The back:
The party was the night before we were leaving Japan, so it was a quickie and wasn't as elaborate as it would have been if we were not moving the next day. For the table, I used my giant roll of paper, and then I cut out printouts of Mario, Luigi, Toad, and Princess Peach and scattered them about. It turns out, the kids had fun picking which ones they wanted to have near them while they ate their cake. I found the images for the printouts by googling the character names and then I right clicked and saved them as clipart. I put them in a word document multiple times and made them each about 2 inches tall.
They made great cupcake picks too:
For napkins, I bought plain yellow ones (much cheaper than design ones) at Target and using my sharpie, drew question marks on them, like hint boxes:
I bought plain green plates and bowls too, since Luigi wears green.
I had my brother and his wife, who are much more artistic than me, draw a Luigi on a piece of cardboard and we cut out the face, so the kids could "pose" as Luigi:
And for the crazy part of the party, if you didn't know, Luigi is a plumber. I cannot stand that my kids are always saying "poo" and "toilet", so I thought since Luigi is a plumber, I'd take the party to a different level than I normally would. I decided to go for the plumber/toilet aspect of Luigi and for a game, we played pin the poo in the toilet:
Yes, unkachan is an actual cartoony character in Japan, so I googled unkachan and downloaded some pics, cut them out, and we were good to go.
I even found some unkachan lollipops at our grocery store for party favors (don't you just love Japan and it's kawaii factor?):
I wanted to do so much more, but there just wasn't time, if you want to have a plumber Super Mario party, I'm sure the possibilities are endless. The game got lots of giggles and my kids didn't take it overboard, so I was happy.
For the cake for our family, I had strict instructions it had to be a Luigi face. Using the images I found for the wooden dolls I painted the kids for Christmas, here's what I came up with:
The cake was a double layer chocolate chip cookie dough, turns out the icing for that cake is the perfect flesh tone (in case you ever need to make a face cake ;) I made the whole amount listed on the link, it was enough to make 24 mini cupcakes (which I'd recommend with this recipe since they are rich) and 2 shallow 9" round cakes. I smeared the dough filling in between the two round cakes and used cone filling method to fill the mini cupcakes. Yum yum yum.
Here is a link to the other Super Mario party we had last summer.
Sunday, January 16, 2011
Triple Layer Chocolate Cake with Whipped Vanilla Icing
Have you ever seen Pollyanna? Well, in the end of the movie, there are lots of cakes in the kitchen at her house, layer cakes, and they look delicious. I remember that being one of my favorite parts of the movie, I had never seen or had a piece of layer cake before. I have always wanted to make one and I've only ever made a 2-layer cake.
As many of you know, last week, almost everyday one of us was sick. I saw this cake on Annie's Eats last week and I really wanted to make it- one thing I've been craving is chocolate cake with vanilla icing. She got the idea for the cake from the book The Pastry Queen (I've already added it to my wish list, my bday is just around the corner ;) I thought making this cake would be a good way to celebrate all of us being healthy again.
The icing recipe was really what stuck out at me because it only needed 1 1/4 cup confectioner's sugar and it was going to make enough icing to cover three layers. I have been rationing my confectioner's sugar so that I have enough left for my last month here. Plus, I thought that a cake that big would be too rich with a standard vanilla buttercream icing.
Before I put down the recipe, I need to note that this is the LARGEST quantity of cake batter I have ever made in my life! I started mixing the initial dry ingredients in my kitchenaid, but it got too full, so I ended up having to do the last few steps with a hand whisk. Unless you have a party with like 15 people to go to, you might consider halving the recipe and using two layers instead. This cake seriously could have fed like 30 people easily!
Oven: 350'
Cake:
4 cups flour
4 cups sugar
1 cup (2 sticks) unsalted butter
1 cup canola oil
2 cups water
4 eggs
1 cup unsweetened cocoa powder
1 cup buttermilk
1 TBSP baking soda
1/2 tsp salt
1 TBSP vanilla
Frosting:
4 cups chilled heavy whipping cream
1 1/4 cup confectioner's sugar
Glaze:
4 oz. bittersweet chocolate, chopped
1/2 cup heavy cream
1/4 cup light corn syrup
2 tsp vanilla
Prepare your cake pans, I lightly buttered them, then added flour mainly to the sides. I cut out circles of parchment paper, by tracing the bottom of the pan on the parchment paper and place the parchment paper inside each pan bottom. HOLY COW, can't believe I've never used parchment paper in a cake pan, the cakes popped right out of the pan so easily! I will always use parchment paper now!
For the cake, in a LARGE mixing bowl, mix together flour, sugar, and cocoa powder. Set aside. In saucepan, heat oil, water, and butter, until butter is melted. Add melted butter mixture to dry ingredients, whisk together. Add in eggs one at a time, scrape down sides. Whisk in buttermilk. This is where I had to switch to hand mixing, the bowl was too full (you might be lucky to have a 6Qt mixer and be okay). Add baking soda, salt, and vanilla, mix to incorporate. Pour into three 9" round cake pans (or 2 10"). I had so much batter, my 3 pans were more than 1/2 full. The cake rose a lot in the oven, but when they cooled, the top came down and I didn't have to cut any off to make it flat when I assembled the cake.
Bake cakes 35-45 min, until a tester comes out clean. Let cool on countertop for 15 min, then remove from pan and cool on rack until completely cooled (I let mine sit 3 hours).
For the icing, add the cream to a medium sized bowl. Using an electric hand mixer, beat on high until stiff peaks form (consistency of cool whip)- if you over beat, it will get thick like butter. It took mine about 4-5 minutes, so be patient. Then, mix in the confectioner's sugar. Frost the top of the bottom layer, stick on the next, frost the top of that, put on the third layer, frost all the sides and then finish off frosting the top.
Let side about 1 hour in the fridge, I left mine on the counter, my fridge was too full. Then make the glaze. Put the chocolate in a small bowl. Heat the cream in a small saucepan until simmering. Pour the cream over the chocolate, let sit a few minutes, whisk together until smooth. Add in corn syrup and vanilla, mix. Then put in a small container with a spout for pouring, let sit 10 minutes to harden slightly. Pour over the top of the cake, I started in the center and swirled out in a spiral until I reached the edges and let it drip down.
I added some strawberries for color.
Now, for the fun part, eat it! But, be careful if you think it looks cute on your tiny pedestal. This is a LOT of cake, I was trying to show how big it was in this picture, but Hazel would not cooperate (however she is saying "cheese" and doing the "v-sign), but I hope you can see it's size compared to her.
When you cut it, watch out, because on your tiny pedestal, if one side is being cut to eat, the other side gets very heavy and this might happen:
My advice to you if you make this cake, put it on a plate or flat board. Needless to say, I did not get any pictures of the nice slice showing the three layers. I was proud of my hard work, you'll just have to trust me it looked pretty. But at the cost of getting that picture, we all had a really good laugh and now it's in a trifle bowl. It was very very good, and we will be eating it for days and days now!
Subscribe to:
Posts (Atom)