I can't believe it's already less than a week before Thanksgiving. I'm scrambling to get two more rooms cleaned and organized for some guests that are coming to visit for the holiday. I am laughing that before we moved in, I was thinking I'd be unpacked by mid- September (ha ha ha). Amidst everything that's going on, I want to have an amazing Thanksgiving dinner to celebrate our first one in our new house. In order to make the day less chaotic and more enjoyable, I made my menu last week and set up a timeline of little things to prepare everyday so that Thursday solely involves cooking turkey, rolls, and a few veggies.
I thought I'd share my menu and timeline in case someone out there needed some ideas. I also find it helpful to read what other people prepare in advance- you'd be surprised how well some things keep.
Breakfast:
Cinnamon rolls
Appetizers:
Pumpkin bread
Zucchini bread
Pumpkin apple soup
Spiced pecans
Veggies:
Mashed potatoes
Butternut squash
Corn
Glazed Carrots
Green bean casserole
Main Course:
Turkey
Stuffing with thyme and onions
Homemade Cranberry Sauce (my something new that I'm making)
Parker house rolls
Beverage:
Apple Cider
Cranberry Margaritas
Dessert:
Apple Pie
Apple Cider Pie with fresh whipped cinnamon cream
Salted Caramel Brownies
Homemade Oreo Ice Cream Pie
Chocolate Mousse Pie with Graham Cracker Crust
Cheesecake
Timeline:
Some things I already have in the freezer - I made them a few weeks ago, ate half, froze half (pumpkin bread and pumpkin soup).
For the oreo pie, last week I made homemade oreos, I put the leftovers in the food processor and pressed the crumbs into a pie plate, covered with plastic wrap and put in freezer.
Sunday: Bake Zucchini bread, freeze
Monday: Make spiced pecans, store in air tight container
Make pie crusts, put in freezer
Make cranberry sauce, can refrigerate for several days
Prepare green bean casserole and freeze
Make cinnamon rolls, freeze once cut into individual rolls
Tuesday:
Make cheesecake
Make oreo ice cream, assemble pie, freeze
Put pumpkin soup in refrigerator to thaw
Make mousse pie and refrigerate
Wednesday:
Bake apple pie, apple cider pie, and brownies.
Make dough for rolls, let rise in refrigerator overnight (you can make them several days in advance and freeze the rolls after the first rise).
Prepare stuffing
Place turkey in brine overnight
Take pumpkin and zucchini bread out of freezer, leave on counter overnight
Put green bean casserole in fridge overnight
Put cinnamon rolls in fridge from freezer
Thursday:
Bake cinnamon rolls
Put turkey in oven
Peel squash, potatoes, carrots, set in pots.
Bake casserole and rolls
Make Maragaritas
Yum, I am getting excited to eat all this food and I am most looking forward to the leftover pie for breakfast over the weekend! What are you having for Thanksgiving dinner?

Monday, November 21, 2011
Saturday, November 19, 2011
Busy Cooking: Pumpkin Spice Muffins with Hidden Cream Cheese Filling

This recipe was found on Brown Eyed Baker.
Note: To get the filling to survive baking, it is frozen ahead of time. It is recommended to freeze it at least 2 hours before baking- I found making it the night before is easy and cuts down on prep time.
Pumpkin Muffins with Cream Cheese Filling:
Oven: 350
Cream Cheese Filling:
4 oz cream cheese, softened
1 1/2 tsp vanilla
1/2 cup confectioner's sugar
Muffins:
1 1/2 cups flour
2 tsp pumpkin pie spice
1/2 tsp cinnamon
1/2 tsp ground cloves
1/2 tsp nutmeg
1/2 tsp baking soda
1/2 tsp salt
2 eggs
1 cup sugar
1 cup pumpkin puree
1/2 cup + 2 TBSP oil
1/2 tsp vanilla
Streusel Topping:
1/4 cup pecans, toasted and chopped
1/2 cup flour
1/3 cup sugar
1/2 tsp cinnamon
3 TBSP unsalted butter, melted
1) In a small bowl, mix together cream cheese, confectioner's sugar, and vanilla until smooth. Lay out a sheet of plastic wrap, about 18 inches long. Pour the cream cheese mixture in a straight line on the plastic wrap, leave room on the ends. Form into a long skinny log, about 12 inches long, wrap up tightly in the plastic wrap and place in the freezer for at least two hours.
2) Toast pecans in oven for 10 minutes. Let cool, lightly chop. In a small bowl, lightly mix together pecans, flour, sugar, cinnamon, and butter to make the streusel. Set aside.
3) In a large bowl, mix together flour, pumpkin pie spice, cinnamon, cloves, nutmeg, baking soda, and salt. Set aside.
4) In a medium bowl, mix together pumpkin, oil, sugar, vanilla, and eggs.
5) Pour the wet ingredients on top of the dry ingredients. Gently mix together until combined.
6) Preheat oven to 350. Prepare muffin tins with liners (makes 12 large muffins or 24 mini, plus 5 large). If you make minis, which I always do, you will get a small sinkhole on the top of the muffin from the cream cheese spreading out because they are so small.
7) Remove the cream cheese log from the freezer, remove it from the plastic wrap and place it on a cutting board. If making full size muffins, cut it into 12 1 inch pieces, if making minis, cut into 1/2" pieces.
8) Scoop a small amount of batter into the bottoms of the muffin cups. Press one piece of cream cheese into each muffin cup on top of the batter. Scoop more batter on top of the cream cheese to cover it.
9) Sprinkle tops of batter with streusel and press it down lightly.
10) Bake 18-22 minutes for large muffins and 14 -17 minutes for the minis. Cool and enjoy.
Wednesday, November 16, 2011
Busy Partying: Princess Birthday Party
How time flies, it seems like just yesterday I was excited that after three boys, I was FINALLY having a girl. Now, here it is, her fourth birthday. She is very much a girly girl and loves to wear dresses and princess things. However, she loves batman, superheroes, power rangers, toy guns, and getting dirty too.
For her birthday outfit, she wanted the batman dress I had been planning to make for her. Add ruffles and ties and any fabric can be fit for the daintiest princess. Here she is sporting the dress, complete with coordinating ruffle bottom pants. The pattern I used for the dress is my favorite one, Claire by Portabellopixie.


I didn't do much in the way of decorations, for several reasons- but the main one is that time is just so limited in my days right now, I put mine into making that outfit and the cake. I went ahead and made a little "bunting" of princess dresses cut out of construction paper and wrote the letters of her name on them:
 Then, I wrapped garland around the columns in our main floor, killing two birds with one stone: birthday, and some Christmas.
 For the cake, she kept insisting she wanted a pony cake (weird- she never plays with ponies, but ok). Then she'd say princess. So, I found this Cinderella set at Target, with princess and ponies (doubling as a bday gift/cake topper- I thought it was a score). Of course, I was rushing to finish decorating the cake an hour before we were supposed to eat it, but here's how it turned out:

 It's a rectangle topped with a 6 inch circle cake, with four mini cupcakes, one in each corner of the rectangle, posing as pedestals for the princesses to stand on. The cake was a total hit with all the kids.
 Happy Birthday Princess Hazel!

For her birthday outfit, she wanted the batman dress I had been planning to make for her. Add ruffles and ties and any fabric can be fit for the daintiest princess. Here she is sporting the dress, complete with coordinating ruffle bottom pants. The pattern I used for the dress is my favorite one, Claire by Portabellopixie.

I think she thinks she is batman because she is getting ready to run really fast!

I didn't do much in the way of decorations, for several reasons- but the main one is that time is just so limited in my days right now, I put mine into making that outfit and the cake. I went ahead and made a little "bunting" of princess dresses cut out of construction paper and wrote the letters of her name on them:


Thursday, November 10, 2011
Busy Sewing: Homemade Pillow Pets
Let me just start off by saying, "I LOVE THESE!!!" I am turning our homemade Angry Super Bird costumes into pillows. Are you looking for ideas for Christmas? I am planning on making some Star Wars themed one for my kids for Christmas.
You can follow the tutorial here to make normal Angry Birds costumes. If you are going to make the pillows, you do not need to use the muslin. You can just do the felt.
You can make any character you want. I found this link to a page with characters cartoonified in circles- which would make it easier for you to make a round pillow looking like your child's favorite character.
Start off with felt- approximately .5 to .75 yards, depending how big you want to make it. You need to cut two circles of your main felt. To make a circle, fold the felt in half, then in half again. On the corner between the two sides with folds, place a piece of yarn, then stretch it out along the edge of the felt. While holding the yarn stretched out, draw an arch across the felt to the other side by moving the yarn like a pendulum and keeping the marker at the far end of the yarn. Cut along this line, open it up and you will have a circle. Cut out one more. For this Super Mario pillow, I used a 13 inch piece of yarn, so the circle ends up being 26 inches wide.
 Attach your felt pieces to the front of the face circle. I opted to sew mine on with a wide stitch. You can hot glue them too.
Sew the front to the back of the pillow- the design should be on the inside. Leave a six to eight inch wide opening so you can invert the pillow and then stuff it.
 Invert the pillow, so the right side is facing out:
 Stuff the pillow- I used about 1.25 bags of fill for the pillow. I could have used more, but I didn't want to make it too firm. I got the fill for 2.99 a bag at Hobby Lobby. After it's filled, carefully pin together the opening, rolling some of the felt into the opening, so you don't have a rough edge. Sew this closed using a topstitch, you can do it by hand too.
Finished product:
 Someone is taking after her mama and likes to take pics of things we make:
 Perfect for little bodies to lay on:
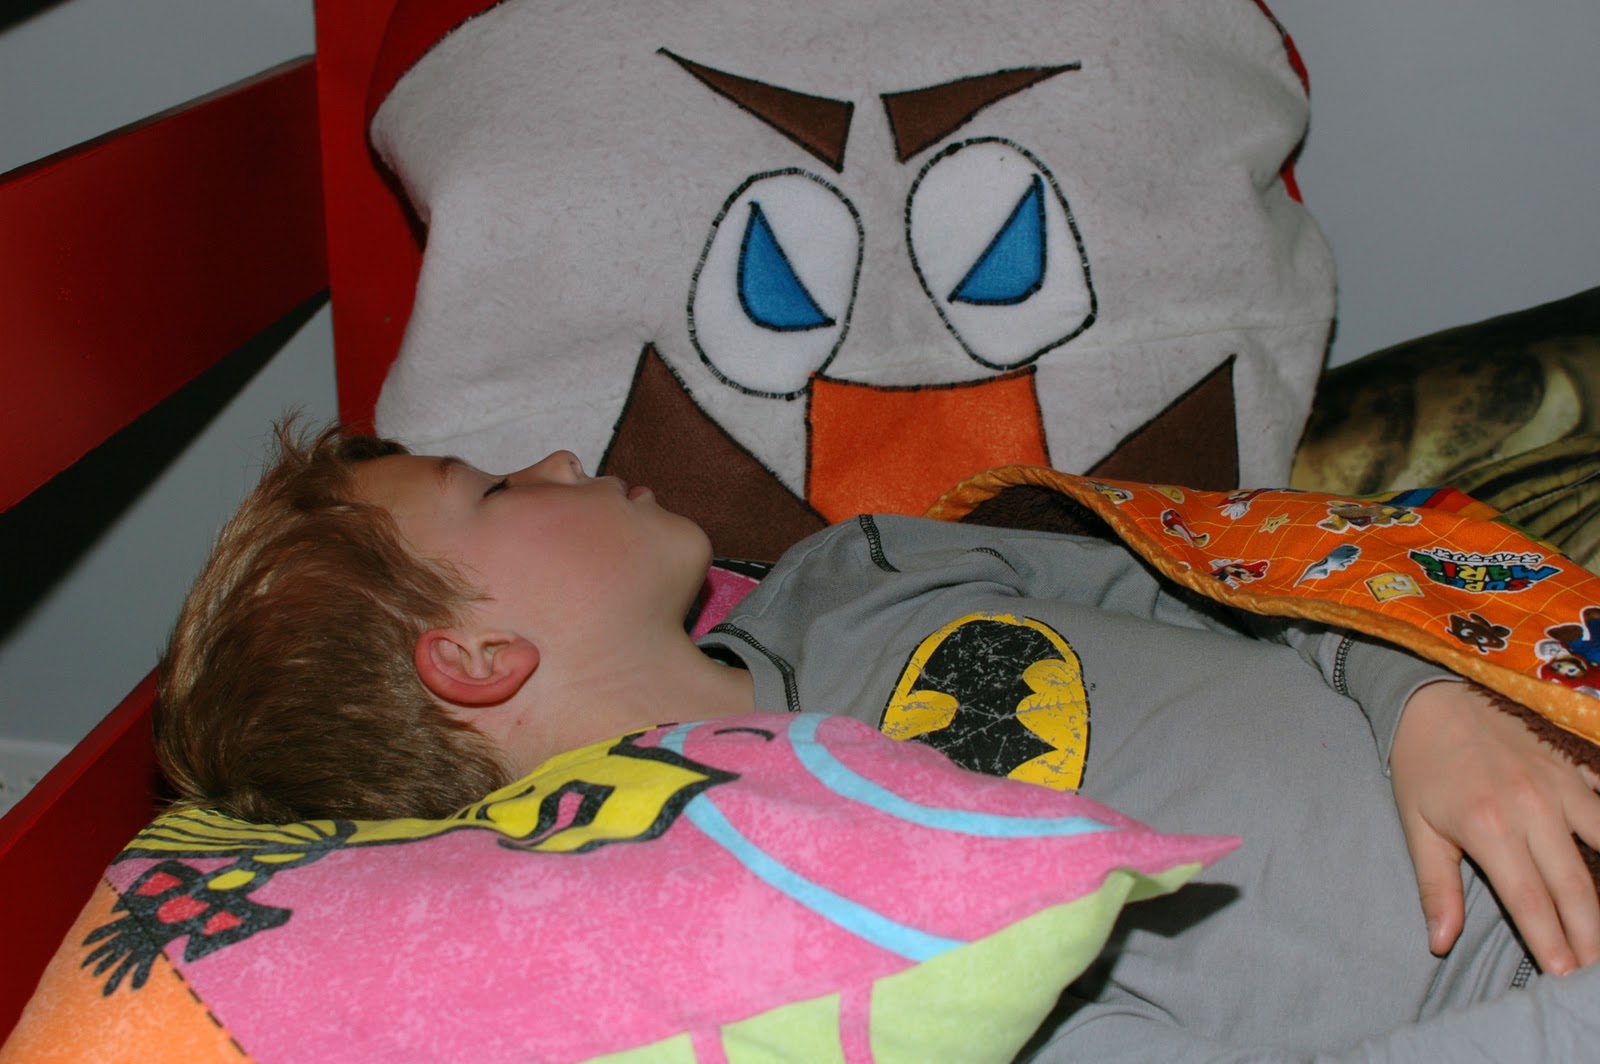
 I wonder if he's going to be freaked out if he wakes up in the middle of the night and sees this staring at him.

You can follow the tutorial here to make normal Angry Birds costumes. If you are going to make the pillows, you do not need to use the muslin. You can just do the felt.
You can make any character you want. I found this link to a page with characters cartoonified in circles- which would make it easier for you to make a round pillow looking like your child's favorite character.
Start off with felt- approximately .5 to .75 yards, depending how big you want to make it. You need to cut two circles of your main felt. To make a circle, fold the felt in half, then in half again. On the corner between the two sides with folds, place a piece of yarn, then stretch it out along the edge of the felt. While holding the yarn stretched out, draw an arch across the felt to the other side by moving the yarn like a pendulum and keeping the marker at the far end of the yarn. Cut along this line, open it up and you will have a circle. Cut out one more. For this Super Mario pillow, I used a 13 inch piece of yarn, so the circle ends up being 26 inches wide.

Sew the front to the back of the pillow- the design should be on the inside. Leave a six to eight inch wide opening so you can invert the pillow and then stuff it.


Finished product:


Wednesday, November 9, 2011
Busy Creating: Halloween Costumes

My oldest son was so indecisive about a costume this year, at one point, he mentioned not even dressing up (unheard of!). In my search for Angry Bird costumes, I found this page with some cool cartoon spoofs of Angry Bird Superheroes. I knew instantly that I wanted to make us Angry Bird-like costumes, but of our favorite characters. As soon as I mentioned to my son that I would make him Angry Mario, he was all for it. I wasn't sure how my design would come out, but he was absolutely thrilled!


This was my kids' first real Halloween in the US and it was a total blast!

Saturday, November 5, 2011
Busy Cooking: Pretzel Pizza Bites

It must be an Illinois thing, because my husband asks me to buy pretzel rolls whenever I go to Whole Foods. I had never heard of them before. Since living here, I've seen so many recipes online for pretzel dinner rolls, pretzel sandwich buns, and now pretzel pizza bites- and they all seem to originate from Illinois. These things totally rock, I can't wait for my dad to visit next week, so I can make them again for him.
As I was making them, I thought I wouldn't post them because it was a bit of an effort, rolling out the small dough balls, filling them, then sealing them. But, the end result was sooo good, it was totally worth it. If you're looking for something new to try as an appetizer or for a lazy rainy Sunday afternoon movie or football treat, try these, you won't be sorry!
Pretzel Pizza Rolls:
Dough:
1 1/2 cups warm water
2 TBSP brown sugar
1 pckg active yeast (2 1/4 tsp)
6 TBSP unsalted butter, melted
2 1/2 tsp kosher salt
4 1/2-5 cups all purpose flour
5 qts water
3/4 cup baking soda
shredded mozzarella cheese
pepperoni slices
sauce for dipping
egg beaten for brush on tops (optional- I didn't do this step)
sea salt for sprinkling on tops
For the dough:
1) In the mixer, mix together water, brown sugar, yeast, and butter with the dough hook. Let sit 5 minutes.
2) Add salt and 4 1/2 cups flour, continue mixing until dough forms a ball. If it is sticky, add more flour, 1 TBSP at a time. Knead for about 4 minutes, dough may be sticking slightly to bottom of ball, but should not stick to sides.
3) Place dough in greased bowl, cover and let rise until doubled 1.5-2 hours.
4) Put dough on lightly floured surface. Cut into 8 equal pieces. Roll each piece into a 21 inch long rope, cut into 7 pieces each (you should have about 56 pieces of dough).
5) Slice pepperoni pieces into quarters and put shredded cheese into a bowl. Take each piece of dough, roll out into a flat circle. Put several pepperoni pieces and a good pinch of mozzarella cheese into the center. Fold sides up and pinch together. Roll ends up and pinch together. Gently press with your finger tips to close the seams. Place the prepared rolls onto a plate.
6) Preheat the oven to 425. Prepare baking sheets by lightly greasing them, or lining them with parchment paper. I needed three baking sheets. Add the 5 qts water and 3/4 cup baking soda to your largest stock pot and bring to a boil. I find that you should let it boil for about 4 minutes before you drop your first roll in.
7) Once water is boiling, put the rolls in and you will see some foam forming in the water, let the rolls boil for 30 seconds. I would drop in about 10-15, count to 30, remove them with a slotted spoon to let the water drain off and place them on a baking sheet. You can tell the water was hot enough because the dough will feel almost rubbery when you remove the rolls, it should not feel sticky and look like it melted, this means your water isn't ready yet- try a few test ones first.
8) Sprinkle salt on the tops of the rolls. (or you can brush with beaten egg first, then top with salt- your choice). Bake in oven until dark golden brown, about 15-18 minutes. After 12 minutes, my tops were getting brown, I took them out, but they weren't done yet. I put them back in for 6 more minutes and they were dark, but done and delicious! They should be dark brown like a pretzel.
9) Let cool, serve with a side of tomato sauce if you like. I was so hungry, I opted for no sauce and they were delicious!!! I think I ate at least 20- no lie.

Wednesday, November 2, 2011
Busy Cooking: Salted Caramel Mocha

When the salted caramel mocha was first released, I tried it and didn't really like it, I thought it was too sugary. One day last week, I was getting coffee and my husband said he didn't want one. That usually means he is just going to take a few large sips out of mine. I thought I'd be the good wife and get his favorite drink, the salted caramel mocha. It ended up being really good and I was hoping he wouldn't want even one sip. In fact, it was so good, that when he did take his sip, he went to the next Starbucks we drove by and got his own.
I remembered coming across this recipe for Salted Caramel Mocha cupcakes and the coffee drink on Bakingdom. Last weekend, I was thinking I would surprise my husband and try to make him a homemade salted caramel mocha. WOW- it was WAY WAY better than Starbucks. In fact, I had two that very day. We didn't have any whipped cream, so I had to whip up some fresh stuff to get the full effect.
The salted caramel is even delicious on it's own, I couldn't stop licking the spoon. I think this may have opened up a can of worms as far as me and making lots more recipes involving salted caramel. The homemade salted caramel popcorn I made last year is soo good, if you haven't tried that, check it out.
Salted Caramel Sauce:
1 cup sugar
1/4 cup water
1 TBSP light corn syrup
2 TBSP unsalted butter
1/2 cup heavy cream
1 1/2 tsp sea salt crushed (I actually used kosher because it's all I had)
Salted Caramel Mocha:
1 shot espresso or 1/4 cup strong brewed coffee
6-8 oz steamed milk (you can microwave if you can't steam it)
2 TBSP salted caramel sauce
1 TBSP chocolate sauce (I used starbucks mocha powder, but you can use Herseys dark syrup too)
Homemade whipped cream:
1/2 cup heavy cream
1 tsp sugar
splash vanilla
For the salted caramel sauce:
1) Stir sugar, water, and corn syrup. Bring to a boil over medium heat without stirring, swirl pan occasionally. I thought it might stick without stirring, but as it boils, it dissolves. Continue boiling until a dark amber color is achieved.
2) Remove from heat, immediately stir in butter, salt, and heavy cream. It will foam up slightly, so be ready.
3) Let cool to room temperature and enjoy. Store in refrigerator in an airtight container. ** Mine was firm the next day, but I was able to scoop out the caramel with the spoon and scrape it into the cup, the hot milk helped it dissolve, and if left out at room temp for about five minutes, it started getting softer.

Put 2 TBSP salted caramel in bottom of cup and 1 TBSP chocolate sauce. Pour espresso or coffee in, stir in milk. Top with whipped cream. Drizzle more salted caramel sauce on top, sprinkle with a pinch of sea salt and sugar (I had some sweet caramel sprinkle from the Pampered Chef that I used too).
**There will be enough salted caramel sauce for about 10 salted caramel mochas.
For fresh whipped cream:
Put heavy cream in a bowl with the sugar. Beat with hand mixer on high for about 1 minute until stiff peaks form, the cream will retain it's shape. Fold in vanilla.

Subscribe to:
Posts (Atom)