Saturday, July 9, 2011

Busy Travelling: License Plates and learning States

This week, my kids and I have been reading "If I were Alive During the American Revoution".  We have been talking about wars, the pledge of allegiance, the thirteen original colonies, and more.  Given that we are driving across the country to Massachusetts, I thought it would be fun to do a license plate game.  On the way here, we tried to remember the plates we saw, but kept losing track.  I wanted to print out little license plates for the kids to fill in, but my printer is still at my parent's house.

We have been chosing paint colors for our house and one day, I was staring at the color strip and was like these are perfect sized for a license plate game.  I took 7 color shade strips for each of my kids' favorite colors, cut them in half horizontally, and glued them to the back of a CEREAL BOX!
For the big kids, I wrote the full names of the states:
For the little kids, I just wrote the two letter state abbreviation.  Each of the thirteen colonies has a star over the top, we are trying to see if we can see each one.  Also, I attached a pen to each board so they can check them off:

I hope this makes the 17+ hours in the car more fun for the kids- wish me luck!

**POST EDIT on July 11, 2011- I was rushing to post this because of course, I was finishing the project last minute before the drive, and I wanted to post photos of the before product, because after the drive, they would be all colored and crossed out.  I realized that the two letter abbreviations for Kansas (should be KS) and Kentucky (should be KY) were written incorrectly on the two letter abbreviation charts.  I corrected them for my kids- corrected photo unavailable because the kids HAD A BLAST with these in the car.  I apologize, and yes, I AM quite certain I am smarter than a fifth grade, just busier and more scatterbrained.  This was such an awesome thing to have in the car, the kids didn't want to go to bed because they were afraid they'd miss something, in fact, they are still in the car, and we have been able to cross off a few more since our trip.  This is HIGHLY recommended for a trip in the car if you are taking one!!!


Thursday, July 7, 2011

Busy Playing: Our Judy Moody Summer Thrill Points Challenge

A few weeks ago, we went to visit some of our old neighbors from Japan.  The girls wanted to go see the new Judy Moody movie, The Not So Bummer Summer.  I was worried that my boys wouldn't be that into the movie because it was about a girl.  We went to the movie anyways because they got excited when I mentioned going to see the movie (they had seen previews on TV).

Well, they LOVED it!  They loved it so much, when I took them to the bookstore to get a kick off summer reading book, they chose this:
Look what it's created:
My 6 year old hasn't gotten into any chapter books until these books came along, in fact, he can't put them down.  So far, he and my 7 year old have each read the No So Bummer Summer TWICE!!!  As soon as we get a new book, they start fighting over who gets it first.  One day, we had to alternate, by each reading a chapter, then switching.  In trying to be cheap, we went to the library, but all the books were checked out (then we found out we can't get cards yet anyways).  Luckily, at Barnes and Noble's, the books are buy 2 get the 3rd free.

Look what I found at breakfast today- he just can't put it down:
For those of you who don't know about the Judy Moody movie, Judy is worried her summer will be boring, so she comes up with a list of challenges for her and her friends to complete over the summer.  Problems arise when one friend is going to Borneo with her mother, another is continuing a family tradition by going to circus camp, and the other has a hard time facing up to challenges.  Judy and her one friend left for the summer, try to complete the challenges, such as tight rope walking, riding a HUGE roller coaster, and seeing a scary movie.  Judy has a little brother who is trying to hunt BigFoot all summer, and her way cool aunt comes to visit for the summer too.  This movie was not just for girls by any means, and neither are the books.

One day, we were driving in the car, and my oldest son said "maybe we can do thrill points challenges mom".  The wheels began to turn in my head for ideas for challenges.  My oldest son is a picky eater, I could challenge him with trying new foods.  My kids haven't played many sports, I can challenge them to try new activities.  I can continue our Random Acts of Kindness by challenging them to do them on their own.  I can let them be silly by challenging them to do silly things and I can show them how to turn something boring into a fun challenge.

I came up with a point system and made a chart:
I put mine and my husband's names on it because this shows them we are willing to take the challenges too (but sorry,I am NOT holding a snake).  The way our point system works is:
 1 point for making a small attempt, whether or not you back out 
5 points if you attempt, but do not complete a challenge
10 points if you complete a challenge
20 points if you are the ONLY one to complete a challenge

I wanted to make the prizes worth it to get the kids really excited and willing to push their limits.  I made up first through fourth place prizes, and each one has two choices.  For example, first prize is either 1 hour of wii each day for a whole week (no exceptions) OR $10 worth of coins for you to use at Chuckee Cheese.  Second prize is going out to do something fun alone with me or dad OR choosing a new book at the bookstore.  Third prize is getting your choice of ice cream treat (sundae, shake, etc) OR being the LAST kid in bed every night for a week.  Fourth prize is choosing a movie of your choice from Netflix for movie night OR I will make them a batch of their favorite cupcakes.

Last week, when I made the blueberry pie, two of my kids refused to try it.  When they heard the prizes a few days later, they were begging me to try a bite.  My oldest son really wants to win that Wii time, so he actually ate the bite and didn't gag ;) My youngest son wants the Chuckee cheese time and he ate it and LOVED it!  Every day, they are asking me what is the challenge and can they add their own to the chart.  I hope by the end of the summer to have the whole posterboard filled with challenges we have tried.  

Here is a list of what we have come up with so far:
I hope you have a challenging and fun summer too!

Tuesday, July 5, 2011

Busy Learning: Incorporating History into Bedtime Stories

A major downside to not being in our house, is that most of our books are boxed up :(  Another one is that we don't have residency in our town yet, so we cannot get library cards to check out books.  Oftentimes, two of my sons will ask me for a story from my mouth (one that is not written in a book).  It is not always easy to come up with a made up story for them, sometimes they get downright silly, so it occurred to me last night to start using stories from history as their "bedtime stories from my mouth".

Since it was Independence Day yesterday, my story was about the first Independence Day.  I started off the story by saying "235 years ago..".  I talked about the Declaration of Independence, parts of the American Revolution, some of the presidents, the Statue of Liberty, and we all recited the Pledge of Allegiance together.  As I was talking to them, I could not remember many of the battles or events that took place during this time.  I could remember the Boston Tea Party, Paul Revere, and Sam Adams, but there were a lot of things that seemed to slip my mind.  OK- this was a major reality check for me- I DO NOT WANT TO NOT BE SMARTER THAN A FIFTH GRADER!!!!  Lucky for me, none of my kids are in fifth grade yet ;) I am totally going today to buy a book on the American Revolution for my kids and I to read together.

During my story, I would periodically stop and do a pop quiz.  I would choose one of the kids and ask them a question about something I just said.  For example, when we were talking about presidents, I stopped and asked my 6 year old the name of the first president (he said "Grampa")- this caused big laughs!  For the Statue of Liberty, the questions were:  Which country gave it to America?, What is on her head?, Where is she?, and What is in her hands? (most of this they know actually from watching Little Einsteins).  They were all begging me to have a turn, there were no prizes obviously, but I think they liked the chance to share their knowledge and for the attention of being chosen.

Another thing that I decided to do to drag out the story, was to stop and ask the kids the definition of words I was saying.  For example:

Me:  What does decision mean?
Addison:  It means when you are playing rock, paper, scissors, and you get to choose.
Nathaniel:  It's when you vote.
Me:  It's when a choice needs to be made, whether by one or many people.  The choice can be achieved in many ways, by an individual choosing one way or another or by a group voting on their choice and the most votes winning.  
Nathaniel:  Like when we vote on what to have for dinner.

Have you ever realized how hard it can be to define a word without using another form of the word in the definition?  Another word we talked about was Independence.  I have begun to realize how many words my kids know how to use properly in a sentence, but do not know how to relay it's meaning when asked.

One of my favorite activities we did for school this year was "Word A Day"- I feel it is so important for kids to know how to define a word and use it in a sentence that they constructed themselves.  That book and activity deserves its own post, another day.

So, if you're looking for something different for bedtime, try incorporating a story from history.  You can even make it slightly fictional and have your child be in the story- kids just love to hear stories about themselves.  You could even read or sing from the dictionary.

Not only did the bedtime story last night open up a whole slew of bedtime story possibilities for the rest of the week about American History, it gave me a great field trip idea.  We are heading back to Massachusetts this week, and guess what is there? - The Freedom Trail!!  My seven year old is so pumped to go walk along it and I have to admit, I've never been on it in my entire life of living so close.

And, as part of our Summer Thrills Challenge (to be posted tomorrow), we are totally dropping tea bags in Boston Harbor, for our own Tea Party.

Do you live near a historical place that you've never visited or brought your kids to?  Incorporate it into a bedtime story and create a field trip- one less day of hearing "I'm bored" for you!

Happy story telling!!!

Monday, July 4, 2011

Busy Cooking: Red, White, and Blueberries and Cream Pie

Ok, cheesy title I know, but the only pie plate I happen to have until I move into my new house is this reddish one I got out of emergency need one day, and the cream is white.  Perfect title for this dessert the day before the Fourth of July.

I have been looking around trying to find tips on food photography and came across this great one, Taylor Takes a Taste.  It is such a cool blog, loaded with great tips, photos, and recipes.  In his posts, he shows you how he took the shots, and how he set them up.  Sometimes, he provides alternatives to the ones he chose for his post.  It is AWESOME and definitely worth a look.

His recipe for blueberries and cream pie struck me because I am trying to get my kids to be more adventurous eaters and blueberries are something that they are very touch and go with.  We are having a summer challenge (to be posted in a few days) to be more daring and I thought a challenge could be to try new foods, such as blueberry pie.  I wasn't sure how I'd feel about serving it cold, as I usually like my pie hot, but I have to say it was quite delicious.  If you are looking for a pie to serve on a hot hot summer day that won't melt and won't make you hot, this might be just what you're looking for.

Top with whipped cream for even more deliciousness!

Oven:  400'

Pie Crust:  Store bought or your favorite recipe, here's mine, from Pioneer Woman
(I cut her recipe in half, still makes a double crust)
1 1/2 cup flour
1/2 egg (I put the egg in a bowl, whisked it and dumped half in the pie crust mix)
2 tsp white vinegar (I didn't have any so I used cider vinegar, couldn't tell the difference)
3/4 cup crisco
2 1/2 TBSP cold water
**this crust is flaky and delicious- it really is perfect!

Filling:
3 cups blueberries
2/3 cup sugar
4 TBSP flour
1/4 tsp salt
1/2-1 tsp cinnamon
1 cup heavy cream

1) To make the pie crust, mix together flour and salt.  Cut in the crisco with a pastry blender or fork, you can also do it in a food processor with the dough blade or kitchen aid with dough hook.  Add in egg, vinegar, and water.  Mix into a ball.  Place in freezer for 15 minutes- roll on well floured surface, if it's too sticky put in freezer for longer, if it freezes, it will thaw after being  at room temp for about 15 min.  Roll out 1 pie crust, place in pie pan.

2) Wash blueberries and pour into crust.

3) Mix together sugar, flour, salt, cinnamon, and heavy cream.  Pour this mixture on top of blueberries.

4) Put pie in oven, cook for 35-40 minutes.  Let cool in the refrigerator.  Serve with whipped cream on top.

I tried to be all patriotic and put a star in the middle, however, when it was baking, it floated over to the side.
My pie cutter/server is in storage until my house is done, so my piece is not as pretty as it could be. Yes, I used that blue knife from IKEA to cut/serve the piece.  I also had five kids jumping around and yelling while I was cutting this piece, it's not a perfect triangle, but it tastes pretty darn good!


Saturday, July 2, 2011

Busy Learning: Name Book Journals

I'm participating in Smart Summer Challenge and one of the blogs I discovered from it is Teachmama.  I love her simple ideas!  I've had simple ideas, but never wrote about them before because I thought they were too simple.  It is really nice to see them written out and with pictures- it helps motivate me to want to do them, and I hope I help you want to do them too.

This name book is such a great idea and is something very simple to do with your child every day!  I went to the store, bought a blank journal for each of my kids and had them write their names on the front:
Then, I told them that everyday, they would open to the next page and practice writing their name, birthday, and my cell phone number.  Going through security one time, my youngest son was asked his birthday, and he couldn't recall the year, so I feel like this is important information.  My hope is that by writing these three things every day, by the end of the summer, it will be committed to memory.

When we lived in Japan, my son's teachers had all the kids' names written on small strips with their mom's cell phone numbers under them in the writing station.  My son would come home with about ten each week and guess what?, he knew my number and sometimes I wasn't even that sure of it (11 digit number over there!).  Lately, my two youngest kids have been humming a commercial 1800 (xxx) LUNA, and they asked me can they call it and one day, I caught my 3 year old trying to dial the number.  They had no idea what it was for, but the TV told them.  So, I hope by the end of the summer, they will all know my cell phone (and my two oldest will also be writing my husband's)- in case of emergency, you just never know.
Speaking of the LUNA commercial, sometimes when we are driving in the car, I sing my cell phone number to my kids to the tune of the song that is my cell phone ring tone.  I think that is beginning to catch on too.

For my three year old, I wrote her name across the top in capital letters.  She can write one or two, which is fine by me, the rest, she draws circles.  I didn't write her birthday or my phone number.
For my five year old, I wrote his name, birthday, and my phone number.  He is practicing properly forming/sizing his letters and using lower case when needed:

For my six year old, I had to spell out his birthday month, February, but besides that, he could do it all himself. He is working on using lower case letters when necessary, writing the letters the proper size, and allowing for the proper amount of space to fit the word on the line.
For my seven year old, he is just trying to write neatly and will be using cursive by the end of the summer.

For the six and seven year old, I might change it up a bit a few days a week and say write it in rainbow letters, write your name in the shape of a question mark, write it in a spiral, or use only one specific color.

We are keeping all of the books on the floor under our tiny table, so they are easily accessible. They are free to doodle or draw at the bottom of the page after they finished their writing for the day.

Happy writing!

Friday, July 1, 2011

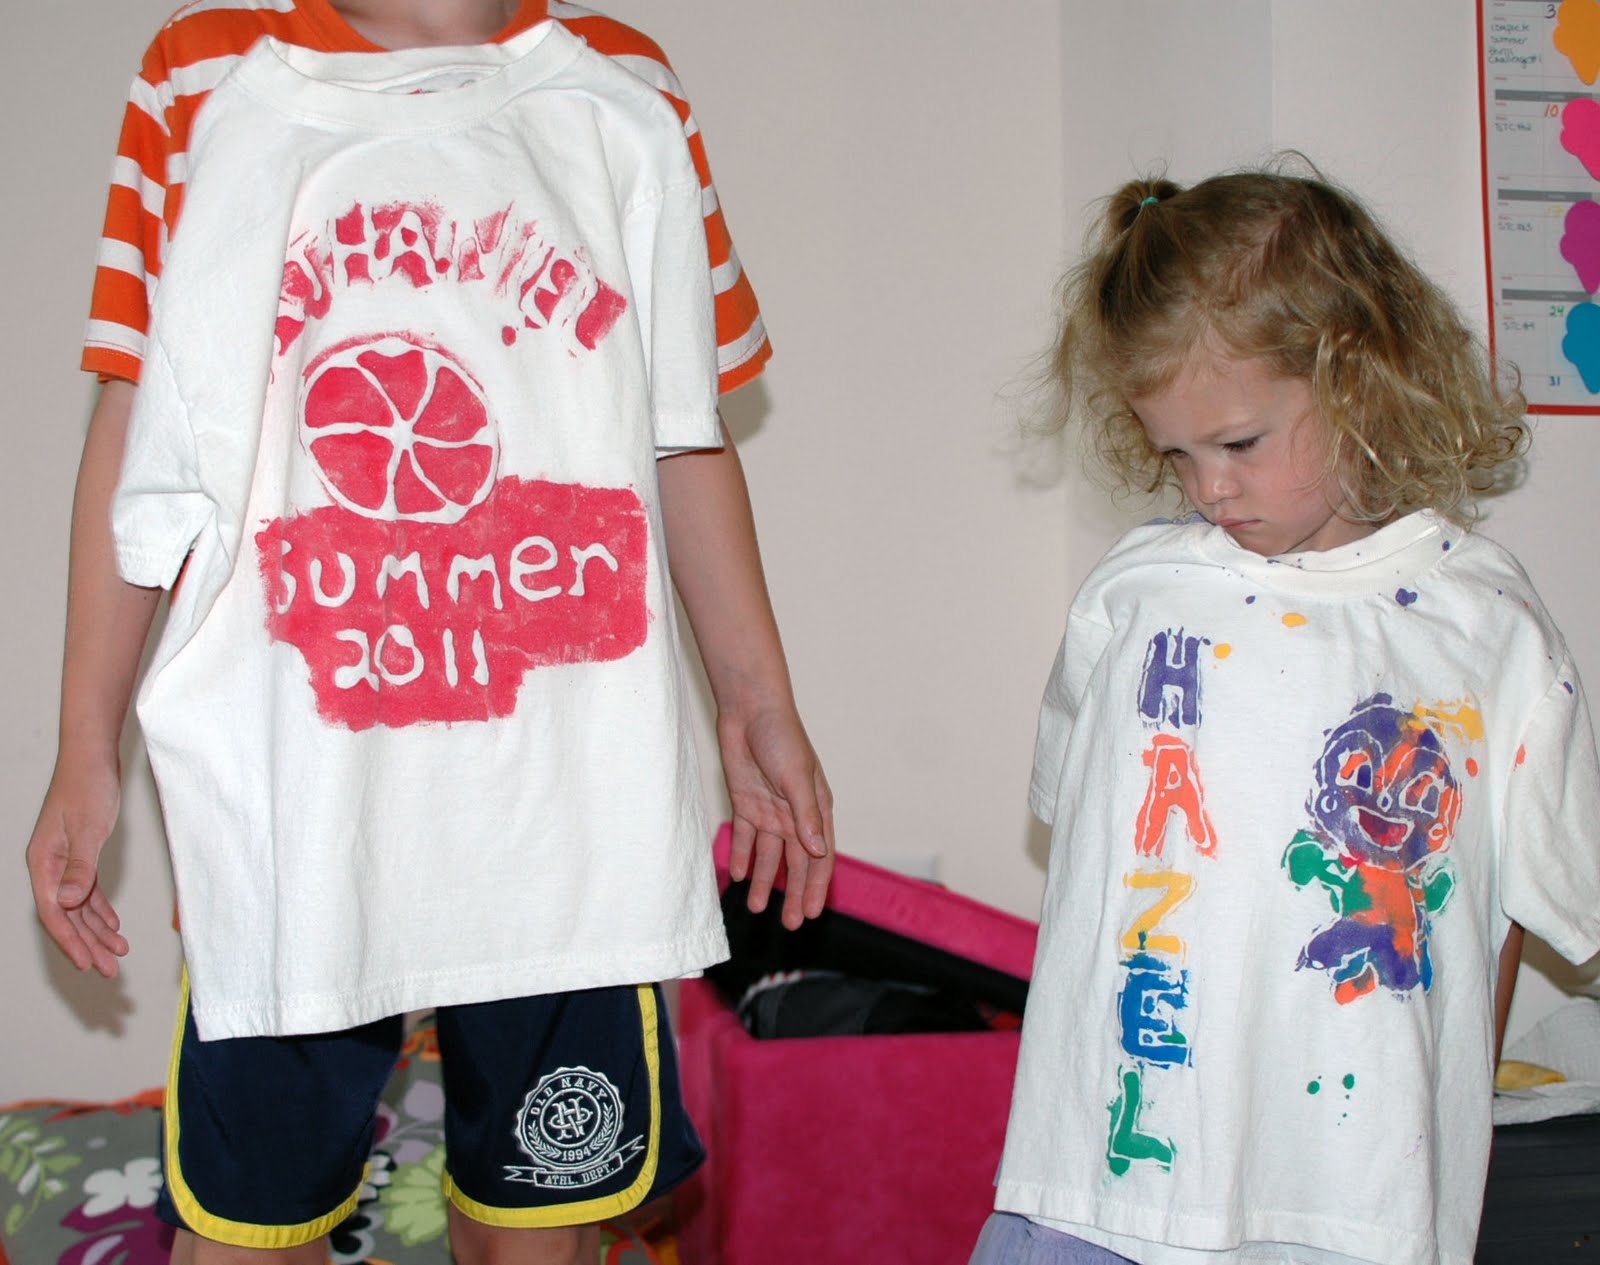
Busy Creating: Hand Painted Custom Summer Fun T-shirts

I wrote about these t-shirts last year and my kids loved it so much, I felt it deserved a revisit.  You can see my original post here.  I was inspired by a link I found on Skip to My Lou.

The t-shirts my kids made last year are one of their favorites and they wear them ALL the time!  I bought a pack of Hanes' tagless t-shirts at Target for $6 for 6 shirts.  I bought a container of Elmer's galaxy glue- the reason for this is the glue dries blue so you can see the lines you are painting over.  This time around, I did not use acrylic paint, I used Tulip Fabric Paint, that I bought at Michael's.  When you see the end results, you will know that the fabric paint is so much more brilliant, but if acrylic is all you have, it will still stay on the fabric, just gets lighter after the first wash.

First, I had my kids draw a design on a sheet of computer paper (the little ones had the option to choose a picture from a coloring book.   Then, I put the paper under the t-shirt, and using glue, traced the outline of the image onto the t-shirt.  I removed the image and placed a piece of cardboard inside the shirt between the front and back (to keep the glue from sticking to the back and so when we painted, to keep paint on the front only).  I did the glue on two of the shirts at my parent's with galactic glue, then I came out to my husband's apartment and forgot the glue.  I used Elmer's school glue for the last two and here's what one looked like:
The lines are still visible, the only thing is make sure you do this with washable glue!

Let the glue dry overnight.  Now for the fun, paint those shirts!! I put the paint in recycled applesauce and yogurt containers.  I put one paint brush in each color to avoid color mixing.  I also added about 1 TBSP water to each container, to make the paint easier to use.
Here's the same shirt from above, but painted:
Let the paint dry- we let it dry over night.  Remove cardboard insert, stick t-shirts in hot hot water - this will soften the glue so you can rub it off.  I put the t-shirts in the tub with hot water and let them sit for about an hour.  Then you use your fingers or small scrub brush and rub off all the glue lines.  You will notice lots of chips of paint (it's the paint that was on top of the glue)- and sparkles (if you used galactic glue).  I gave my son a sponge and when he took a shower, he scrubbed the bottom of the tub clean.

After a wash and dry:
We are always trying to get kids to color in the lines, with this project, it was a bit hard for some of the kids to understand that the glue lines would go away and that they should smear the paint:
I love this one:
These would be great to use as your camp shirt, or just to wear on special days like field trips.  Have fun creating your own wearable masterpieces this summer!

Thursday, June 30, 2011

Busy Cooking: Homemade granola bars

A friend of mine sent me the link to this granola bar recipe on Smitten Kitchen around Christmastime, it took me this long to get around to making it.  Boy am I sad I waited this long to make them because they are gooood (and wicked easy to make!!!)  This is a hand mix, super easy, no kitchen aid, barely any cooking skills required recipe!

I liked the way the first batch came out that I made them again the next night.  I've made three different variations and all three turned out great.  In the recipe on Smitten kitchen, she mentioned that she was not sure what would happen if you omitted corn syrup from the recipe (did that).  I also tried one batch where I omitted peanut butter just to see how they'd hold up without it for those of you with nut allergies in the house.

These have come in handy for my kids' breakfast for the past few mornings when we had to run out the door, and snack at their morning sports camp this week.  My son liked them so much, he asked to help me make them the second night.

Below, you can see from left to right, the granola bar with no peanut butter or corn syrup, I only added cinnamon chips to this bar, next is the granola bar with no corn syrup- to this I added mini chocolate chips, and finally the granola bar I made per her exact recipe with added craisins, chopped almonds, and mini chocolate chips.
You can see for yourself the one on the right is more glossy, it definitely tasted more chewy, but I didn't notice any great taste difference between this one and the one without corn syrup.  The one without peanut butter or corn syrup was definitely not as chewy, but still held together well and tasted good- I think it was still softer than a quaker granola bar.

Oven:  350'

Prepare a 9x9 or 8x8 baking pan by greasing first lightly with butter, then lining it with parchment paper.  Make sure the parchment paper is rising up the sides, it will be like a "hammock" for the granola bars, so when they are done, you will grab both sides of the parchment paper and pull the giant bar out of the pan for better cooling.

1/2-3/4 cup sugar (you can decide how sweet you want them to be, I used 3/4 cup)
1/3 cup oat flour (you can make it in food processor from oats, I found mine at whole foods)
1 2/3 cup quick oats
1/2 tsp salt
1/4 tsp cinnamon ( I omitted second time around, I think peanut butter and cinnamon don't compliment each other well)
1 tsp vanilla
1/3 cup peanut butter (or other nut butter)
6 TBSP melted butter (I think once I used unsalted, once salted)
1/4 cup honey (or maple syrup or corn syrup)
2 TBSP light corn syrup
1 TBSP water
2-3 cups dried fruit, nuts, candies

1) Mix together dry ingredients in a large bowl.

2) Melt butter in a small bowl.  Add in vanilla, honey, corn syrup, and water, stir to combine.

3) Add liquid ingredients into dry ingredients, stir to combine.  Add peanut butter, stir.

4) Add fruit, nuts, or candies.  I divided my batter in half and added the chocolate chips to one half and the other was almonds, craisins, and chocolate chips.

5) Pour batter into prepared pan.  Bake in oven 35-40 minutes, I did 36 minutes.  You can tell it's ready to come out because the edges start to brown.  The center may be wobbly or look unsettled, don't try to cut yourself a hot granola bar, they need to be cooled and set, about 20 minutes from oven removal. After about five minutes, using the parchment paper, pull the bars out of the pan and place on cookie rack for the rest of cooling.  Cut into strips or squares and enjoy!!!

A delicious and nutritious summer snack for the kids: