My oldest son chose this cake as his special dessert last week. On his first day at his new school here, he came home, and was asking me if I had ever heard of a whopper. He told me how the two boys sitting near him were eating them and they looked so good, but when they offered him one, he said "no" because he hadn't finished eating his apples. They told him to throw them away, but he said I would get mad, so he didn't (ah, yes, my kids do listen sometimes :) ). Of course, I immediately went to the store to get him a box for his honesty.
As soon as I saw this cake, when flipping through Baked: New Frontiers in Baking, I knew it had his name written all over it. I may have convinced him he really wanted this cake because I wanted to make it. How can you not want to try a cake with three layers of whipped milk chocolate icing sandwiched between layers of vanilla malt cake, topped with whoppers? How?
Even the baby wanted some- you may have noticed an out of place whopper in the first photo, and some fingerprints. Here's what happened just before:
Oven: 325
Malt Cake:
2 1/4 cup cake flour
3/4 cup flour
1 TBSP baking powder
1 tsp baking soda
3/4 tsp salt
1/4 tsp nutmeg
1 cup malted milk powder (I got mine at King Arthur Flour- you could use ovaltine)
1/2 cup (1 stick) unsalted butter
1/2 cup crisco (vegetable shortening)
2 cups sugar
1 TBSP vanilla
2 cups ice cold water
4 large egg whites
Frosting:
8 oz bittersweet chocolate, chopped
8 oz milk chocolate, chopped
1 1/2 cups heavy cream
2 TBSP light corn syrup
1 cup (2 sticks) unsalted butter
1) Preheat the oven to 325. Prepare the cake pans- 3 round pans, you can use either 8" or 9". Cut parchment paper rounds for the bottoms of the pans, grease and flour the sides, set aside.
2) Mix flours (I didn't have cake flour, so a substitute I used was 1 3/4 cup all purpose flour and 1/4 cup cornstarch to replace 2 cup cake flour), baking powder, baking soda, salt, nutmeg, and malted milk powder together in medium bowl, set aside.
3) In mixer, using paddle attachment, beat butter and shortening until creamy, about 3-4 minutes. Add in sugar and vanilla, beat on high until fluffy, about 3 minutes.
4) Prepare a bowl of ice water. In alternating additions, add flour mixture to creamed butter/sugar, then add 1 cup ice water, then more flour, remaining 1 cup ice water, then the rest of the flour mixture. Scrape the sides of the bowl, give it another quick mix.
5) Beat the egg whites with hand mixer until peaks form. Fold the egg whites into the cake batter.
6) Divide the batter among the cake pans. Bake 40-45 minutes, be sure to rotate the pans halfway through for even cooking. When cake tester inserted in center comes out clean, remove from oven. Let cool on wire rack. Once completely cool, invert pans and remove cakes. This cake is a bit fragile and crumbly, so you may want to refrigerate or freeze the cakes for a few minutes before assembling, I did not but they recommended it in the recipe, and I did notice the cakes were a bit more fragile than normal.
7) Make the icing while the cakes are cooling. Place the chocolate in the bowl of your mixer, with the whisk attachment. In a small saucepan, heat the cream and corn syrup until boiling. Remove from heat and pour over chocolate, let sit 2-3 minutes. Whisk on high until chocolate mixture is smooth.
8) Cut butter into 1 TBSP pieces. Put paddle attachment on mixer. Slowly add butter 1 piece at a time and mix until smooth. Mix on medium and once all butter is added, stop, scrape down sides, then turn up to high for about 5-6 minutes. It will thicken like pudding. If it's not thick enough, beat on high for a few more minutes, you can also set in the refrigerator for about 5-10 minutes to thicken it as well.
9) Put the first cake layer on a plate or cake stand. Add 1 1/4 cup icing to the top of the layer, spread it out. Refrigerate for 5-10 minutes to let it set, Repeat with second layer. With the third layer, add a light coat of icing to the whole cake, so it is coated, but very lightly. Refrigerate for 10 minutes. This is crumb coating, so now, when you remove the cake to finish icing it, you won't have any pesky crumbs getting in the way. Garnish the top with malted milk balls and enjoy!
Saturday, October 22, 2011
Sunday, October 9, 2011
Busy Cooking: 1000 eyed Monster Grasshopper Cake
A couple weeks ago, my daughter got stitches in her eyebrow. I let her be the "special person" of the week and choose the dessert that I'd make for Friday night. The next week, my son wanted to choose the special dessert, and thus a tradition was born that each week, one of my kids gets to choose a dessert for Friday night. The pictures of Hazel's cake didn't come out that great and Addison chose a hot fudge cake last week, which wasn't anything to write home about. This one, however- WOW!
Owen wanted a chocolate cake with turquoise frosting and decorated like a monster. I had just bought some candy eyeballs for decorating at the grocery store, love those things! My son is reading a book called the Beast with the 1000 Eyes, hence the other inspiration for the cake decor. I figured it'd be appropriate to have my first Halloween post be something in the kitchen;)
I was thumbing through my cookbooks looking for a new chocolate layer cake recipe to try, when I remembered reading the title "Grasshopper cake" in my new favorite dessert cookbook, Baked, New Frontiers in Baking. If you like dessert and want recipes that come out delicious, get this cookbook, you won't be disappointed. The Brownies are AMAZING!!! If I ever get a good picture of them, I'll post it.
This chocolate cake was really good, good enough that I could have eaten it on its own without icing. It was a recipe for a triple layer cake, but that seemed like too much to me. I ended up making a double layer cake and seven cupcakes. The cake layers were each topped with a small layer of mint chocolate ganache, followed by mint buttercream icing. The icing was really light and fluffy, kind of like a swiss meringue buttercream, but without having to go through the hassle of cooking the egg whites to a certain temperature. I've never made icing this way and it came out soo good, in fact, my husband told me it's the best frosting I've ever made.
If you have the time, I'd highly recommend giving this one a whirl, it won't disappoint the chocolate and mint lovers out there. It's not too overwhelming either, it's just the right balance.
Oven: 325
Cake:
3/4 cup unsweetened cocoa powder
1 1/4 cup hot water
2/3 cup sour cream
2 2/3 cup flour
2 tsp baking powder
1 tsp baking soda
1/2 tsp salt
3/4 cup (1 1/2 sticks) unsalted butter
1/2 cup crisco
1 1/2 cup sugar
1 cup brown sugar, firmly packed
3 large eggs
1 TBSP vanilla
Mint Buttercream Icing:
2 1/4 cup sugar
1/2 cup flour
2 1/4 cup milk
1/2 cup heavy cream
3 sticks butter (they used 4 1/2 sticks- I cannot use that much butter, just can't)
2 TBSP vanilla (they used creme de menthe)
2 1/4 tsp peppermint extract
food coloring (if desired)
Chocolate Mint Ganache:
6 oz bittersweet chocolate, chopped
1/2 cup heavy cream
1 TBSP vanilla (they used creme de menthe)
1/2 tsp peppermint extract
For the cake:
1) Preheat the oven, line the bottoms of your cake pans with parchment paper, grease and flour the sides. (This is enough for 3 8 inch cakes or 2 cakes and 7-8 large cupcakes).
2) In medium bowl, combine flour, baking powder, baking soda, and salt, set aside.
3) In another medium bowl, combine cocoa powder, sour cream, and hot water, set aside.
4) In bowl of mixer with paddle attachment, cream sugar, brown sugar, butter, and crisco on medium high until light and fluffy. Scrape down sides. Add in eggs one by one, scrape down sides. Beat in vanilla.
5) Alternating with the flour mixture, add cocoa mixture in three additions. Mix lightly until just combined. Scrape down sides, mix one more time. Divide batter between cake pans (about 2/3 full). Bake for 35-40 minutes, until tester inserted in the center comes out clean. Cupcakes bake about 18-22 minutes.
6) Remove cakes from oven, let cool on wire rack about 20 minutes before removing from pan, let cool rest of way on racks.
For the ganache:
1) While cake is cooling, heat cream in small sauce pan until comes to a light simmer. Put chocolate in a heatproof bowl. Pour hot cream over chocolate and let sit about 2 minutes. Add vanilla and peppermint extract, whisk together until smooth. Set aside
For the mint buttercream:
1) Put sugar and flour in a medium saucepan, whisk to combine. Stir in milk and cream, heat over medium to boiling. Stir occasionally, scraping the bottom. Once it boils, mixture will thicken. Once mixture thickens, remove from burner and place in bowl of mixer with paddle and mix on high until it cools (mine turned a slightly greyish color).
2) Once the mixture cools, add in pats of butter slowly at medium low speed. Once butter is added, turn mixing speed up to medium high, after a few minutes, you should notice the icing gets thicker and jiggly like jello. Stop the mixer, add in vanilla, peppermint extract, and food coloring, beat on high one minute longer to get it all combined. When you stop mixing, the icing should look soft and shiny, but retain it's shape, for instance, if you put your finger in and pull it out, there should remain a little point from where your finger left the icing. (You can chill it slightly to thicken it, but then it will probably soften again at room temp or heat it over a double boiler to thin it if it's too thick).
Assemble the cake:
1) Put your first layer on a plate or cake stand. Trim the top to make it straight and flat. Put about 1/4 cup of the mint ganache on and spread it out to the edges. Refrigerate for 10-15 minutes to let it set. Put 1 1/4 cups mint butter cream on top and spread to the edges. Put second layer on and repeat ganache and butter cream- repeat with a third layer if you chose to use one.
2) Put a light coat of frosting all around the edges and smooth down (this is a crumb coat)- refrigerate for about 10 minutes to let it set. Now, frost the edges and top. I too the icing in a decorating bag with a star tip and dolloped it randomly all over the top and sides to give it a monster fur look. Then, I took the remaining mint ganache and did the same. The kids put eyeballs in the ganache. You can refrigerate or leave at room temp for up to 3 days.
This cake was so good, it almost tops my favorite over chocolate chip cookie dough cake (almost).
Owen wanted a chocolate cake with turquoise frosting and decorated like a monster. I had just bought some candy eyeballs for decorating at the grocery store, love those things! My son is reading a book called the Beast with the 1000 Eyes, hence the other inspiration for the cake decor. I figured it'd be appropriate to have my first Halloween post be something in the kitchen;)
I was thumbing through my cookbooks looking for a new chocolate layer cake recipe to try, when I remembered reading the title "Grasshopper cake" in my new favorite dessert cookbook, Baked, New Frontiers in Baking. If you like dessert and want recipes that come out delicious, get this cookbook, you won't be disappointed. The Brownies are AMAZING!!! If I ever get a good picture of them, I'll post it.
This chocolate cake was really good, good enough that I could have eaten it on its own without icing. It was a recipe for a triple layer cake, but that seemed like too much to me. I ended up making a double layer cake and seven cupcakes. The cake layers were each topped with a small layer of mint chocolate ganache, followed by mint buttercream icing. The icing was really light and fluffy, kind of like a swiss meringue buttercream, but without having to go through the hassle of cooking the egg whites to a certain temperature. I've never made icing this way and it came out soo good, in fact, my husband told me it's the best frosting I've ever made.
If you have the time, I'd highly recommend giving this one a whirl, it won't disappoint the chocolate and mint lovers out there. It's not too overwhelming either, it's just the right balance.
Oven: 325
Cake:
3/4 cup unsweetened cocoa powder
1 1/4 cup hot water
2/3 cup sour cream
2 2/3 cup flour
2 tsp baking powder
1 tsp baking soda
1/2 tsp salt
3/4 cup (1 1/2 sticks) unsalted butter
1/2 cup crisco
1 1/2 cup sugar
1 cup brown sugar, firmly packed
3 large eggs
1 TBSP vanilla
Mint Buttercream Icing:
2 1/4 cup sugar
1/2 cup flour
2 1/4 cup milk
1/2 cup heavy cream
3 sticks butter (they used 4 1/2 sticks- I cannot use that much butter, just can't)
2 TBSP vanilla (they used creme de menthe)
2 1/4 tsp peppermint extract
food coloring (if desired)
Chocolate Mint Ganache:
6 oz bittersweet chocolate, chopped
1/2 cup heavy cream
1 TBSP vanilla (they used creme de menthe)
1/2 tsp peppermint extract
For the cake:
1) Preheat the oven, line the bottoms of your cake pans with parchment paper, grease and flour the sides. (This is enough for 3 8 inch cakes or 2 cakes and 7-8 large cupcakes).
2) In medium bowl, combine flour, baking powder, baking soda, and salt, set aside.
3) In another medium bowl, combine cocoa powder, sour cream, and hot water, set aside.
4) In bowl of mixer with paddle attachment, cream sugar, brown sugar, butter, and crisco on medium high until light and fluffy. Scrape down sides. Add in eggs one by one, scrape down sides. Beat in vanilla.
5) Alternating with the flour mixture, add cocoa mixture in three additions. Mix lightly until just combined. Scrape down sides, mix one more time. Divide batter between cake pans (about 2/3 full). Bake for 35-40 minutes, until tester inserted in the center comes out clean. Cupcakes bake about 18-22 minutes.
6) Remove cakes from oven, let cool on wire rack about 20 minutes before removing from pan, let cool rest of way on racks.
For the ganache:
1) While cake is cooling, heat cream in small sauce pan until comes to a light simmer. Put chocolate in a heatproof bowl. Pour hot cream over chocolate and let sit about 2 minutes. Add vanilla and peppermint extract, whisk together until smooth. Set aside
For the mint buttercream:
1) Put sugar and flour in a medium saucepan, whisk to combine. Stir in milk and cream, heat over medium to boiling. Stir occasionally, scraping the bottom. Once it boils, mixture will thicken. Once mixture thickens, remove from burner and place in bowl of mixer with paddle and mix on high until it cools (mine turned a slightly greyish color).
2) Once the mixture cools, add in pats of butter slowly at medium low speed. Once butter is added, turn mixing speed up to medium high, after a few minutes, you should notice the icing gets thicker and jiggly like jello. Stop the mixer, add in vanilla, peppermint extract, and food coloring, beat on high one minute longer to get it all combined. When you stop mixing, the icing should look soft and shiny, but retain it's shape, for instance, if you put your finger in and pull it out, there should remain a little point from where your finger left the icing. (You can chill it slightly to thicken it, but then it will probably soften again at room temp or heat it over a double boiler to thin it if it's too thick).
Assemble the cake:
1) Put your first layer on a plate or cake stand. Trim the top to make it straight and flat. Put about 1/4 cup of the mint ganache on and spread it out to the edges. Refrigerate for 10-15 minutes to let it set. Put 1 1/4 cups mint butter cream on top and spread to the edges. Put second layer on and repeat ganache and butter cream- repeat with a third layer if you chose to use one.
2) Put a light coat of frosting all around the edges and smooth down (this is a crumb coat)- refrigerate for about 10 minutes to let it set. Now, frost the edges and top. I too the icing in a decorating bag with a star tip and dolloped it randomly all over the top and sides to give it a monster fur look. Then, I took the remaining mint ganache and did the same. The kids put eyeballs in the ganache. You can refrigerate or leave at room temp for up to 3 days.
This cake was so good, it almost tops my favorite over chocolate chip cookie dough cake (almost).
Monday, October 3, 2011
Busy Cooking: Pumpkin Cinnamon Roll Pancakes
First of all, sorry for all of the cooking posts. Right now, my kitchen is the only room in the house that is fully unpacked and I know where everything is. Today, I made some major headway in the basement (new art and craft area), but I have to get a few more things done before I can start up all the projects that have been brewing in my head- Halloween crafters beware!
I'd much rather be dealing with this:
Than this:
Now, on to the recipe. I found this recipe for Pumpkin cinnamon roll pancakes on recipe girl last week when I was searching around for pumpkin recipes. I love going out to breakfast and one of the major reasons (besides obviously not having to do dishes) is to try a unique dish that you might never have thought to make yourself. This is a recipe I would dream of seeing at a breakfast joint- pumpkin pancakes turned cinnamon roll- yes, please!
The recipe is a slight bit labor intensive, but well worth it. All of my kids LOVED them and we will definitely be eating them again! Try them this weekend, you won't be disappointed.
The recipe yielded 10 medium large pancakes, enough for our family of six.
Cinnamon Filling:
1/2 cup (1 stick) butter
3/4 cup brown sugar
1 TBSP cinnamon
Icing:
2 oz. cream cheese
1/4 cup (1/2 stick) butter
1 cup confectioner's sugar
1/2 tsp vanilla
Pancakes:
2 cups flour
1 TBSP baking powder
1/2 tsp baking soda
2 TBSP pumpkin pie spice
1 TBSP brown sugar
1/2 tsp salt
1 1/2 cups whole milk
2 eggs
1 cup pumpkin puree
2 TBSP apple cider vinegar
2 TBSP oil
1) Put the butter, cinnamon, and brown sugar for the filling in a microwave safe bowl, microwave for 30 seconds, stir until smooth. Put in a sandwich sized ziploc bag and set aside.
2) Put butter and cream cheese for icing in a microwave safe bowl. Microwave about 30-40 seconds until almost melted, stir together with vanilla and confectioner's sugar. Put into a sandwich sized ziploc bag and set aside for later.
3) In a medium sized bowl, mix flour, baking powder, baking soda, salt, pumpkin pie spice, and brown sugar and set aside.
4) In large bowl (with spout if you have one), mix together milk, eggs, oil, vinegar, and pumpkin. Slowly add dry ingredients to the center of the wet ingredients, mix until incorporated, lumps may remain, this is okay.
5) Preheat griddle. Pour pancake mix onto griddle, it is slightly thick, so spread it out a bit. Knead the bag with the filling in it slightly to soften it, cut a small part of the lower corner of the ziploc bag and squeeze a spiral of cinnamon filling onto the top of each pancake. Let pancake cook until bubbles form and pop on the top of the pancake.
6) Very carefully, flip the pancake. The cinnamon filling will become liquid and ooze out onto the pan, its okay. Cook on this side for about 3-4 minutes. Take pancake off pan, put on plate with cinnamon side up. When it is flipped, it will look like a small indent where the cinnamon filling was, it's okay. Scrape remaining cinnamon off of pan with a paper towel or use a spatula and drain it onto a plate.
7) Squeeze icing bag to soften it up, cut a small hole in the bottom corner, then squeeze it onto the top of the hot pancake, serve and enjoy-there's going to be a pumpkin party in your mouth!
I'd much rather be dealing with this:
Than this:
Now, on to the recipe. I found this recipe for Pumpkin cinnamon roll pancakes on recipe girl last week when I was searching around for pumpkin recipes. I love going out to breakfast and one of the major reasons (besides obviously not having to do dishes) is to try a unique dish that you might never have thought to make yourself. This is a recipe I would dream of seeing at a breakfast joint- pumpkin pancakes turned cinnamon roll- yes, please!
The recipe is a slight bit labor intensive, but well worth it. All of my kids LOVED them and we will definitely be eating them again! Try them this weekend, you won't be disappointed.
The recipe yielded 10 medium large pancakes, enough for our family of six.
Cinnamon Filling:
1/2 cup (1 stick) butter
3/4 cup brown sugar
1 TBSP cinnamon
Icing:
2 oz. cream cheese
1/4 cup (1/2 stick) butter
1 cup confectioner's sugar
1/2 tsp vanilla
Pancakes:
2 cups flour
1 TBSP baking powder
1/2 tsp baking soda
2 TBSP pumpkin pie spice
1 TBSP brown sugar
1/2 tsp salt
1 1/2 cups whole milk
2 eggs
1 cup pumpkin puree
2 TBSP apple cider vinegar
2 TBSP oil
1) Put the butter, cinnamon, and brown sugar for the filling in a microwave safe bowl, microwave for 30 seconds, stir until smooth. Put in a sandwich sized ziploc bag and set aside.
2) Put butter and cream cheese for icing in a microwave safe bowl. Microwave about 30-40 seconds until almost melted, stir together with vanilla and confectioner's sugar. Put into a sandwich sized ziploc bag and set aside for later.
3) In a medium sized bowl, mix flour, baking powder, baking soda, salt, pumpkin pie spice, and brown sugar and set aside.
4) In large bowl (with spout if you have one), mix together milk, eggs, oil, vinegar, and pumpkin. Slowly add dry ingredients to the center of the wet ingredients, mix until incorporated, lumps may remain, this is okay.
5) Preheat griddle. Pour pancake mix onto griddle, it is slightly thick, so spread it out a bit. Knead the bag with the filling in it slightly to soften it, cut a small part of the lower corner of the ziploc bag and squeeze a spiral of cinnamon filling onto the top of each pancake. Let pancake cook until bubbles form and pop on the top of the pancake.
6) Very carefully, flip the pancake. The cinnamon filling will become liquid and ooze out onto the pan, its okay. Cook on this side for about 3-4 minutes. Take pancake off pan, put on plate with cinnamon side up. When it is flipped, it will look like a small indent where the cinnamon filling was, it's okay. Scrape remaining cinnamon off of pan with a paper towel or use a spatula and drain it onto a plate.
7) Squeeze icing bag to soften it up, cut a small hole in the bottom corner, then squeeze it onto the top of the hot pancake, serve and enjoy-there's going to be a pumpkin party in your mouth!
Friday, September 30, 2011
Busy Cooking: Apple Whoopie Pies with Vanilla Bean Filling
OH.MY.GOD! These are soooo good! Last weekend, we went apple picking for the first time in five years. Most of our kids had never been before. The place we went to was a TOTAL ripoff (the money we saved from not picking in five years was just spent on this one trip). Don't ever go to an orchard that makes each person buy a bag, even the little little kids. Needless to say, we had fun, got six bags of apples, McIntosh or not, they're still delicious.
On the drive up to the orchard, I was ripping pages out of the Better Homes and Gardens Fall Baking magazine. This recipe jumped out at me and I couldn't wait to get home to make it. I wanted to make it that night, but we got home too late. Combining lots of cinnamon, homemade applesauce, and vanilla bean filling, these are quite possibly the best whoopie pies I have ever made/eaten!
As I was sampling the first one, I was thinking how a cinnamon icing would be delicious inside too, I pulled down a jar of cinnamon red hots and stuck one inside. MAGICAL! My assistant helped me pop one red hot in the center of each pie. (Note: you do not need to completely fill the pies with icing, I just pipe around the edges- when you bite, it squeezes in and fills the rest.)
Oven: 350
Whoopie Pies:
2 cups brown sugar
3/4 cup (1 1/2 sticks) unsalted butter
2 eggs
1 tsp vanilla
1 1/2 cups Homemade Applesauce (or jarred)
3/4 cup heavy cream
2 3/4 cup flour
1 TBSP cinnamon
1 tsp baking soda
1 TBSP baking powder
1 tsp salt
Vanilla Bean Icing:
3 1/2 cups confectioner's sugar
3-5 TBSP whole milk
1/2 tsp vanilla
1 vanilla bean
1/2 cup (1 stick) butter
Homemade Applesauce:
1/2 cup apple cider or apple juice
5 large or 10 small apples
1/2 cup sugar
2 tsp cinnamon
If you are going to make the homemade applesauce, which I HIGHLY recommend (it's sooo good), do this part first. Core and peel the apples (you can leave the peel on, it will soften and make your sauce a pinkish color). Put the cider, sugar, cinnamon, and apples into a dutch oven over medium heat. Bring to a boil, reduce heat to low, and let simmer 45-60 minutes or until apples are soft (mine were done in 25 minutes). Put apples and 1-2 ladles of the juice into a blender or food processor and puree. You can add more juice if it's not the consistency you want.
For the whoopie pies:
1) Preheat the oven, then line your baking sheets with parchment paper. I would recommend the parchment paper if you have it, the whoopie pies are sticky because of the applesauce, so it makes it very easy to get out of the pan.
2) In a medium bowl, combine flour, cinnamon, baking powder, baking soda, and salt. Set aside
3) Put brown sugar and butter into bowl of mixer and beat on medium high until fluffy and light tan. Scrape down sides.
4) Add in eggs and vanilla, beat until combined. Scrape down sides.
5) Add in heavy cream and applesauce, beat until combined. Scrape down sides.
6) Slowly add in the dry ingredients, scrape down sides, give one final quick mix.
7) Using a cookie scoop or spoon, drop batter onto prepared cookie sheets. I used a small cookie scoop and only filled it half way, the small whoopie pies I made were about 2 inches wide, they were quicker to cook than the larger ones. Space them about 2-3 inches apart to account for spreading while baking.
8) Bake until they are a dark golden brown color. The recommended time in the recipe called for 10-12 minutes, mine were pale colored and raw in the centers. I ended up cooking for 20-22 minutes, you just kind of have to watch that first batch and adjust for the way your oven cooks. When you see the dark golden color in my pictures you'll know they're done.
9) Let cool completely on a cooling rack.
10) While they are cooling, mix up the icing. Put butter in bowl of mixer, beat to soften, then add the confectioner's sugar 1 cup at a time. Take the vanilla bean, cut it lengthwise, scrape the seeds into the bowl. Add in the vanilla, and then the milk until your desired consistency. Make sure to add the milk slowly, because even 1 TBSP too many can result in runny icing. Be sure to scrape down the bowl periodically too, butter can often cake to the bottom of the bowl.
11) Choose your favorite pastry tip, put it in a decorating bag or ziploc, put in a cup for stability, and fill with the icing. Swirl the icing around the outside edges of the pies, then add a top. You can also just put a scoop of icing in the center of a whoopie pie and press the top on to spread it out.
Add a red hot if you have them and want to add some zing!
12) Eat them and try to contain yourself, I seriously ate 6 yesterday!
On the drive up to the orchard, I was ripping pages out of the Better Homes and Gardens Fall Baking magazine. This recipe jumped out at me and I couldn't wait to get home to make it. I wanted to make it that night, but we got home too late. Combining lots of cinnamon, homemade applesauce, and vanilla bean filling, these are quite possibly the best whoopie pies I have ever made/eaten!
As I was sampling the first one, I was thinking how a cinnamon icing would be delicious inside too, I pulled down a jar of cinnamon red hots and stuck one inside. MAGICAL! My assistant helped me pop one red hot in the center of each pie. (Note: you do not need to completely fill the pies with icing, I just pipe around the edges- when you bite, it squeezes in and fills the rest.)
Oven: 350
Whoopie Pies:
2 cups brown sugar
3/4 cup (1 1/2 sticks) unsalted butter
2 eggs
1 tsp vanilla
1 1/2 cups Homemade Applesauce (or jarred)
3/4 cup heavy cream
2 3/4 cup flour
1 TBSP cinnamon
1 tsp baking soda
1 TBSP baking powder
1 tsp salt
Vanilla Bean Icing:
3 1/2 cups confectioner's sugar
3-5 TBSP whole milk
1/2 tsp vanilla
1 vanilla bean
1/2 cup (1 stick) butter
Homemade Applesauce:
1/2 cup apple cider or apple juice
5 large or 10 small apples
1/2 cup sugar
2 tsp cinnamon
If you are going to make the homemade applesauce, which I HIGHLY recommend (it's sooo good), do this part first. Core and peel the apples (you can leave the peel on, it will soften and make your sauce a pinkish color). Put the cider, sugar, cinnamon, and apples into a dutch oven over medium heat. Bring to a boil, reduce heat to low, and let simmer 45-60 minutes or until apples are soft (mine were done in 25 minutes). Put apples and 1-2 ladles of the juice into a blender or food processor and puree. You can add more juice if it's not the consistency you want.
For the whoopie pies:
1) Preheat the oven, then line your baking sheets with parchment paper. I would recommend the parchment paper if you have it, the whoopie pies are sticky because of the applesauce, so it makes it very easy to get out of the pan.
2) In a medium bowl, combine flour, cinnamon, baking powder, baking soda, and salt. Set aside
3) Put brown sugar and butter into bowl of mixer and beat on medium high until fluffy and light tan. Scrape down sides.
4) Add in eggs and vanilla, beat until combined. Scrape down sides.
5) Add in heavy cream and applesauce, beat until combined. Scrape down sides.
6) Slowly add in the dry ingredients, scrape down sides, give one final quick mix.
7) Using a cookie scoop or spoon, drop batter onto prepared cookie sheets. I used a small cookie scoop and only filled it half way, the small whoopie pies I made were about 2 inches wide, they were quicker to cook than the larger ones. Space them about 2-3 inches apart to account for spreading while baking.
8) Bake until they are a dark golden brown color. The recommended time in the recipe called for 10-12 minutes, mine were pale colored and raw in the centers. I ended up cooking for 20-22 minutes, you just kind of have to watch that first batch and adjust for the way your oven cooks. When you see the dark golden color in my pictures you'll know they're done.
9) Let cool completely on a cooling rack.
10) While they are cooling, mix up the icing. Put butter in bowl of mixer, beat to soften, then add the confectioner's sugar 1 cup at a time. Take the vanilla bean, cut it lengthwise, scrape the seeds into the bowl. Add in the vanilla, and then the milk until your desired consistency. Make sure to add the milk slowly, because even 1 TBSP too many can result in runny icing. Be sure to scrape down the bowl periodically too, butter can often cake to the bottom of the bowl.
11) Choose your favorite pastry tip, put it in a decorating bag or ziploc, put in a cup for stability, and fill with the icing. Swirl the icing around the outside edges of the pies, then add a top. You can also just put a scoop of icing in the center of a whoopie pie and press the top on to spread it out.
Add a red hot if you have them and want to add some zing!
12) Eat them and try to contain yourself, I seriously ate 6 yesterday!
Monday, September 26, 2011
Busy Cooking: Homemade Pumpkin Spice Latte Syrup
Here I am sitting at Starbucks, using their free Wifi, and I'm typing up a post about how to make your own knock off pumpkin spice lattes. I couldn't just stop at making the pumpkin spice latte cupcakes, I had to keep going and try to make my own pumpkin spice lattes. These are the things that keep me busy late at night while I'm up with a sick baby. I found a few versions when I was searching, but I decided on one from Cooks Like a Champion.
I bought the Starbucks pumpkin spice syrup a few years ago to make my own while living in Japan. Quite honestly, they never tasted like I wanted, they were too sweet. I made the syrup yesterday and it smelled like potpourri. Well, I was worried I was going to feel like I was drinking a bag of spiced pinecones when I used this syrup. The end result was shockingly delicious, enough to make me think once I get internet at my house on Tuesday, I can kick my Starbucks habit and save some money ;)
Pumpkin Spice Syrup:
1 1/2 cup sugar
1 1/2 cup water
4 cinnamon sticks
1/2 tsp ground cloves
1/2 tsp ground ginger
1 tsp ground nutmeg
3 TBSP pumpkin puree (I might add 4 the next time I make this)
1) In medium saucepan over medium heat, combine sugar and water until sugar is dissolved.
2) Whisk in remaining ingredients, let simmer 6 minutes (try not to let it boil). Mine did (oops)
3) Let cool slightly, strain with a fine mesh sieve. My sieve had a ton of stuff (mainly the undissolved spices)- I actually got worried it was going to detract from the flavor of the syrup and I saved them until the syrup had completely cooled and I could test it. I wanted to make sure it would taste right before I threw them all away and it was delicious. So, don't worry if you have 2 or so TBSP of leftovers on the sieve.
4) Put in a container with a lid and store in the refrigerator. Some settling will occur, so stir each time before using it. If you look at the picture below, you can see a line towards the bottom where the settling began.
Pumpkin spice latte:
1 shot espresso ***
1 1/2 TBSP pumpkin spice syrup
8 oz steamed milk
Put syrup and espresso into cup, stir in milk. Top with whipped cream and a sprinkle of pumpkin pie spice. I think the whipped cream and pumpkin pie spice really make the drink go the extra mile.
***If you don't have an espresso maker, a shot of really strong brew can work, or just add the syrup to your favorite hot or cold coffee drink.
Maybe all this coffee will help me unpack faster so I can get my sewing stuff out.
Happy fall!
I bought the Starbucks pumpkin spice syrup a few years ago to make my own while living in Japan. Quite honestly, they never tasted like I wanted, they were too sweet. I made the syrup yesterday and it smelled like potpourri. Well, I was worried I was going to feel like I was drinking a bag of spiced pinecones when I used this syrup. The end result was shockingly delicious, enough to make me think once I get internet at my house on Tuesday, I can kick my Starbucks habit and save some money ;)
Pumpkin Spice Syrup:
1 1/2 cup sugar
1 1/2 cup water
4 cinnamon sticks
1/2 tsp ground cloves
1/2 tsp ground ginger
1 tsp ground nutmeg
3 TBSP pumpkin puree (I might add 4 the next time I make this)
1) In medium saucepan over medium heat, combine sugar and water until sugar is dissolved.
2) Whisk in remaining ingredients, let simmer 6 minutes (try not to let it boil). Mine did (oops)
3) Let cool slightly, strain with a fine mesh sieve. My sieve had a ton of stuff (mainly the undissolved spices)- I actually got worried it was going to detract from the flavor of the syrup and I saved them until the syrup had completely cooled and I could test it. I wanted to make sure it would taste right before I threw them all away and it was delicious. So, don't worry if you have 2 or so TBSP of leftovers on the sieve.
4) Put in a container with a lid and store in the refrigerator. Some settling will occur, so stir each time before using it. If you look at the picture below, you can see a line towards the bottom where the settling began.
Pumpkin spice latte:
1 shot espresso ***
1 1/2 TBSP pumpkin spice syrup
8 oz steamed milk
Put syrup and espresso into cup, stir in milk. Top with whipped cream and a sprinkle of pumpkin pie spice. I think the whipped cream and pumpkin pie spice really make the drink go the extra mile.
***If you don't have an espresso maker, a shot of really strong brew can work, or just add the syrup to your favorite hot or cold coffee drink.
Maybe all this coffee will help me unpack faster so I can get my sewing stuff out.
Happy fall!
Wednesday, September 21, 2011
Busy Partying: Super Mario Brothers Birthday Party #3
For some reason, this year, we have moved within days of my kids' birthdays. There was a birthday in August, only 4 days before we made our final big move. There was cake, oh lots of cake, but not so much in the area of games, decor, and favors. There were ideas, but no time to implement them, so you will just be seeing lots and lots of sweets here. Oh, and this birthday t-shirt- a birthday in our house just isn't complete without a birthday outfit!
For this shirt, I found some fabric printer paper at a JoAnn's Fabrics going out of business by my parent's house. I skeptically bought it, but it turned out to be AWESOME! Only thing, if you don't follow the directions and handwash, the ink will fade drastically after several washings (learn from my mistake). It was soo easy to use, just create the image (I even downloaded super mario font), print it out, cut it out, and sew it on to the t-shirt - I used interfacing on the inside of the t-shirt to help feed it through my sewing machine easier.
For decor, I bought a pack of white stars (I was going to decorate them like the power up stars)- the kids took care of this for me:
I made this cupcake stand, it's my first one, so it came out a little sketchy, but I can't wait to make more. I found the tutorial online here at Annie's Eats. All you need is a glue gun, some soup cans, pretty paper, ribbon, and 3 different sizes of styrofoam circles. You can customize one of these for any occasion!
I cut Mario pictures off a box of trading cards we had and glued them to the stand.
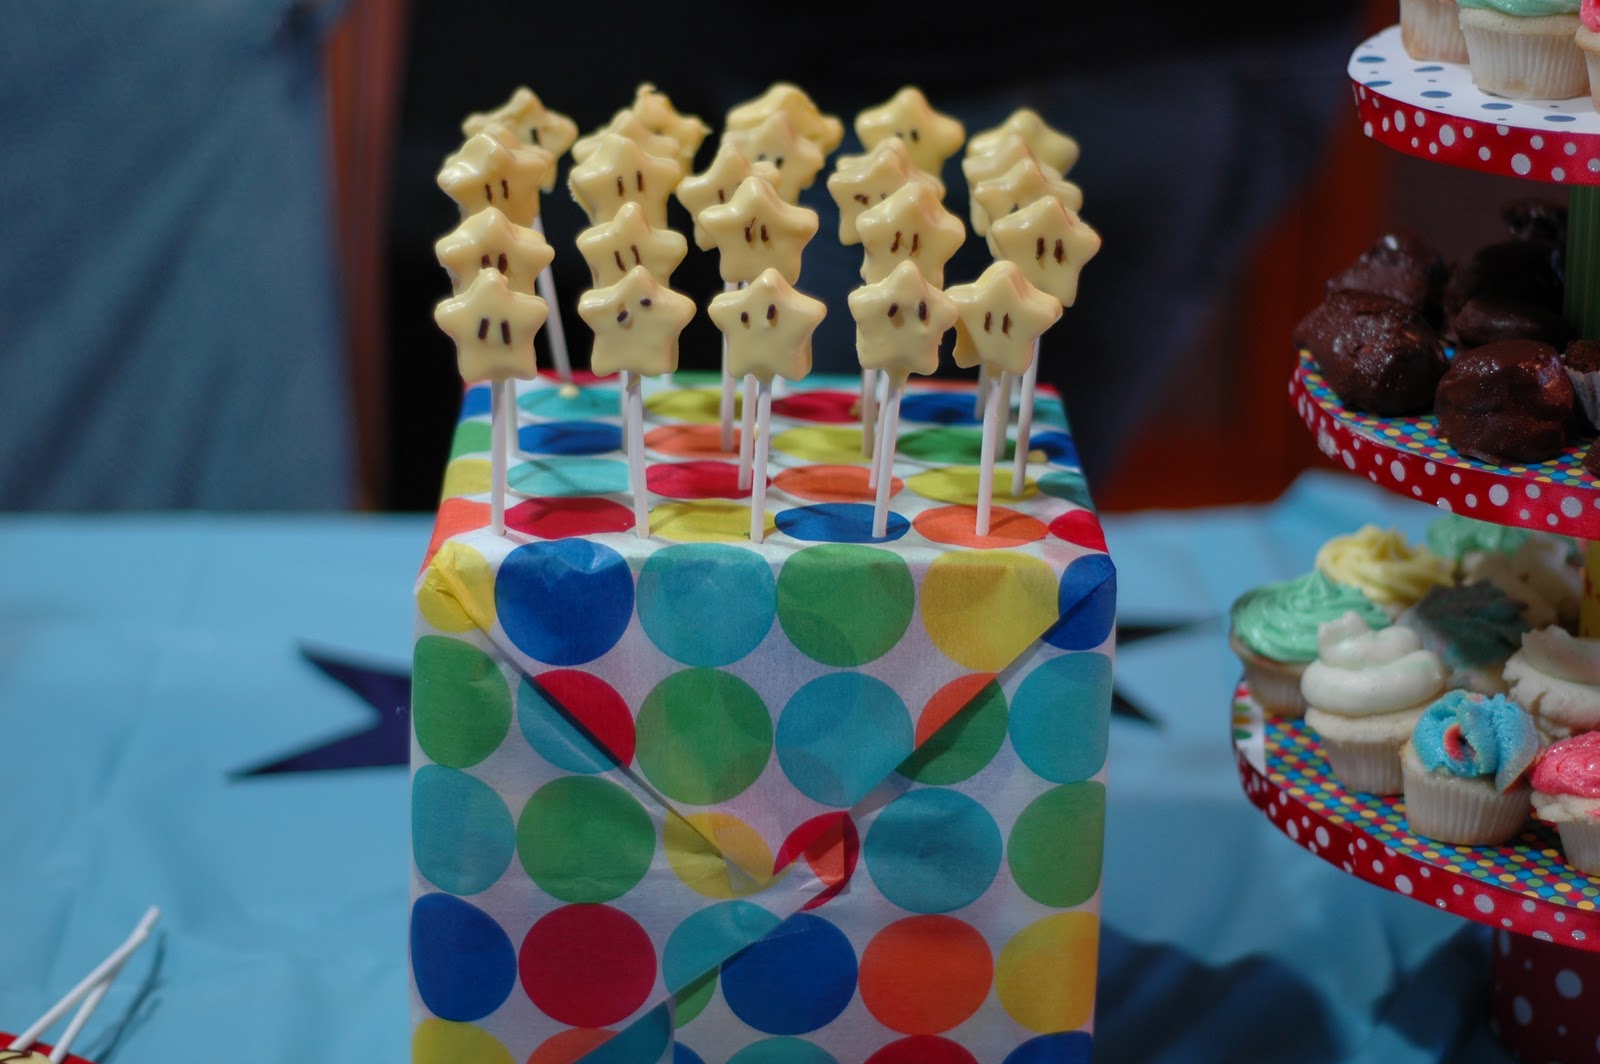
For the cake, the main thing I wanted to do was make these power up star cake pops- yes Bakerella, I did it! Victory is mine (with cake pop making). I made a vanilla cake, homemade vanilla icing, crumbled up the cake, mixed in the frosting, spread it out in a big cookie sheet, froze it, then used mini star cookie cutters to cut out the star shapes. I froze them some more, then I dipped the sticks in a bit of melted chocolate, put them in the stars, and put them back in the freezer to anchor them in. I dipped the stars in melted yellow chocolate, my key to success: I added a few teaspoons of oil to the melted chocolate to make it smoother. I used chocolate sprinkles for the eyes- these were quite a hit!
For the cupcakes, I used my new favorite vanilla bean icing and vanilla bean cake recipe (to follow soon)- oh these are just so yummy, no one can eat just one- no one! I used rainbow colors because Super Mario Bros. is such a colorful game!
For the chocolate you saw in the cupcake stand, homemade yodels (what's a yodel?, stay tuned for a future post on those too)- you'll never buy store bought again! Not super mario themed, but a request from the birthday boy!
Who doesn't love a birthday filled with lots of cakes and sweets? What a SUPER day!
For this shirt, I found some fabric printer paper at a JoAnn's Fabrics going out of business by my parent's house. I skeptically bought it, but it turned out to be AWESOME! Only thing, if you don't follow the directions and handwash, the ink will fade drastically after several washings (learn from my mistake). It was soo easy to use, just create the image (I even downloaded super mario font), print it out, cut it out, and sew it on to the t-shirt - I used interfacing on the inside of the t-shirt to help feed it through my sewing machine easier.
For decor, I bought a pack of white stars (I was going to decorate them like the power up stars)- the kids took care of this for me:
I made this cupcake stand, it's my first one, so it came out a little sketchy, but I can't wait to make more. I found the tutorial online here at Annie's Eats. All you need is a glue gun, some soup cans, pretty paper, ribbon, and 3 different sizes of styrofoam circles. You can customize one of these for any occasion!
I cut Mario pictures off a box of trading cards we had and glued them to the stand.
For the cake, the main thing I wanted to do was make these power up star cake pops- yes Bakerella, I did it! Victory is mine (with cake pop making). I made a vanilla cake, homemade vanilla icing, crumbled up the cake, mixed in the frosting, spread it out in a big cookie sheet, froze it, then used mini star cookie cutters to cut out the star shapes. I froze them some more, then I dipped the sticks in a bit of melted chocolate, put them in the stars, and put them back in the freezer to anchor them in. I dipped the stars in melted yellow chocolate, my key to success: I added a few teaspoons of oil to the melted chocolate to make it smoother. I used chocolate sprinkles for the eyes- these were quite a hit!
For the cupcakes, I used my new favorite vanilla bean icing and vanilla bean cake recipe (to follow soon)- oh these are just so yummy, no one can eat just one- no one! I used rainbow colors because Super Mario Bros. is such a colorful game!
For the chocolate you saw in the cupcake stand, homemade yodels (what's a yodel?, stay tuned for a future post on those too)- you'll never buy store bought again! Not super mario themed, but a request from the birthday boy!
Who doesn't love a birthday filled with lots of cakes and sweets? What a SUPER day!
Friday, September 16, 2011
Busy Cooking: Pumpkin Spice Latte Cupcakes
Living in a country where Halloween isn't celebrated, means you go without certain staple fall items, such as Starbucks' Pumpkin Spice Lattes. Two years ago, when I was really missing them, I had my mom send me over a bottle of the Starbucks Pumpkin Spice syrup so I could make my own- they just never turned out the same. Now that I'm back in the US and pumpkin spice lattes returned last week, I have no need to buy the syrup. I do have to say though, once you have experienced the consistent goodness and perfection of your coffee order at a japanese Starbucks, it's hard to come home and get a drink. Don't get me wrong, the pumpkin spice lattes I've had this week have been good, just some better than others. (I'm fearing the release of gingerbread lattes because the ones in Japan were so delectable, in fact, I got one EVERY day last winter, knowing that the ones in the US could never compare).
I saw this recipe come up on Annie's Eats last week and I immediately had to make it, like that night had to make it. I have a friend in Japan that has an affection for pumpkin spice lattes like myself. I thought if I made the cupcakes and taste tested them, I could let her know if it's worth her time to make them. I may have surpassed my chance to fit into my pre-baby winter jeans in this round of cupcake making. I tried the cupcakes before each phase to see which way tasted best (plain, with espresso brushed on, frosted, frosted with cinnamon sugar, frosted with pumpkin spice topping- multiple of those) to come up with what I think any expat without the luxury of a Starbucks serving pumpkin spice lattes this year would enjoy.
Adapted from Pumpkin Spice Latte Cupcakes by Annie's Eats. I cut down the amount of espresso she recommends in her recipe because both Dave and I thought it overpowered the pumpkin taste in the cupcake, I omitted the caramel topping because I've never had it on a pumpkin spice latte, and I added a sprinkle of straight pumpkin spice to the tops. (I also am mentioning here the recipe for a half batch).
Oven: 350'
Cupcakes:
1 1/3 cup flour
1/2 TBSP espresso powder (I cut open an espresso pod- you can also finely grind coffee or espresso)
1 tsp baking powder
1 tsp baking soda
1/16 tsp nutmeg (pinch)
1/16 tsp ground cloves (pinch)- I omitted because I didn't have them
3/4 tsp cinnamon
1/2 tsp salt
7.5 oz pumpkin puree (1/2 jar)
1/2 cup sugar
1/2 cup brown sugar
1/2 cup oil
2 eggs
1/4 cup brewed coffee or espresso for brushing
Icing:
1 1/8 cup heavy cream, chilled
1/8 cup confectioner's sugar
pumpkin spice for dusting
1) Preheat oven and prepare cupcake pans with liners.
2) In a medium bowl, combine flour, baking powder, baking soda, salt, espresso powder, cinnamon, nutmeg, and cloves, set aside.
3) In bowl of mixer, with paddle attachment, combine pumpkin puree, sugar, brown sugar, and oil. Scrape down sides, add in eggs one at a time, scrape down sides after mixing.
4) Slowly add flour mixture, scrape down sides, mix until just combined.
5) Add batter into cupcake liners about 3/4 full. Bake until stick inserted in center comes out clean. For minis, approximately 14-17 minutes, big ones about 18-22 minutes. This made 6 large and 22 minis.
6) Let cool, then brush tops with 2-3 coats of the brewed espresso or coffee. Let dry. (You can leave some plain if you have crazy kids that don't need any extra energy ;))
7) For the icing, beat heavy cream on high (with hand mixer), once it begins to thicken ~2 minutes, add in confectioner's sugar, continue to beat on high until it thickens. You will notice it gets thick enough that it keeps its shape when you move the mixers around, about 4-5 minutes. Don't overmix or it will appear slightly lumpy.
8) Frost cupcakes, garnish with pumpkin spice, and enjoy with your favorite hot beverage!
I saw this recipe come up on Annie's Eats last week and I immediately had to make it, like that night had to make it. I have a friend in Japan that has an affection for pumpkin spice lattes like myself. I thought if I made the cupcakes and taste tested them, I could let her know if it's worth her time to make them. I may have surpassed my chance to fit into my pre-baby winter jeans in this round of cupcake making. I tried the cupcakes before each phase to see which way tasted best (plain, with espresso brushed on, frosted, frosted with cinnamon sugar, frosted with pumpkin spice topping- multiple of those) to come up with what I think any expat without the luxury of a Starbucks serving pumpkin spice lattes this year would enjoy.
Adapted from Pumpkin Spice Latte Cupcakes by Annie's Eats. I cut down the amount of espresso she recommends in her recipe because both Dave and I thought it overpowered the pumpkin taste in the cupcake, I omitted the caramel topping because I've never had it on a pumpkin spice latte, and I added a sprinkle of straight pumpkin spice to the tops. (I also am mentioning here the recipe for a half batch).
Oven: 350'
Cupcakes:
1 1/3 cup flour
1/2 TBSP espresso powder (I cut open an espresso pod- you can also finely grind coffee or espresso)
1 tsp baking powder
1 tsp baking soda
1/16 tsp nutmeg (pinch)
1/16 tsp ground cloves (pinch)- I omitted because I didn't have them
3/4 tsp cinnamon
1/2 tsp salt
7.5 oz pumpkin puree (1/2 jar)
1/2 cup sugar
1/2 cup brown sugar
1/2 cup oil
2 eggs
1/4 cup brewed coffee or espresso for brushing
Icing:
1 1/8 cup heavy cream, chilled
1/8 cup confectioner's sugar
pumpkin spice for dusting
1) Preheat oven and prepare cupcake pans with liners.
2) In a medium bowl, combine flour, baking powder, baking soda, salt, espresso powder, cinnamon, nutmeg, and cloves, set aside.
3) In bowl of mixer, with paddle attachment, combine pumpkin puree, sugar, brown sugar, and oil. Scrape down sides, add in eggs one at a time, scrape down sides after mixing.
4) Slowly add flour mixture, scrape down sides, mix until just combined.
5) Add batter into cupcake liners about 3/4 full. Bake until stick inserted in center comes out clean. For minis, approximately 14-17 minutes, big ones about 18-22 minutes. This made 6 large and 22 minis.
6) Let cool, then brush tops with 2-3 coats of the brewed espresso or coffee. Let dry. (You can leave some plain if you have crazy kids that don't need any extra energy ;))
7) For the icing, beat heavy cream on high (with hand mixer), once it begins to thicken ~2 minutes, add in confectioner's sugar, continue to beat on high until it thickens. You will notice it gets thick enough that it keeps its shape when you move the mixers around, about 4-5 minutes. Don't overmix or it will appear slightly lumpy.
8) Frost cupcakes, garnish with pumpkin spice, and enjoy with your favorite hot beverage!
Subscribe to:
Posts (Atom)